
Inventory
Citywide Assets stores all asset information and supports advanced asset management and finance functions. Navigate to Home 🢡 Asset 🢡 Inventory.
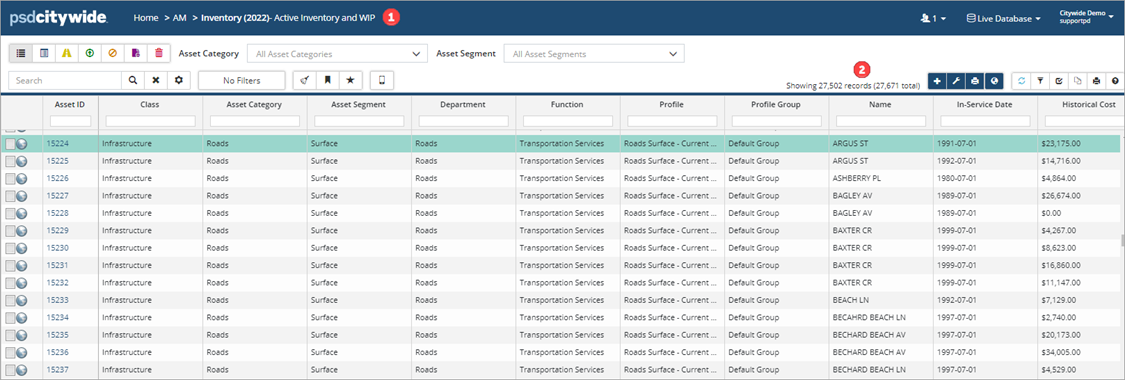
Once in the Inventory, all Active and WIP Assets display. The breadcrumbs ❶ in the banner shows the reporting year (i.e., 2022), and the applied filter (i.e., Active and WIP). The number of assets displayed in the grid, as well as the total number in the inventory, is displayed below the banner ❷.
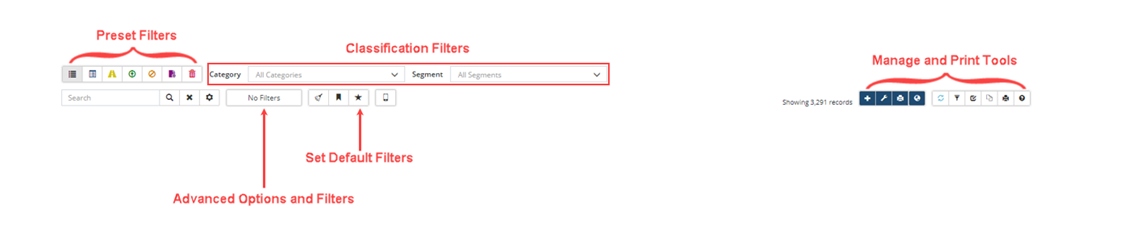
Grid Filter and Search Tools
Several filter and search options are available under the banner. Users can save their filter preferences as the default which will then load each time they log into Assets.
| Item | Description |
|---|---|
| Show Active Inventory and WIP: Displays all active and work in progress assets, as well as disposals or transfers from previous years. | |
| Show Active Inventory: Displays all active assets for the selected reporting year, as well as assets disposed of in the reporting year. Click here for steps on how to set the reporting year. | |
| Show WIP Only: Displays work-in-progress assets. These are not-in-service assets but are incurring costs to date (e.g., a new road incurs cost during construction but does not start to amortize until the project is complete). Once complete, the asset is transferred to service. | |
Show Pending Imports: Displays assets that have been created or adjusted through the Upload Center or Mobile App. These items will remain pending until approved. When in this view two additional buttons appear on the right toolbar: |
|
| Show Disposed Assets: Displays assets that have been fully disposed in a year prior to the reporting year. | |
| Show Assets Excluded From PSAB: Displays assets excluded from PSAB (financial) reports. These assets may fall below a capitalization threshold or are for asset management purposes. | |
Show Recycle Bin: Displays assets that have been recycled/deleted. When an asset is recycled, all financial information is removed retroactively. An asset should only be recycled if it was added by mistake and/or was never meant to be a part of your TCA reporting. When in this view two additional buttons display on the right toolbar: |
|
| Category | Filters the inventory list by category. Use Ctrl + single click to select multiple categories. |
| Segment | Filters the inventory list by segment. A category must be selected for the Segment dropdown to populate. Use Ctrl + single click to select multiple segments. |
| Search Bar | Searches the displayed view by keyword(s) (i.e., hydrant). Click to run the search or press Enter. To clear search criteria, click . To extend the search across additional columns that are not in the grid, click (the icon is orange when selected). |
| Advanced Options and Filters: Apply additional filters such as, exclude past disposals or fully transferred assets. The button displays the number of filters applied, i.e., . | |
| Clear All Filters: Clears all filters and returns the grid to show active inventory and WIP assets. | |
| Load Default Filters: Use to quickly revert to the default view. | |
| Save Default Filters: Allows users to define a set of filters which will then load each time the application is opened. For example, to see only road network assets upon first logging in, filter the list using any of the filter options available and then click Save Default Filters. | |
| Mobile Profile: Click to create a subset of assets to download onto the mobile app. Once offline, these assets can be edited and then synced back with the inventory. The Asset Collector module is required for this feature to integrate with Assets. | |
| Add Asset: Click to add a new asset to the inventory. | |
| Default Values: Click to bulk edit a group of assets. Filter the inventory list to show the group of assets that you want to edit, and then select Default Values. | |
| Print a Range of Asset Summaries: Click to generate an asset summary report for up to 50 records at a time. Preview and save the summary as a PDF. | |
| View Data in GIS: View linked assets spatially on a map. An integration with a GIS viewer is required. | |
| Refresh: Click to refresh the grid. | |
| Clear Filters: Clears all column filters. | |
| Customize Columns: Display/hide columns of information within the grid. Create and save custom views and switch between them. | |
| Export Data: Export data from the inventory list to Excel. | |
| Print Grid: Print the grid to PDF. | |
| Help: Click to access filter and sort tips. |
Column Filters and Sort
In addition to the pre-set filter buttons, Category/Segment dropdown lists, and the search bar, users can filter by columns.
To filter by column(s):
- Click in the field below the column header.
- Enter a keyword(s).
- Press Enter on your keyboard.
- Further refine the search by repeating the above steps in multiple columns.
To clear a column filter:
- Click the X within the column header field or click the Clear Filters icon.
Advanced Options and Filters
Further filter the Inventory list using Advanced Options and Filters. Options include Exclusions, Transfers, Reporting Year, etc.
To set advanced options and filters:
- Click the No Filters button (this button may read # Filters if options have already been set).
- Navigate to the section you would like to set filters on.
- For example, to remove Past Disposals and Fully Transferred assets from view, navigate to the Display section.
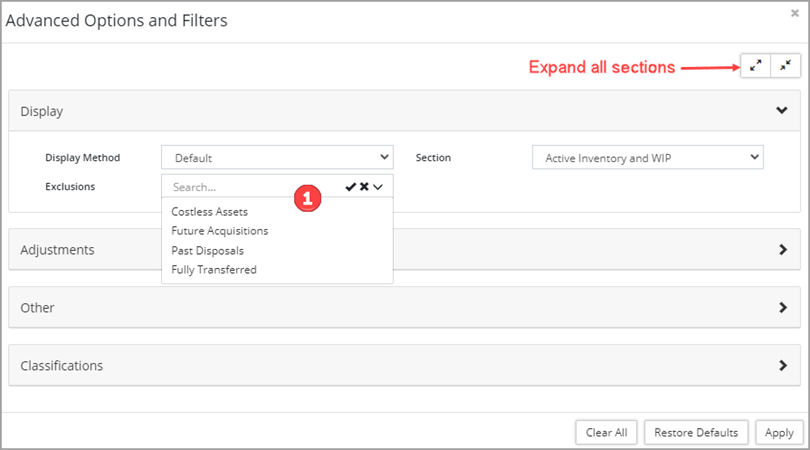
- Click the Exclusions dropdown ❶.
- Select multiple options by holding Ctrl on the keyboard while clicking each option
- Click ✅ to select all
- Click the X to clear the selections
- Make selections as needed.
- Click Apply.
- To clear all selections within the dialogue box, click either Clear All or Restore Defaults followed by Apply.
- For example, to remove Past Disposals and Fully Transferred assets from view, navigate to the Display section.
Set the Reporting Year
- Click the No Filters button (this button may read # Filters if options have already been set).
- In the Advanced Options and Filters dialogue box navigate to the Other section.

- Enter a year in the Reporting Year ❶ field.
- Click the blue Apply button beside the year field.
- Once the year has been changed (this may take a minute), close the dialogue box and refresh the screen.
Save Default Filters
- Filter the list to display a select group of assets. These assets will load on login.
- Click Save Default Filters
 .
. - Click Save Defaults in the popup.
-
To quickly revert back to the default, click Load Default Filters .
Customize Columns
Sort, resize, and reorder any of the columns within the grid. Also, create and save custom column sets that display the data in different ways. All Assets users can access any saved column set.
Sort, Resize, and Reorder Columns
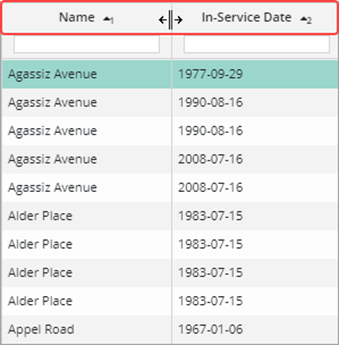
- To sort: Click a column header (i.e., Name). To apply a secondary sort, hold Shift + single click a column header (i.e., In-Service Date). A triangle with a number appears to the lower right of the column header indicating a sort.
- To resize a column: Hover over the right border of the column header. When the mouse pointer changes to a double headed arrow click and drag left/right to decrease/increase the column with.
- To reorder a column: Click + drag the column header to the new location on the grid. When dragging a shadow appears attached to the mouse pointer.
Create New Column Set
- Click Customize Columns
 .
. - In the Customize Columns window, columns that are currently displayed in the grid are set to Yes.
- Navigate through the sections and click Yes/No to display/hide the column in the view.
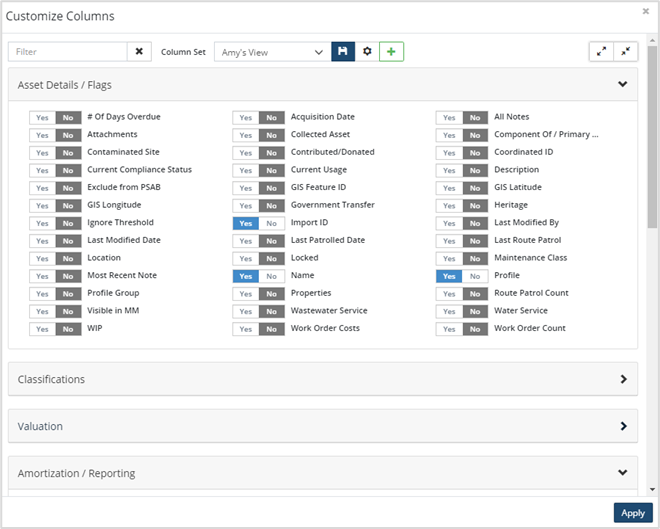
- Click Expand All/Collapse All in the top right to show/hide all options.
- Click Create New Column Set
 to save the column set.
 - Enter a name, set the save order and save width flags to yes if columns have been reordered and/or resized within the grid.
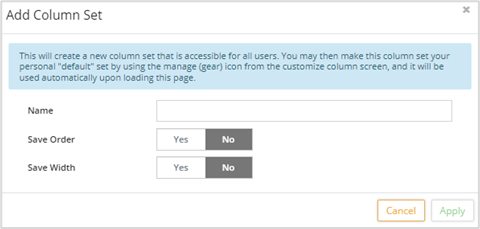
- Click Apply.
- Click the Column Set dropdown and select the name that was just added.
Modify an Existing Column Set
- Click Customize Columns
 .
. - Set additional columns to Yes.
- Click Save
 at the top of the popup to update the column set.
 - Click Apply to load the new column set.
Set a Default Column Set
- Click Customize Columns
 .
. - Click
 to manage saved column sets.
- Click
 on the right to set a column set as the default view.
 - Click
 to delete an existing column set.
- Click
- Click Close.
Export to Excel
- Filter the Inventory list as needed.
- Click Export Data
 .
. - Click the citywide_export.csv file from the download tray or navigate to your downloads folder to open the file.
Add Asset
As new assets are acquired, users with the appropriate permission settings can add them to the inventory using the Add Asset button. Use this option to manually add a single asset or a small number of assets.
When adding assets to the inventory be sure to have the In-Service Date, the Historical Cost, and the Estimated Useful Life(EUL). The system uses these three key pieces of information to calculate the amortization schedule.
To add new assets:
- Click Add Asset
 in the top right corner of the Inventory view.
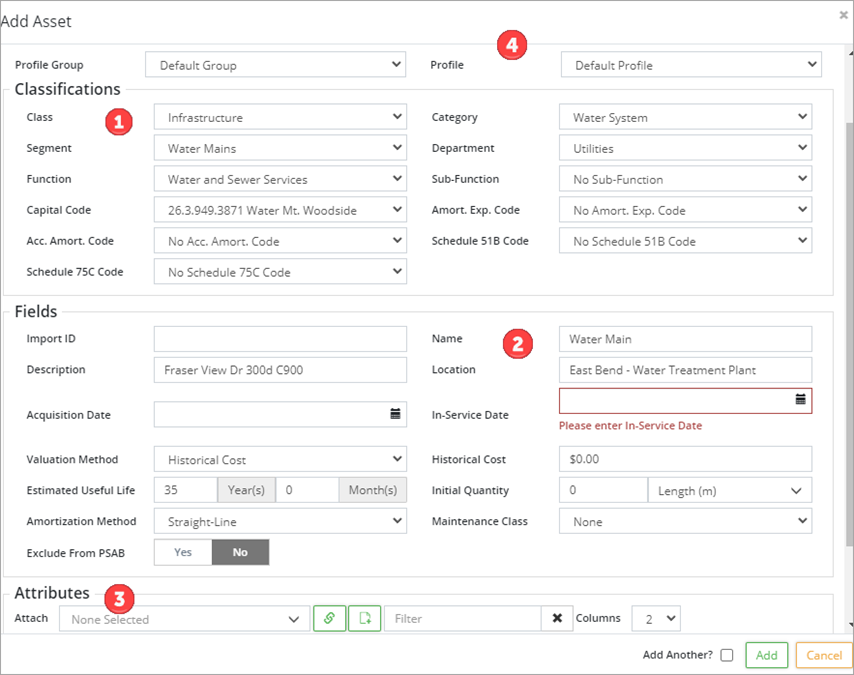
- Set the classifications ❶ for the asset. For consistency, reference a similar asset within the inventory to ensure consistency and accuracy. Class, Category, and Segment are mandatory.
- Enter a name ❷. Make sure to follow any naming conventions when naming the new asset.
- Enter an In-Service Date. The asset will begin to amortize in the month of the year entered. Fill-in the historical cost, valuation method, estimated useful life, initial quantity, unit of measure, and an amortization method. These are all mandatory fields.
- Attach attributes ❸ as needed. Check an existing similar asset to ensure all necessary attributes are being tagged to the new asset.
- To attach attributes, click Attach and scroll through the list. Click an option or Ctrl + single click to select multiple options. Narrow the list by typing in text or click ✅ to select all. Click the X to clear the selections. Once all attributes have been selected, click Select Attributes
 . Fill in the new fields.
- To attach attributes, click Attach and scroll through the list. Click an option or Ctrl + single click to select multiple options. Narrow the list by typing in text or click ✅ to select all. Click the X to clear the selections. Once all attributes have been selected, click Select Attributes
- The Profile Group and Profile ❹ can be left as Default if additional profiles have not been created. If changed, some fields may auto populate based on the selected profile. Profiles allow you to apply the same information to similar types of assets. Click here for information on how to set up profiles.
- Once all fields are complete click Add. Check Add Another ✅ in the bottom right prior to clicking Add when adding several assets to the inventory.
Save time when adding assets by using Copy details from existing Asset located at the top of the Add Asset popup. Click > to expand the section, and then enter an Asset ID or use the Search icon to locate an asset whose details will be copied. Set the Copy Asset Attribute Fields and Include Asset Attribute Values flags to yes. Click Copy. Review the fields and adjust as needed.
Default Values (Bulk Edit/Single Value)
The Default Values tool is used to bulk edit data on a group of assets. For example, replacement cost can be updated using CPI tables on a group of assets, or a specific capital code or department can be assigned to a group of assets at once. Default Values can be used to apply asset flags, assign a profile to a group of assets, update initial quantity or units of measure, etc. Changes are applied to the assets displayed in the inventory view, so it’s important to filter the view first before using the Default Values button.
To use Default Values:
- Filter the Inventory list to show only the assets to be edited.
- Click Default Values .
- Select a Default Type from the dropdown. The default type refers to a category of information that can be changed on an asset, such as Classification, Flags, Attributes, Replacement Cost, etc. The Default Type determines the remaining fields on the form.
- Select a Field to Default from the dropdown (this field will vary depending on the default type selected). Complete all remaining fields.
- Click Apply to update the assets.
| Be sure to read the notes in yellow at the top of the Default Values window. A count for selected assets, year-end locked assets, and locked assets will display. Locked assets will not be modified, and assets with a Year-End lock will not have fields related to their valuation modified if they were In-Service before the lock date. |
Update Replacement Cost using Default Values (CPI Method):
- Filter the Inventory list to show only the assets to be updated.
- Click Default Values to open the Default Values popup.
- Select Replacement Cost from the Default Type dropdown list.
- Click the Costing Method dropdown and select CPI Tables.
- The Valuation Basis, what Citywide will use to inflate, defaults to HistoricalCost.
- Select an Inflation Source (CPI or NRBCPI). Once selected, copy the date displayed in the Most Recent Indexes field into the Cost Date
- Check whether to Limit to existing and/or Ignore Populated
- Click Apply.
| The Default Values tool updates all the assets displayed in the inventory view. If for example, only Light Duty vehicle assets is to be updated, make sure to filter the inventory down to those assets first, then use the Default Values tool. There is no undo button for this tool, so use with caution (or try it out in a sandbox/test database first). |


