
WIP (work-in-progress) assets are not in-service but are incurring costs, such as a capital project that incurs cost during construction but does not amortize until the project is complete and the WIP asset is transferred to service. When the WIP is initially entered, all costs incurred to date are entered as the historical cost. As the project progresses, additions can be completed on the WIP to record additional costs. Once the project is complete or a portion of the project is complete, it is transferred to service as a new asset(s) or as an addition(s) to an existing asset. Writedowns can also be completed on the WIP.

Each WIP asset will have it's own Asset ID and is identified by a yellow icon. If a diamond is superimposed on the icon then the WIP has transfers. Consider adding the Adjusted Cost column to the grid which shows the total dollar value added to the project (historical Cost + additions). If the adjusted cost is showing $0.00 then the WIP has been completely transferred to service.
- Click Add Asset
 in the top right.
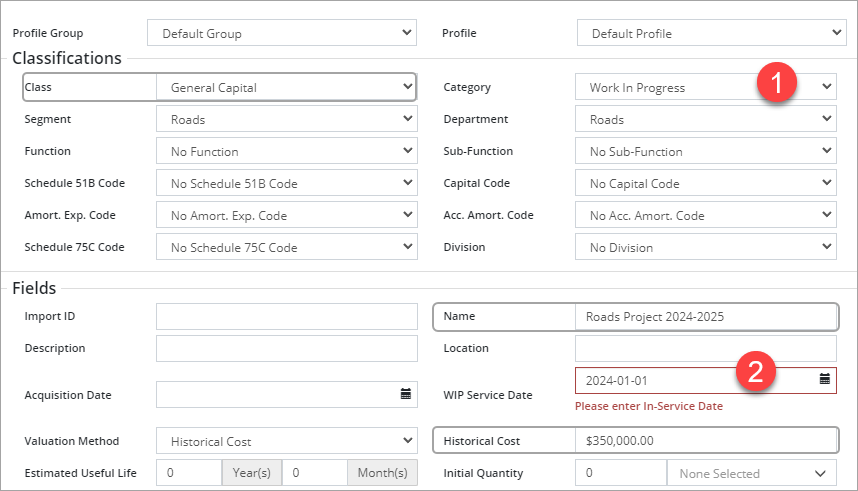
- Select a Class and set the Category to Work In Progress .
- Enter a Name and a WIP Service Date .
- Enter total costs incurred to date in the Historical Cost field.
- Complete as much of the remaining fields and add attributes as needed.
- Click Add. A new WIP asset is created and opens on screen.
- Click Asset/Details Flag and note the WIP flag is set to Yes.
- Complete Additions/Writedowns on the WIP to account for additional costs incurred on the project.
- In the WIP asset view click Transfers to Service.
- Click +New Transfer to Service in the top right.
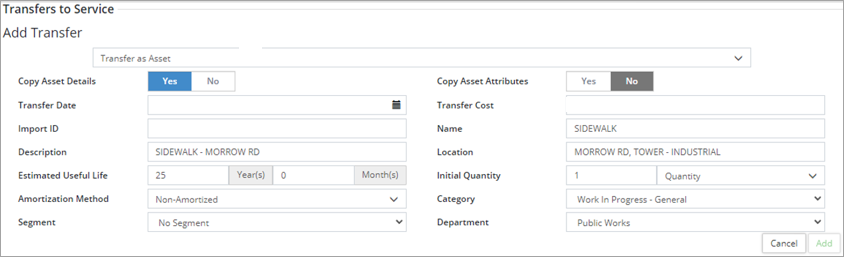
- Select Transfer as Asset.
- Set the Copy Asset Details flag to Yes to copy Name, Transfer Cost, Description, Location, Initial Quantity and Unit of Measure fields form the WIP to the new asset. These can be edited as needed.
- Set the Copy Asset Attributes to Yes if attributes were added to the WIP asset (i.e., GIS attribute) and you would like to copy them to the new asset.
- Enter a Transfer Date which will be the in-service-date for the new asset and starts amortization.
- Adjust the Transfer Cost if the full amount is not being transferred out. The remaining amount may be transferred out at a later date or may be written down. If the WIP asset is being transferred out to many new assets consider using the Upload Center to do a bulk transfer to service.
- Enter a Name, Estimated Useful Life, Initial Quantity, and Unit of Measure.
- Set the Amortization Method to Straight-Line.
- Set the Category, Segment, and Department.
- Click Add. The details of the transfer is summarized in the grid and the New Asset ID is pending. Continue to add transfers as needed.
- Once all transfers have been added click Save. The new asset is created and a new Asset ID assigned. Review the asset information including the amortization schedule and add any additional information as needed.

Transfers to Service as an Addition
- In the WIP asset view click Transfers to Service.
- Click +New Transfer to Service in the top right.

- Select Transfer as Addition.
- Enter a Transfer Date.
- Enter the Asset ID of the asset that will be receiving the transfer in the Transfer to Asset ID field. If the asset ID is unknown click Search on the left and search by Category/Segment or by Department.
- Enter a dollar amount to be transferred in the Transfer Cost field.
- If this transfer will extend the useful life of the receiving asset enter a value in the Added Estimated Useful Life field (year/month). The amortization schedule of the receiving asset will adjust to reflect the added cost and EUL from the transfer date forwards.
- Enter a quantity in the Added Quantity field.
- Assign a Capital Code (optional). Capital codes are set up on the Classifications screen (Home ð Classifications ð Capital Code).
- Click Add. Continue to add transfers as needed.
- Once all transfers have been added click Save.
Once all transfers are complete any remaining costs can be written down by completing a Writedown. Once the adjusted cost of the WIP asset is at $0.00 the WIP project is closed.
If a WIP asset is to be transferred out as multiple new assets or as multiple additions consider using the Upload Center to bulk import the transfers.
- Navigate to the Assets landing page. Click Upload Center.
- Select an Upload Type.
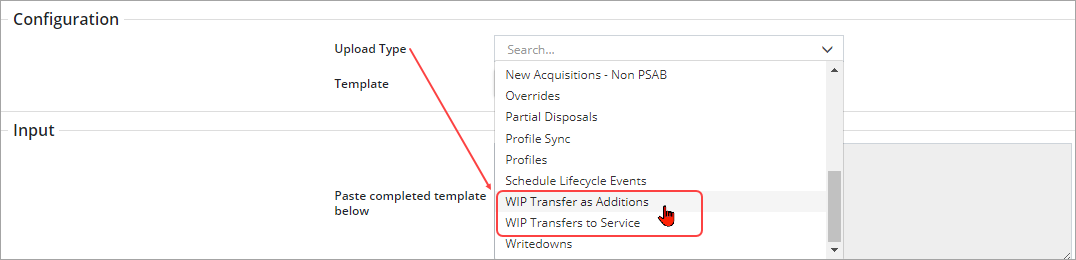
- Select Click to Export.
- If WIP Transfer as Additions is selected, copy the string of text to an Excel worksheet.
- If WIP Transfers to Service is selected, review the Customize Template dialogue box and select fields as needed. Required fields are set to Yes and are dimmed. The darker blue flags are optional and can be toggled to no if not needed. Once done click Generate. Copy the string of text to an Excel worksheet.
- Enter the details for each of the transfers into the Excel workbook as shown below (the screenshot is showing the WIP Transfers to Service template). If you'd like to collect attribute data on any of the entries, label the next available column with the appropriate attribute name and then enter attribute information.

- Once the details for each transfer has been entered and reviewed, copy and paste the data from Excel into the Upload Center Input section.
- When reviewing the data, ensure the Year has been entered using YYYY-MM-DD. Also verify that the Classifications (Class, Category, Segment, etc.) as entered are an exact match to what has been defined in the database so as to avoid duplicating classifications. Lastly, make sure there are no blank cells in any mandatory column.
- Review the data and header row . If a column is not mapping correctly click the bottom label and edit as needed. If an error has been entered in the data, than switch back to the Excel spreadsheet and edit as needed.

- Once the data has been reviewed click Submit Upload .
- Citywide will confirm whether the upload has been successful or unsuccessful. If errors exist within the upload, click Reset in the upper left and return to the Excel spreadsheet to make the corrections.
- The final step is to Approve the Import.


