
Attribute Table
When Citywide assets are linked to GIS feature layers, asset attribute information can be identified and viewed in the map viewer. The attribute table will include links to the assets detail view allowing for quick navigation into the asset inventory.
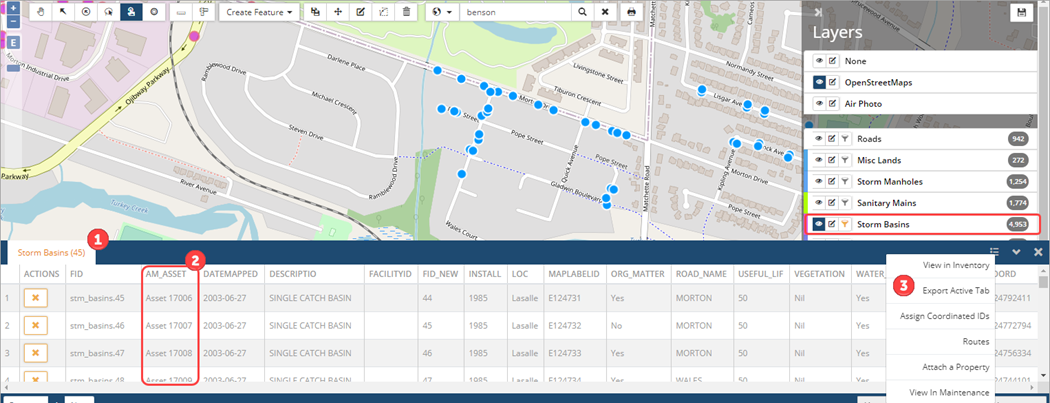
The attribute table displays when asset features are selected in the map viewer window. The Layer (tab) ❶ includes the individual layer name and total number of assets selected for the layer. The AM_Asset column ❷ will show whether the asset is linked or unlinked. When linked, the asset ID# is used to navigate into the asset detail view. For example, the first asset listed in the table above is Asset 17006, click the ID# to navigate into the asset detail view.
To remove an asset record from the table, click it’s corresponding deselect button ![]() or to access additional functions click the context menu ❸ in the upper right corner of the table.
or to access additional functions click the context menu ❸ in the upper right corner of the table.
| Context menu option | Description |
| View in Inventory | View assets from the table in the Assets inventory view |
| Export Active Tab | Export the data from the table as a CSV file |
| Assign Coordinated IDs | Group assets within the table with a coordinated ID for reporting purposes |
| Routes | Add assets to an existing Route or create a new Route Patrol. |
| Attach a Property | Attach a property to the assets from the table |
| View in Maintenance | View items features listed in the table in the Maintenance module |
View Linked Asset
The AM_Asset column in the attribute table displays the Asset ID of the assets linked to GIS features. Click an Asset ID to open the asset detail view. For example, click Asset ID 17006 to view the Storm Basin asset details in Citywide Assets ❶.
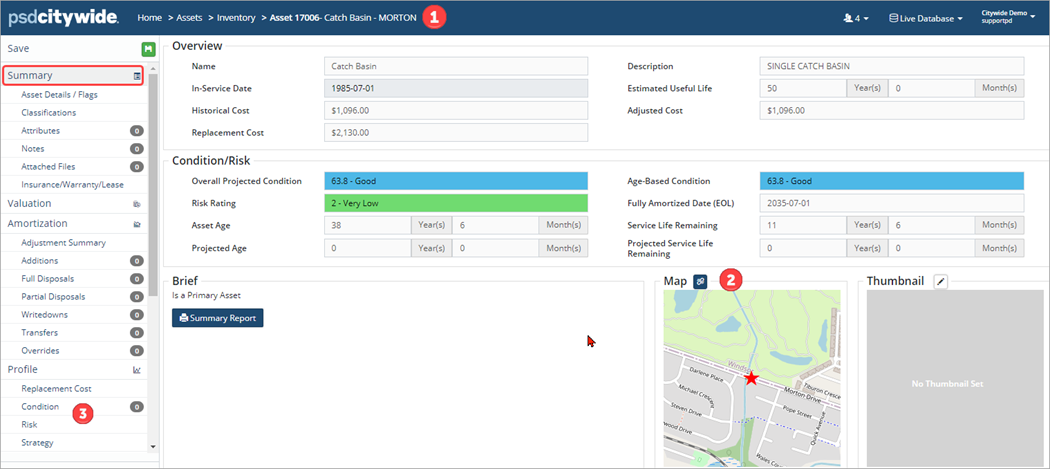
A linked map image ❷ is shown on the Summary page. The Advanced Filter legend option is used to query Projected condition, Age-based condition, Risk Rating, etc. information from the Condition/Risk section ❸ of the asset view.
The Asset Details/Flags screen shows linked GIS feature information ❹ such as the GIS Feature ID, Latitude and Longitude, as well as the Import ID ❺ and Coordinated ID.

To navigate back into the GIS viewer, click the Summary screen in the left pane and then click the map image. The GIS feature will be highlighted in the map and the details displayed in the attribute table. Click ![]() to deselect the feature and close the attribute table.
to deselect the feature and close the attribute table.
View GIS Features in Inventory
The View GIS features in Inventory option is used to view feature assets in the Assets Inventory view. To view feature assets in the Assets inventory:
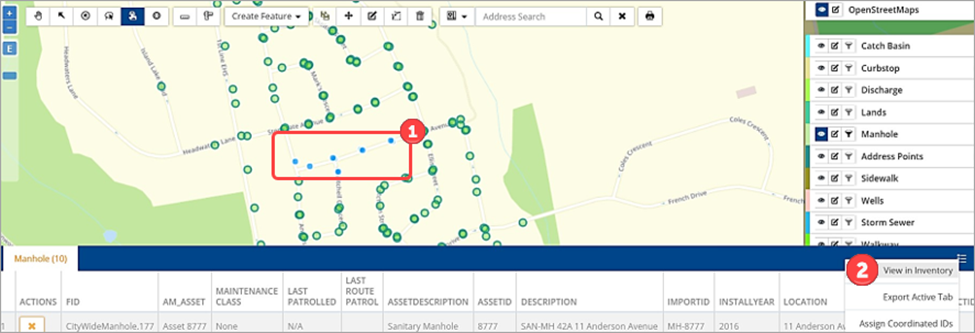
- Box select or draw to select ❶ the assets (linked or unlinked) to be viewed in the Assets Inventory.
- Click the context menu ❷ in the upper right corner of the attributes table and select View in Inventory.
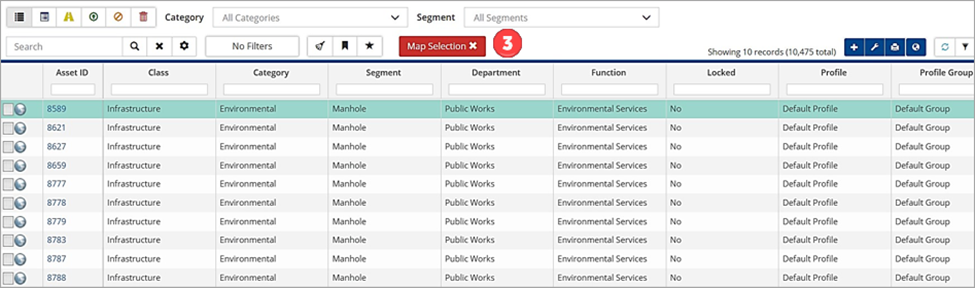
- The selected assets will be listed in the inventory view with the filter Map Selection ❸ Remove the map selection filter (click the X) to display the entire inventory.
Assign Coordinated ID
A coordinated ID is a unique identifier assigned to related assets either in the Assets module or from the context menu options in the attributes table. The purpose of the coordinated ID is to group co-located assets for reporting purposes (e.g., group all segments of a road along with its sublinear assets). To assign a coordinated ID:
- Select the assets in the map viewer.
- Click the context menu in the upper right corner of the attributes table and select Assign Coordinated IDs.
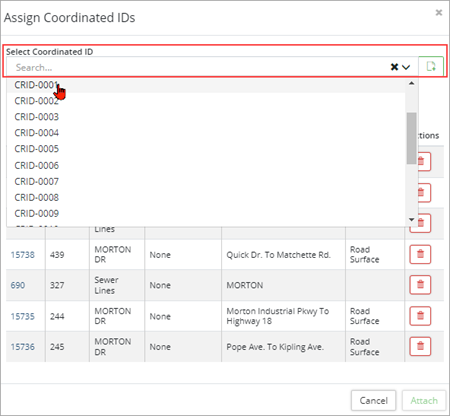
- Review the assets in the Assign Coordinated IDs Click
 to remove an asset.
 - Click Select Coordinated ID and select an ID to assign to the assets. Use the
 to create a new ID.
 - Click Attach
Integration and Linking
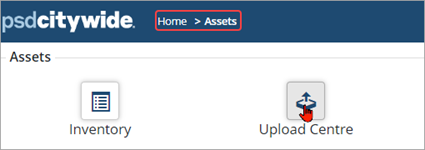
The linked-GIS features can be accessed from the Assets inventory providing seamless navigation from both the GIS and Assets modules. Navigate to Home 🢡 Assets 🢡 Inventory.
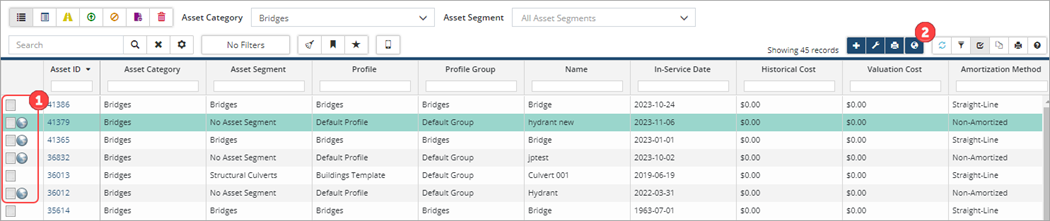
Filter the inventory list to show the assets to be viewed in the GIS viewer (e.g., in the screenshot above the inventory is filtered by category to show Bridge assets). Assets that are linked to GIS features will have a ![]() icon ❶ which is used to navigate to the location of the asset in the viewer. A second
icon ❶ which is used to navigate to the location of the asset in the viewer. A second ![]() icon is available in the toolbar ❷ to show all linked assets within the inventory grid on the map.
icon is available in the toolbar ❷ to show all linked assets within the inventory grid on the map.
Manually link GIS features to Assets
Assets and GIS features can manually be linked using the Asset Linking wizard in either Assets or the GIS Viewer. Each asset to be linked requires a globally unique linking key value and linking is updated automatically each night.
There are several ways to manually link an asset feature in GIS to a corresponding asset in the Inventory list. One method is through the attribute table in the GIS viewer. In the screenshot below, the attribute table shows that one of the selected roads features is not linked ❶.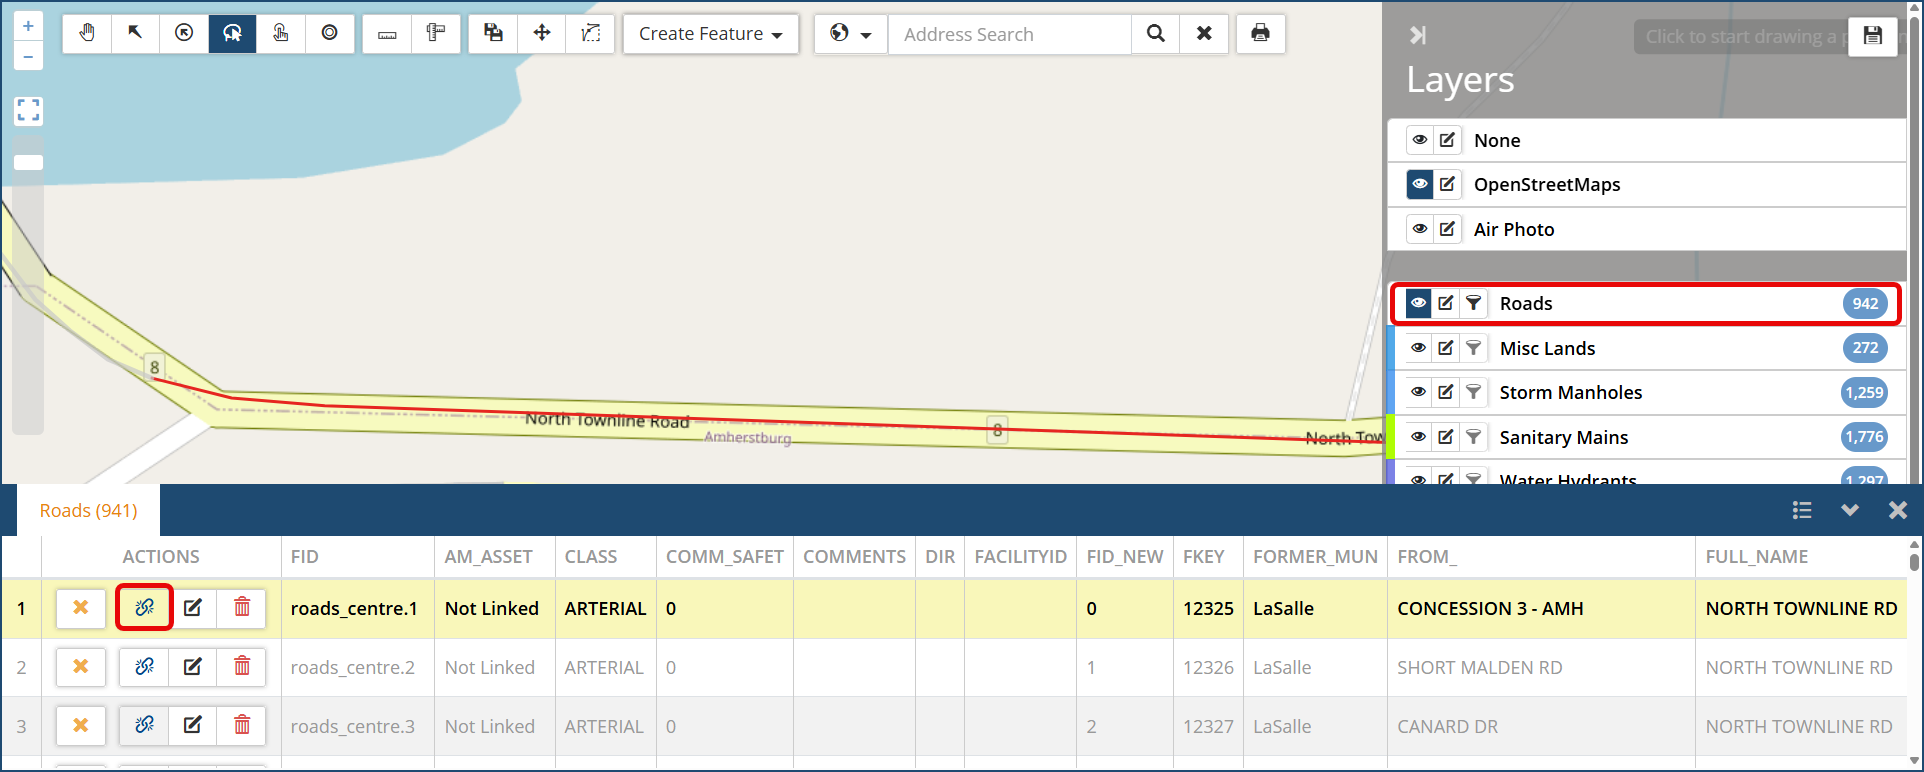
To link a GIS feature to an existing asset:
- Click the paperclip icon
 in the Actions column of the attribute table.
 - In the Asset Linking wizard click Link Existing Asset.

- Enter an Asset ID and click or click the Advanced Search button and search by Category/Segment or by Departments.
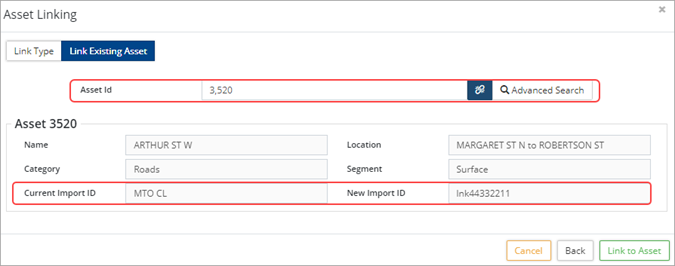
- Once an asset ID has been added, review the asset information and note the New Import ID which will replace the Current Import ID.
The import ID is the linking value and must be globally unique. Linking is updated automatically each night and if the GIS feature you are trying to link to an asset has a linking key that is not globally unique, the link will be overwritten overnight and the asset will no longer link the next day. Refer to the GIS Nightly Report for further information.
- Click Link to Asset
To link a GIS feature to a new asset:
- Click the paperclip icon
 in the Actions column of the attribute table.
 - In the Asset Linking wizard click Create New Asset. This process will add a new asset to the Assets inventory.
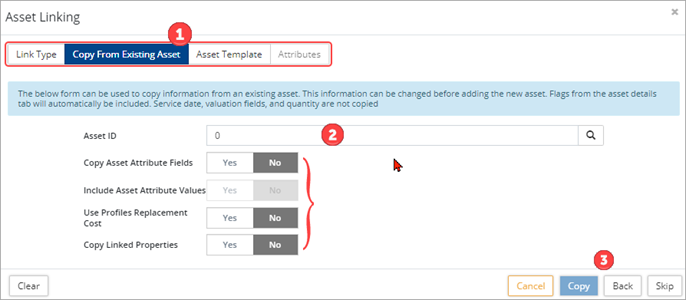
- In the Copy From Existing Asset ❶ window users can copy information (such as classifications, attributes, etc.) from an existing asset to the new asset. This saves time and ensures consistency. Enter an Asset ID or search by Category/Segment or by Departments. Review each flag and set them to yes as needed. Alternatively, click the Skip button in the lower right to navigate to the Asset Template
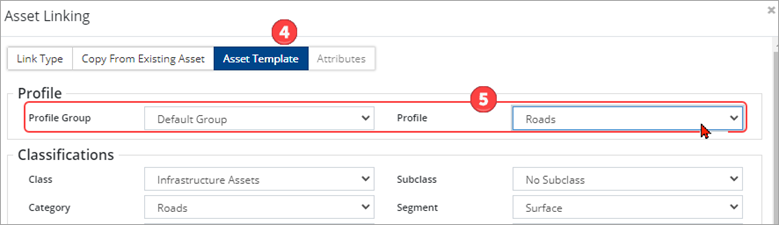
- In the Asset Template ❹ tab, users can select a Profile Group/Profile ❺ to assign to the new asset. Any classification set within the Profile’s Asset Template screen will be applied to the new asset. Changes can be made on this tab as needed.
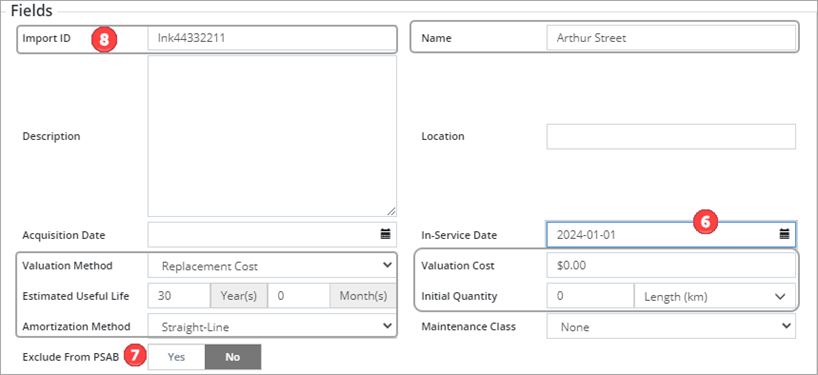
- Scroll down to the Fields section and enter a name and in-service date ❻. The in-service date is used in Citywide to start amortization of the asset. Amortization begins in the month of the year entered in this field. If the asset will not be amortized and/or is not a TCA asset, set the Exclude from PSAB ❼ flag to yes.
- Note the Import ID ❽ field which is the linking value and must be globally unique. Linking is updated automatically each night.
-
Review the Nightly Reports to see what linking keys have been assigned to each Layer.
-
- Set a valuation method/cost, enter an estimated useful life, initial quantity and unit of measure. The amortization method defaults to straight-line but can be adjusted as needed.
- Click Next.
- In the Attributes tab, assign and/or complete attribute information as needed for the asset. Attributes may have loaded if a profile was selected in the Asset Template tab.
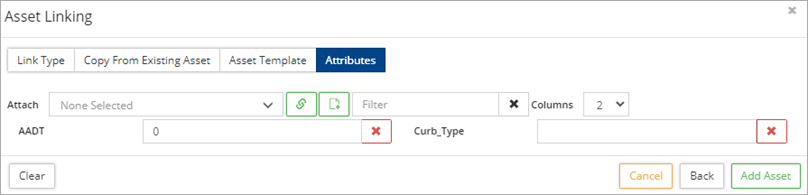
- Click Add Asset . A new asset will be added to the inventory and linked to the GIS feature asset using the assigned linking value (i.e., Import ID or GIS attribute).
Linking from the Assets module to GIS
Linking can also be done from the Assets module. In the inventory view, unlinked assets do not have a globe icon ![]() . Another way to identify unlinked assets is to add the GIS feature ID column to the grid and filter by this column. Blank cells indicate that the asset is not linked.
. Another way to identify unlinked assets is to add the GIS feature ID column to the grid and filter by this column. Blank cells indicate that the asset is not linked.

Update the Import ID field (or GIS attribute) with the corresponding GIS linking ID value.
Link multiple assets with the Upload Center
A third option is to bulk update changes to the Import ID or GIS attribute field using the Upload Center, Asset Sync template.
To bulk link assets:
- Click the Upload Center.
- Select Asset Sync from the Upload Type dropdown field.
- Select Click to Export.

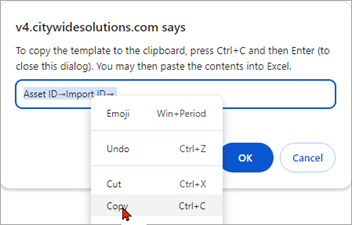
- The Asset ID is a required field. Set the Import ID to yes. Click Generate.
- Copy the string of text and paste into an Excel worksheet.
- In Excel enter an asset ID and an Import ID for each asset to be linked. (If a GIS attribute is the linking key, label a blank column in Excel GIS ID rather than use the Import ID)
- Once all information has been entered, copy and paste it (including the header row) in the Input field of the Upload Center.
- Review the data, verifying that the header row is mapping correctly.
- Click Submit Upload.
-
Regardless of which method is used, manual link or the Upload Center/Asset Sync, linking is refreshed overnight. Changes in the number of linked assets is reflected the next day.


