
Asset Profiles are used for asset management, and contain Condition Range, Risk calculation, and Lifecycle Events information. Profiles manage groups of similar assets, such as a Roads profile applied to road assets that generally have the same EUL and follow the same lifecycle strategy.
To access Asset Profiles, navigate to Home 🢡 Assets 🢡 Asset Profiles.
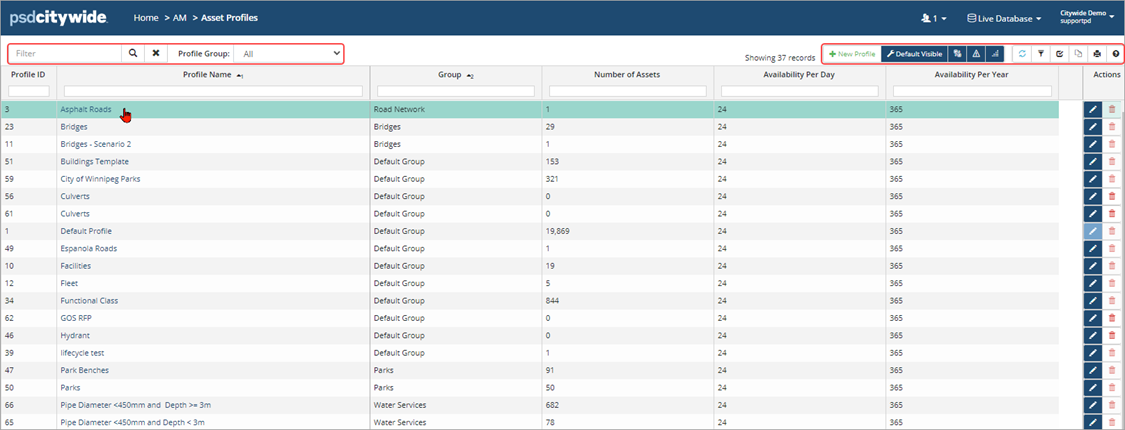
The Default Profile and any user-defined profile can be managed on the Asset Profiles page with appropriate permission settings. The grid shows:
- Profile Name (it must be unique)
- Group: Organize similar profiles into groups.
- Number of Assets: Displays the number of assets assigned to the profile.
- Availability Per Day: Shows the number of hours per day the assets within the profile are available and is used for Citywide Maintenance out of service calculations.
- Availability Per Year: Shows the number of days in a calendar year the assets within the profile are available and is used for Citywide Maintenance out of service calculations.
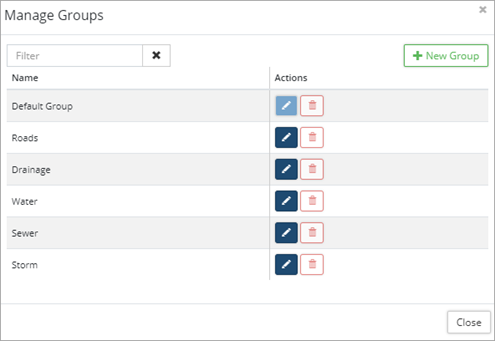
Create a Profile Group
- Click Manage Groups
 in the top right of the Asset Profiles
 - All groups are listed in the popup.
- To create a new group, click +New Group . Enter a name, click Add .
- To edit or delete a group, click
 or
or  on the right under Actions.
- Click Close when done.
Create and Manage Asset Profiles
Asset Profiles are created and applied to many similar assets as a template/guide for asset management. Users can build out condition and risk models, lifecycle events and strategies.
To create a new asset profile:
- Click +New Profile in the top right of the Asset Profiles view.
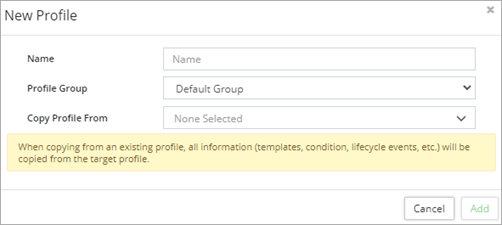
- Enter a unique Name.
- Select a profile group. Use Default Group if no other groups have been created.
- Use Copy Profile Information field to copy information from an existing profile.
- Click Add .
- Once created, click the asset profile name in the list to view and customize the profile sections: Dashboard, Asset Template, Maintenance Metrics (if Citywide Maintenance is enabled) and Lifecycle.
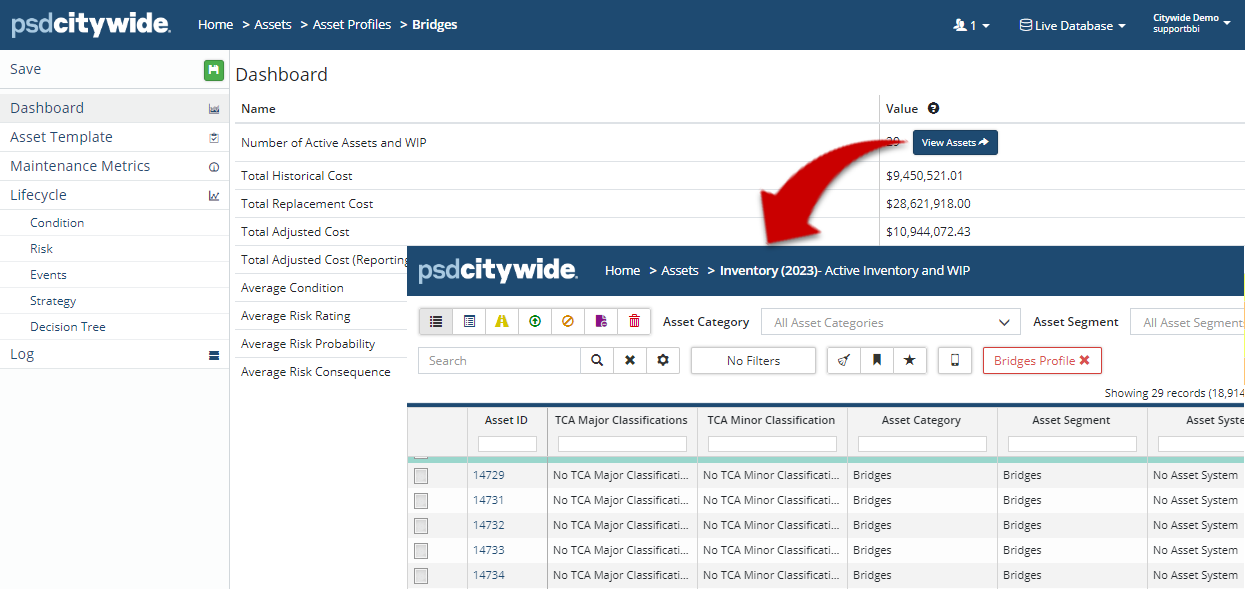
Dashboard
The profile Dashboard displays a summary of the assets within the selected profile. Totals for historical cost and replacement cost, as well as averages for condition and risk are shown on this screen. To see assets assigned to the profile in the inventory view, click View Assets.
Asset Template
In the Asset Template section, classifications, valuation information, attributes, and replacement cost method can be defined and applied to new assets assigned to the profile. The template is a great tool to help create consistency within groups of similar assets.
To update the asset template:
- Select which fields to populate. Use the Copy Details from existing Asset button at the top of the screen to prepopulate some of the fields and bring in attributes.
- Once the form has been completed, click Save in the top left.
Maintenance Metrics
The Maintenance Metrics section is used to define: 1) the number of hours per day and number of days within the year the asset is available, and 2) the Failure Classes associated with the selected asset type. The availability factors are used in the Maintenance module for Out of Service calculations; while the failure classes are used to track failures.
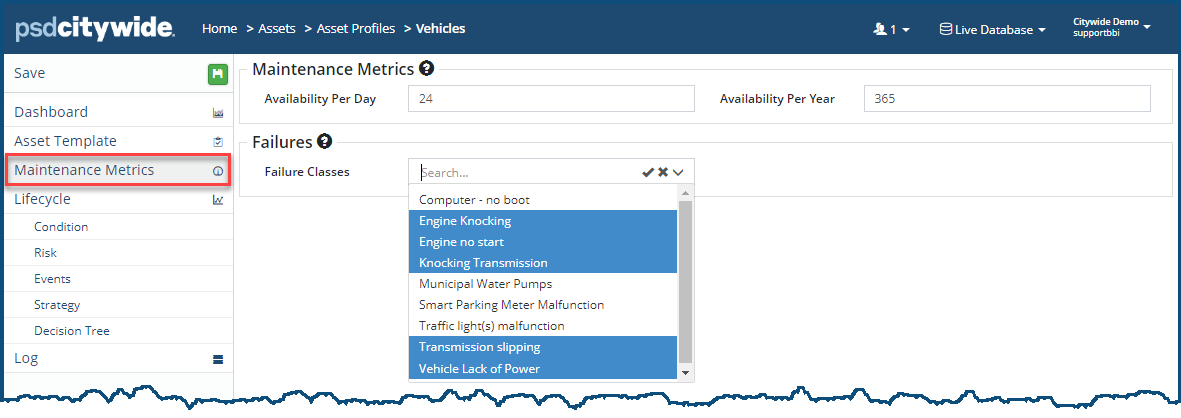
- Enter the hours and days in the Availability Per Day and Availability Per Year fields ❶.
- Select one or more Fault Classes ❷. To select more than one, hold down the Ctrl key and click on all the applicable classes. In the above example, all the Failure Classes that pertain to Vehicles have been selected.
Lifecycle Condition
The Lifecycle Condition section is used to determine how condition will be defined for the assets within the profile. Two methods are available:
- Standard method: This method uses a condition range. The default range is 0-100, but if a group of assets are typically assessed on a range of 1-5, the range, direction, and individual range levels are set on this page.
- Custom method: This method uses a condition assessment formula to set a logical mathematical expression to be used when adding condition assessments on assets. The condition assessment calculator works with numeric type attributes and simple mathematical operators.
Profiles allow for multiple condition ranges to be used on different groups of assets.

Standard Method
The standard method allows users to set a condition value using the condition range ❶ defined on the profile. When entering a condition assessment at the asset level, the range displays as a guide for the user to determine what value best reflects the condition of the asset at the time of assessment.
To change the condition range:
- Enter the new range (i.e., 1 to 5).
- Select the Direction of the range.
- Standard: the range goes from lowest being the worst to highest being the best.
- Reversed: the range goes from lowest being the best to highest being the worst.
- Enter the starting value for each label in the range and include a description. Click Save.
-
When a condition range is changed on a profile, (i.e., from 0-100 to 1-5), the changes will apply to all assets in the profile. If the original condition rating of an asset was 50 (one-half of 100), it will now have a proportional condition rating of 2.5 (one-half of 5).
Custom Method
The Condition Assessment Calculator ❷ allows for the use of Attributes and mathematical operators to calculate the condition assessment rating on assets. When defining a custom condition formula:
- Only Number or Number (allow zero) type attributes are available for use
- Use simple mathematical operators (*, /, +, -, and (), Citywide applies the order of operations logic)
- Include digits (i.e., 2 * attribute(1) + 3 * attribute(2))
- Attributes can be used multiple times within a formula
- When defining the formula, the system won’t save equations divided/multiplied by a zero or equations that are incomplete (i.e., Attribute(1) * 0 OR Attribute(1) +
To set a custom condition formula:
- Set the Use Custom Assessment Method flag to yes.
- Enter a Name.
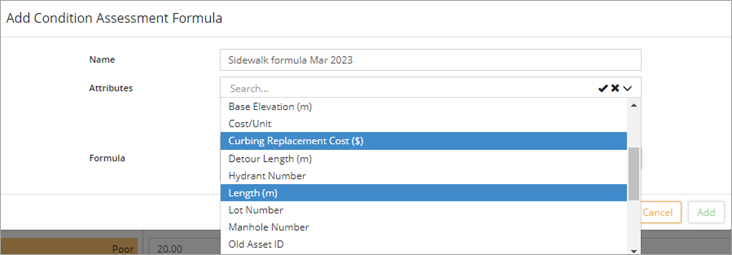
- Click Add/Edit Formula
 . Click Attributes and select all attributes that will be used in the formula (hold Ctrl to select multiple attributes). Only numeric type attributes are available on the dropdown list.

- Create a custom Formula using the selected attributes and simple mathematical operators such as multiplication, division, addition, and subtraction. The system will apply the order of operations logic and brackets can be used. A single attribute can be used multiple times within the formula.
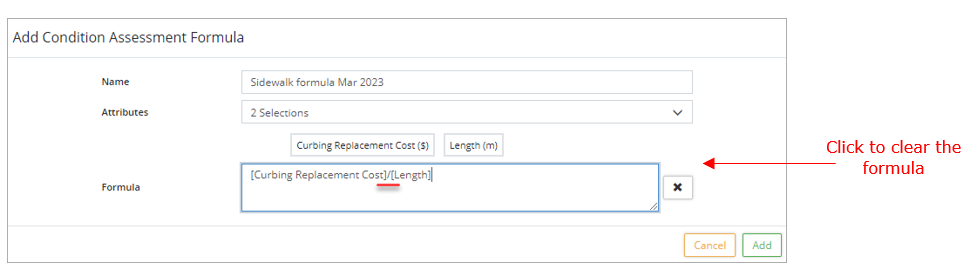
- Click Add .
- Save the profile. The assessment calculator will now be active at the asset level.
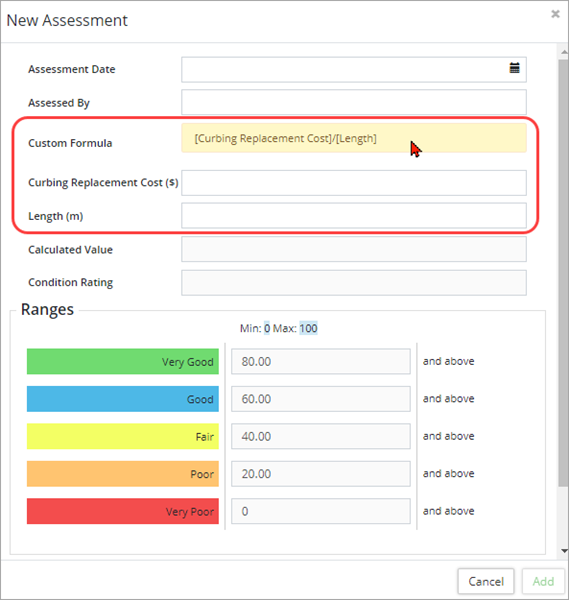
- Going forward, when a user adds an assessment to an asset tagged to a profile with a condition assessment formula applied, the user inputs attribute information and Citywide calculates the condition value and rating. Any historical assessments will continue to appear as standard.
-
Edit condition formulas with the Add/Edit Formula button
 located on the right of the formula field. Citywide will always prompt to archive formulae data. Editing a condition assessment formula will clear all attribute values and calculated values at the asset level where a condition assessment had been entered using the archived formula. The condition rating will still remain.
Lifecycle Risk
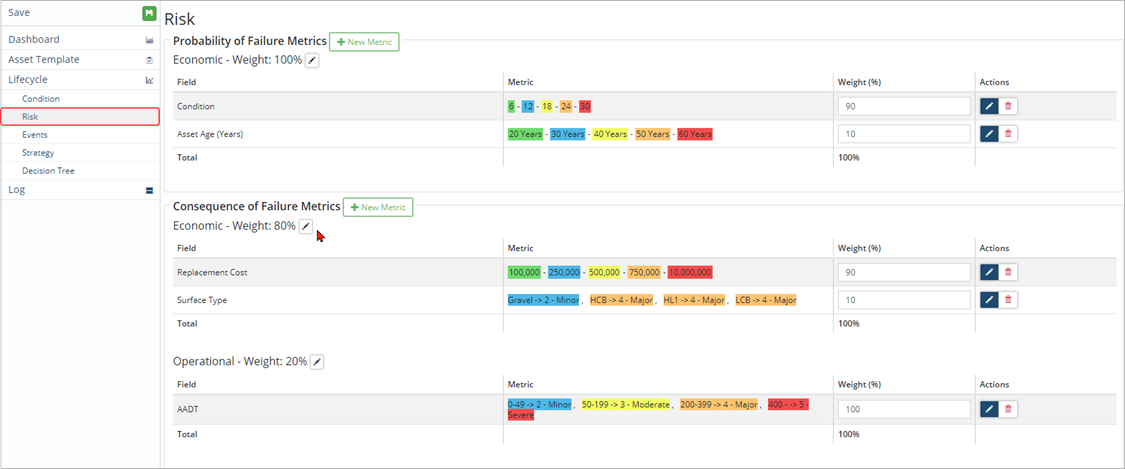
The Lifecycle Risk screen is used to set up a custom risk model for the assets within the profile. The Risk model determines the Probability and Consequence of failure for these assets. New metrics based on Asset fields (e.g., condition, replacement cost, service life remaining, asset age), Classifications, or Attributes can be added.
Various classifications (economic impact, environmental, social, etc.) can be used and weight assigned.
To add a new metric using an asset field:
- Click +New Metric .
- Select a Risk Classification.
- Set the Field Type to Asset Fields.
- Select a field, such as Replacement Cost from the Field dropdown list.
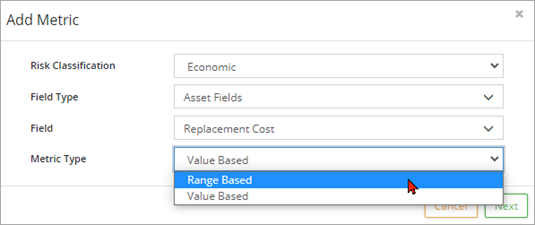
- Select Range Based in the Metric Type dropdown list.
- Click Next .
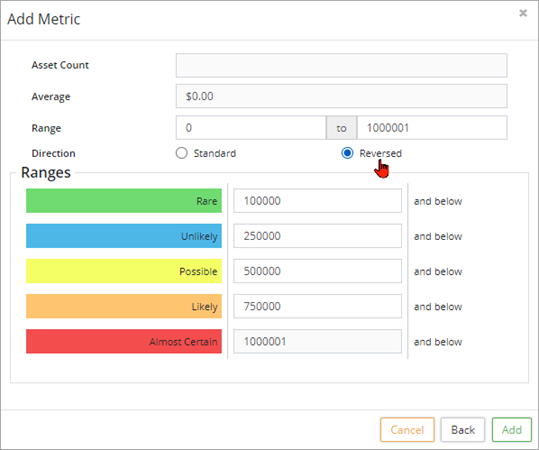
- In the Add Metric window, enter a Range. When using replacement cost as a metric, consider the highest and lowest replacement cost of the asset group using this profile to determine an appropriate range.
- Set the direction to Reversed.
- Assign a value to each risk level.
- Click Add .
- Assign weight to the metric. If you have multiple metrics under Probability or Consequence, assign a weight (%) for each metric so that the total weight equals 100%.
- Click Save.
To add a new metric using an attribute:
- Click + New Metric .
- Select a Risk Classification.
- Set the Field Type to Attributes.
- Select an attribute, such as AADT from the Field drop-down list. If there are too many attributes to load into the dropdown, begin typing the attribute name.
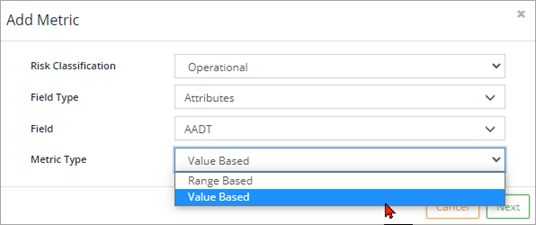
- Select Value Based as the Metric Type when the attribute type is Dropdown, or to use specific values for each risk level and not a range. Click Next .
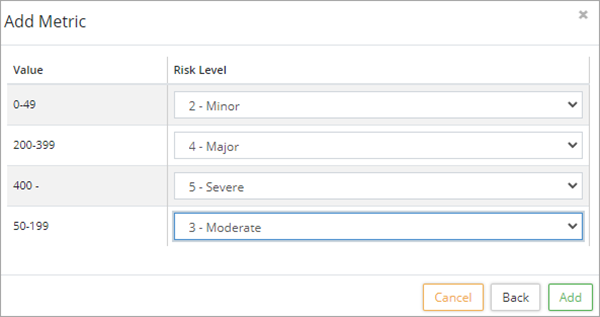
- Assign a risk level to each value.
- Click Add .
- Assign weight to the metric. If you have multiple metrics under Probability or Consequence, assign a weight (%) for each metric so that the total weight equals 100%.
- Click Save.
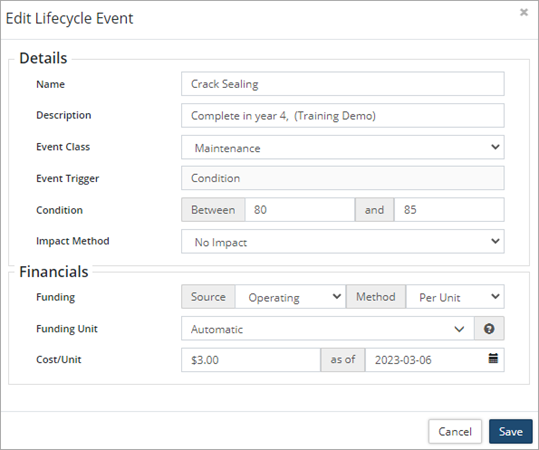
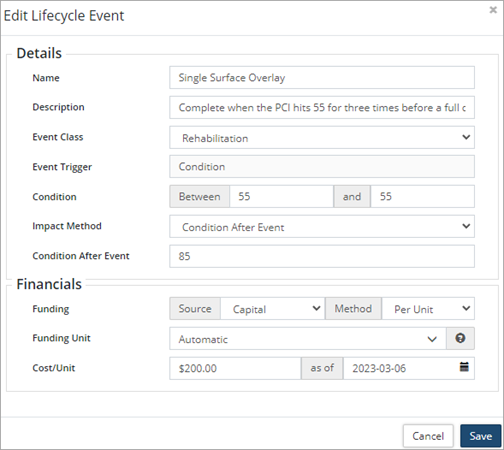
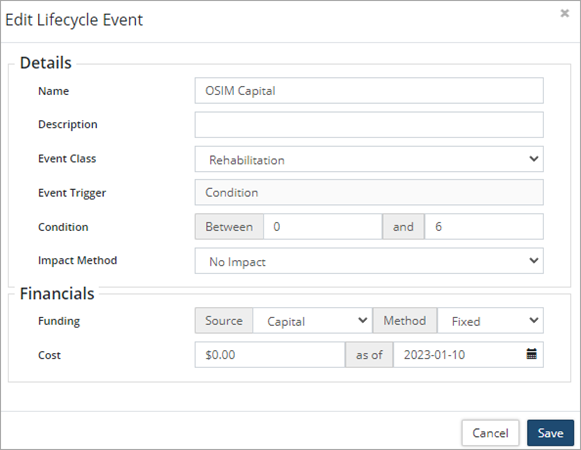
Lifecycle Events
The Lifecycle Events screen is used to set up an event schedule for assets within the profile. It lists and describes the lifecycle management activities that are required to maintain levels of service for the assets. Events include operations, maintenance, rehabilitation, and replacement activities. Add new events and include when the event is triggered, the impact on the asset once completed, as well as cost information and funding sources.

To add a new event:
- Click + New Event .
- Enter a Name and Description.
- Select an Event Class (maintenance, preventative maintenance, rehabilitation, or regulatory).
- Set the Event Trigger (condition, asset age, repeating event or lifecycle event). Complete the required fields based on the 'event trigger' selected.
- Select an Impact Method and the asset condition after the event.
- Fill in the financial details. (Funding source can be used as a filter when generating reports.)
- To use conditional costing and a lookup table for lifecycle events based on asset attributes, click here.
- Click Add . The event is added to the Lifecycle Events table.
- Click Save. in the top left of the affiliate panel.
Example 1: An operating/maintenance event for an asphalt roads profile. The event is triggered when the condition of the asset reaches an 80-85 condition.
Example 2: A capital/rehabilitation event for an asphalt roads profile. The event is triggered when the condition of the asset reaches a 55 condition. The impact once applied is to raise the condition of the asset up to 85.
Example 3: A capital/rehabilitation event for a bridge profile based on OSIM report recommendations. When the event is scheduled at the asset level, the cost and impact can be added.
Example 4: Conditional Costing using an Asset Attribute lookup table
In the lifecycle event, you can use conditional costing based on asset attributes. For example, you may have similar lifecycle events for a profile of assets but based on the material type, the cost per unit is different. To enable and define the conditional costing lookup table in the lifecycle event, click the Funding Method as Per Unit. ![]()

- Enable the Cost by Attribute toggle to Yes , then select from the drop down the asset Attribute you want to use for costing.
- In the example above, the cost per unit for the lifecycle event 'Crack Sealant' is different based on the asset attribute Surface Type of the road. Click Next.
- On the next screen, specify on the lookup table the cost per unit based on the different surface types:
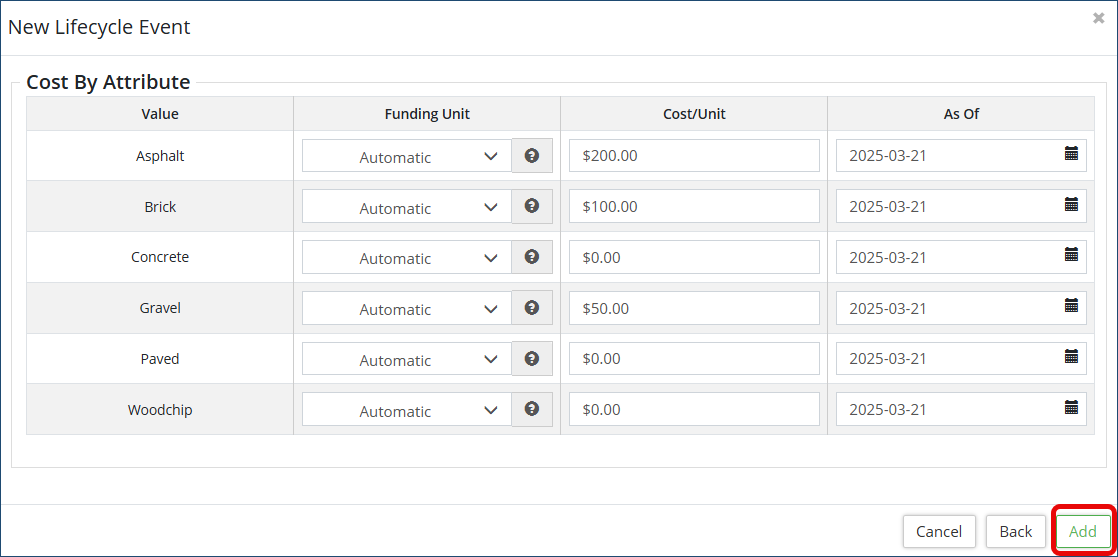 Once your conditional costing lookup table is complete, click Add.
Lifecycle Strategy
Use the Lifecycle Strategy screen to schedule events and create a general strategy for the assets within the profile. Enter a Lifecycle EUL ❶ to display the chart.
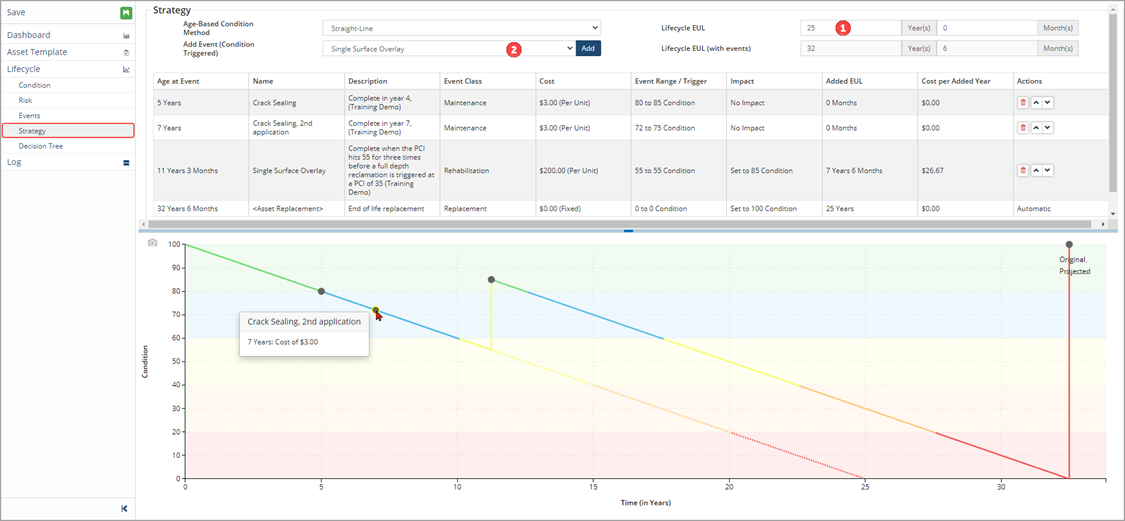
To add new events to the general strategy:
- Select the event from the Add Event (Condition Triggered) ❷
- Click Add. The event will be added to the chart. If the event has an impact on the condition of the asset, then the life of the asset is projected out.
- Click Save to apply the change(s).
Lifecycle EUL
The Lifecycle EUL is used in asset management reports to calculate replacement costs/dates and annual requirements.
Lifecycle Decision Tree
The Lifecycle Decision Tree screen is used to view and edit the decision flow chart for the assets. Here, you can map out decisions to complete certain lifecycle event types based on the condition of your assets (as one example).
To edit the decision tree:
- Click the Edit/pencil icon.
- Select whether to add/edit/remove any of the nodes.
- Fill out the fields.
- Click Save to apply the change(s).
Batch Default Settings
This operation is only available to users with Admin privileges.
You can set up all the above settings as defaults for an entire Profile Group. When you then add a new Profile that belongs to a Profile Group, it will inherit the default settings you set up here. Those settings can then be edited if required. To do so:
- Select the Profile Group ❶ that you wish to apply defaults to. All the profiles that belong to the selected group will appear in the list (two in this Vehicles sample:
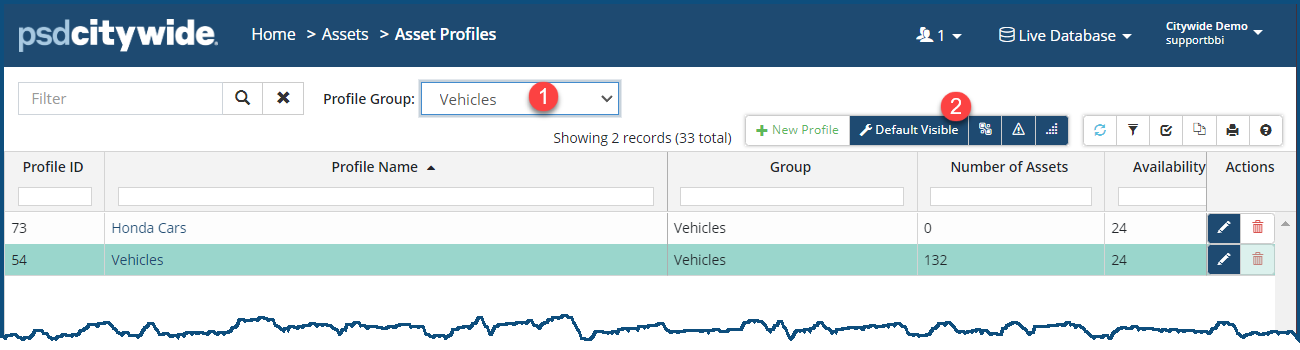
- Click on Default Visible ❷. (The "Visible" here refers to the profiles in the visible on-screen list that are part of the selected Profile Group ❶. The Default Profiles dialog box appears:

- Click on one of the Settings buttons ❸ to see the options associated with it. All the above options settings outlined above will appear for each of the corresponding choice. Here, for example, the default failure classes that will apply to the Vehicle Profile Group is being set up.
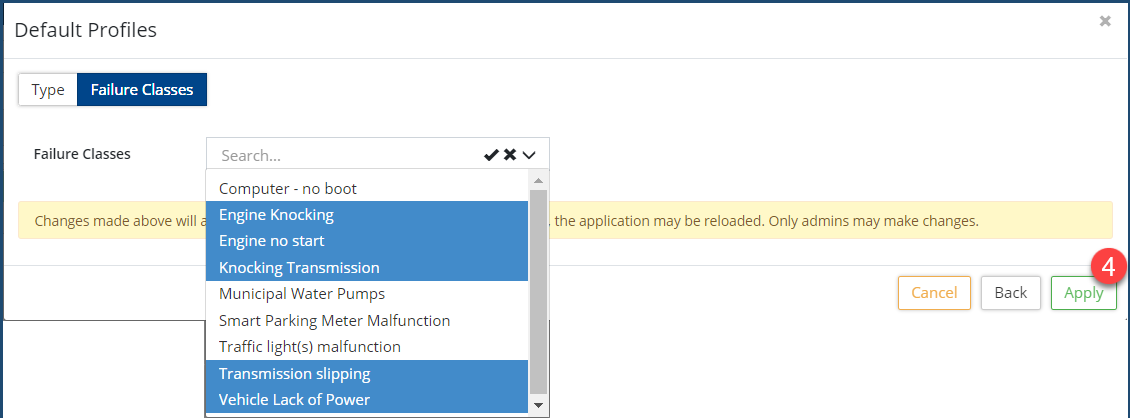
- Click Apply ❹.


