Overview
Properties may comprise all the properties in your jurisdiction (if you enter or import them all), but it must contain all the properties involving Citywide matters (e.g. Permits, Service Requests, etc.). Each property record contains detailed information about the property itself, as well as adjunct information concerning current and historical activities, documents, notations, etc. Property details can be added here or, in many cases, they can be added on the fly on other screens (e.g. the Building Permits screen).
This is the Properties screen, which lists all the properties in the system (currently) sorted in reverse chronological order by their unique, system-assigned Property number ❶:
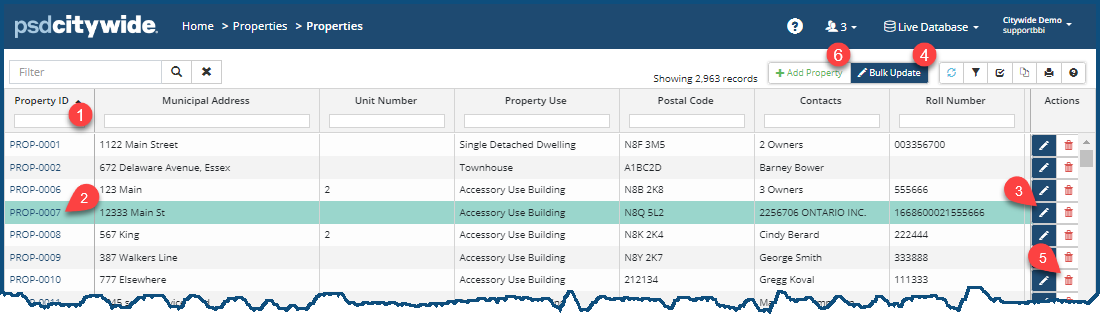
Clicking on an individual Property ID ❷ will open the details page for the property. Clicking on the pen icon ![]() ❸ allows you to Edit the individual property, while clicking on Bulk Update ❹ will allow you to make bulk updates to multiple records at the same time. Clicking on the trash can icon
❸ allows you to Edit the individual property, while clicking on Bulk Update ❹ will allow you to make bulk updates to multiple records at the same time. Clicking on the trash can icon ![]() ❺ allows you to delete a property. Clicking on + Add Property ❻ allows you to add a property.
❺ allows you to delete a property. Clicking on + Add Property ❻ allows you to add a property.
Property Information
Details
The Property Details page provides a comprehensive overview of all matters pertaining to a property.
Click on an individual Property ID. The full property page appears, displaying the Details page and sections on the side panel.
Most of the fields on this page will be known to most everyone and are in no need of explanation.
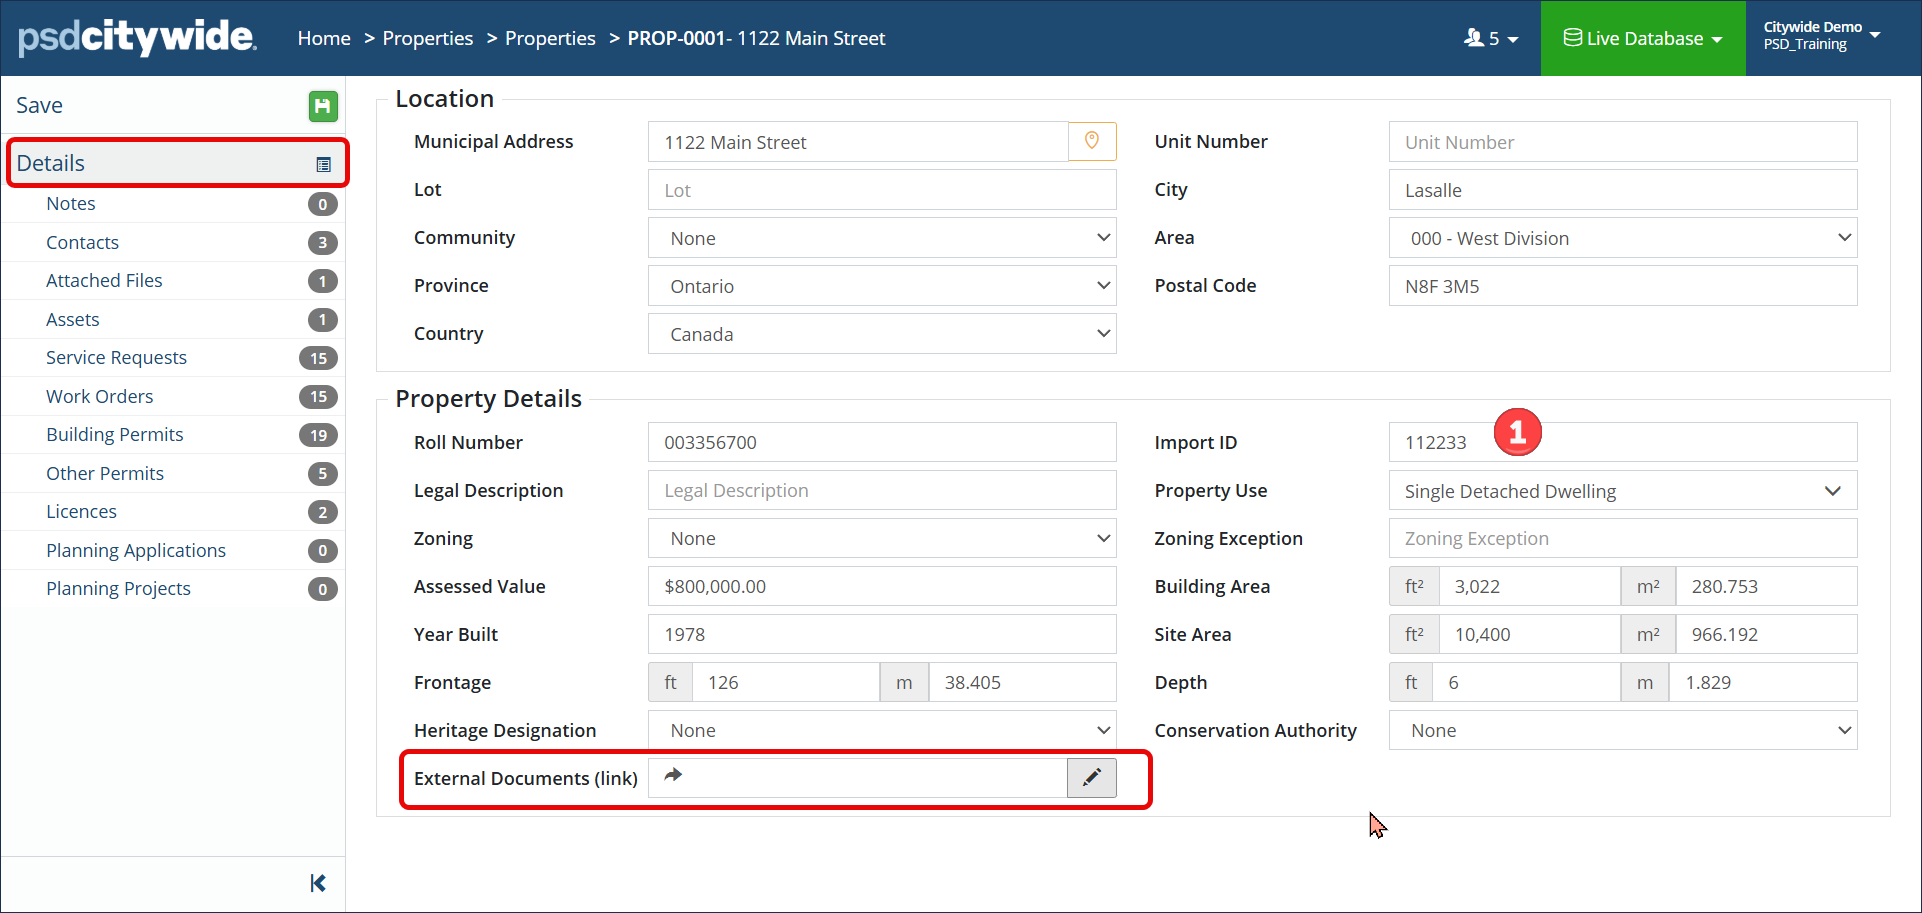
- Import ID ❶ field involves an identifier that will appear on this screen if the current record was either created or updated through a data import. If the record was added manually (here or on another screen—e.g. on the Building Permit page), this field will be blank.
- Property Uses ❷ (if applicable) can be set up where a property use can be selected to indicate current or intended use of the property on the application. To set up a list of Property Uses, click here.
- External Documents (link) field can be used to store a valid URL link that would allow them to access historical data/details/files about that property stored in an external document management system like Sharepoint (or Google Drive, for example).
Be sure to fill in any of the fields that you may wish to include in a filtering process or in a report query.
Clicking on Notes will show any existing notes for the property and allow you to add additional notes, each of which will contain a Date stamp, the Note itself, the username of the person who added it (Added By), and the ability to edit or delete the note (Actions). 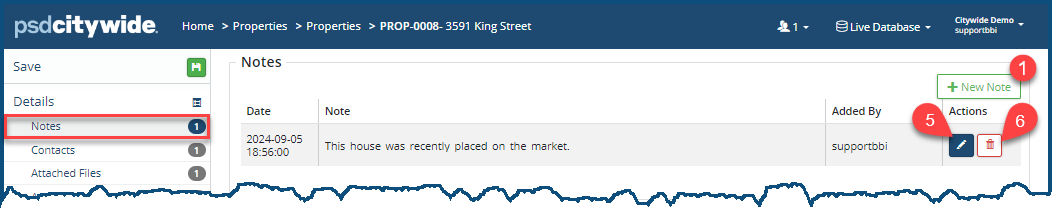
To add a Note:
- Click on +New Note ❶. The Add Note dialog box appears:
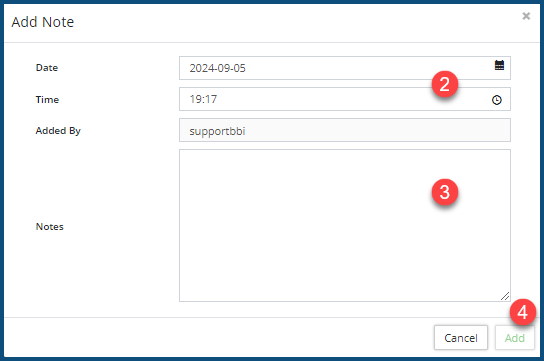
- Set the Date and Time ❷ if it is different from the current system date and time.
- Enter the Note ❸.
- Click Add ❹.
To edit a note, click on the Edit icon ![]() ❺.
❺.
To delete a note, click on the Delete icon ![]() ❻.
❻.
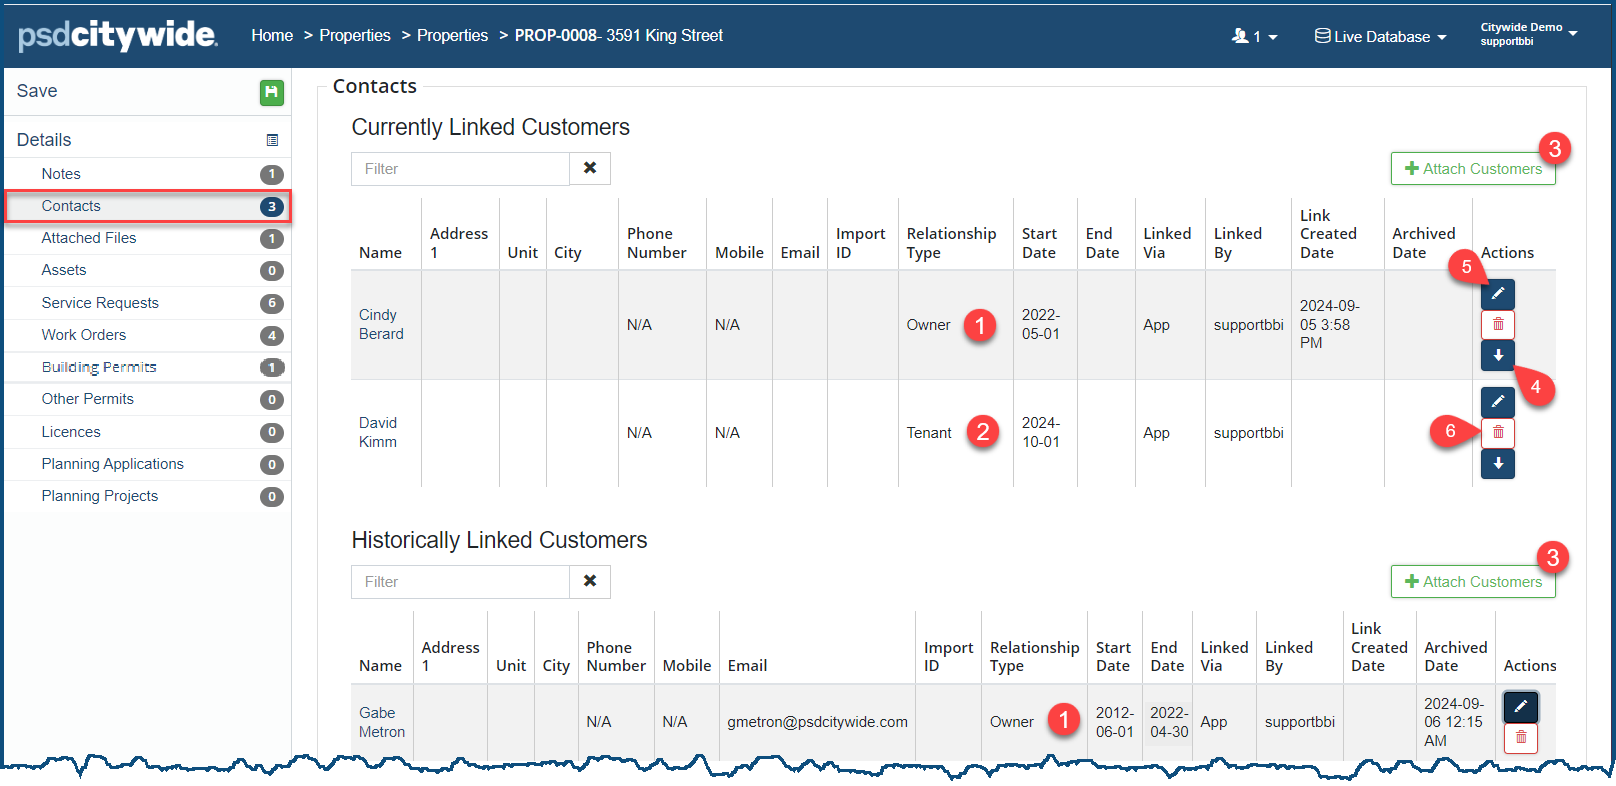
Contacts
Contacts refers to all the individual(s) who is/are either the current owner(s) ❶ or tenant(s) ❷ or prior (historical) owner(s) ❶ or tenant(s) of the Property. There can, of course, be more than one of each at any one time. In this example, the current (sole) owner is Cindy Berard, who took ownership of the property from Gabe Metron in May 2022. David Krim became a tenant in the property as of Oct 2024.
Attach a New Contact
You can only attach an existing contact here; that is, a contact that already exists in the system. If the contact does not exist in the system, they will have to be added. Click here for instructions on how to add a contact to the system.
- Click on + Attach Customers ❸. The Select Customers dialog box appears:
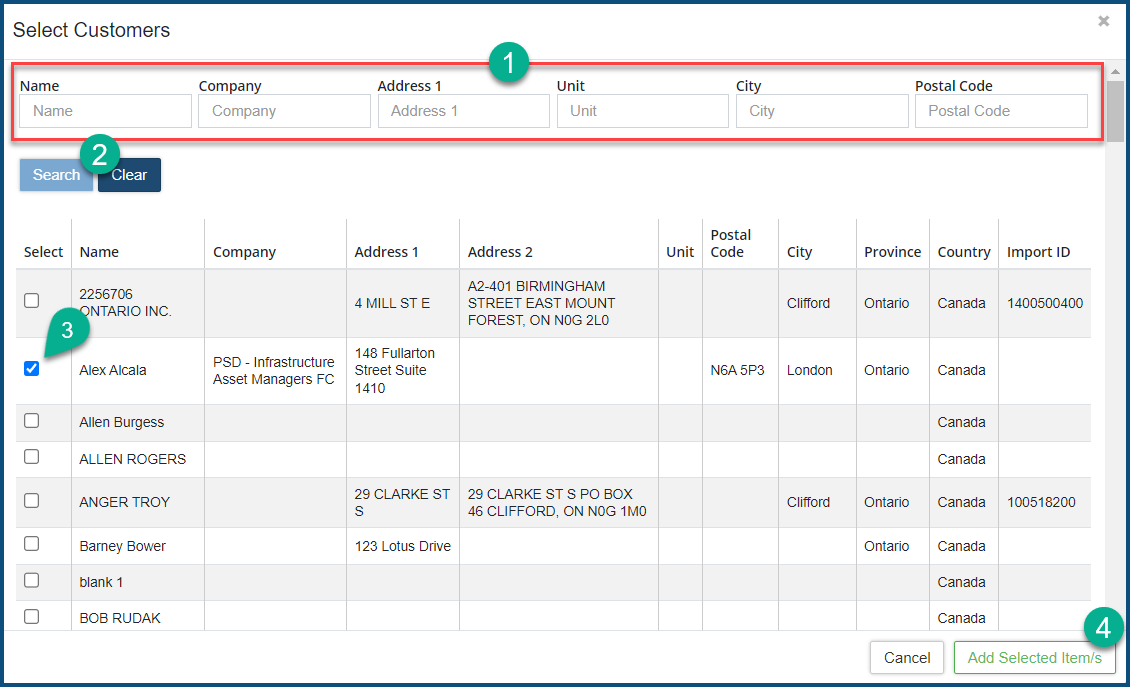
- You can use (any combinations of) the Search ❶ fields the whittle the list down, and the click Search ❷.
- Check ✅ ❸ one or more contacts to be added to either the Current or Historical list.
- Click Add Selected Item/s ❹.
Archive a Contact
Archiving a contact means moving the contact from the Currently Linked Customers list to the Historically Linked Customers list. To do so:
- Click on the Archive icon
 ❹ in the Actions column of the contact to be archived. The Archive customer dialog box appears with the following warning:
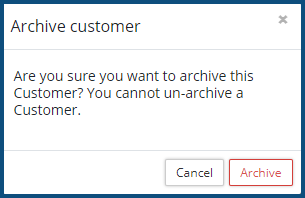
- Click Archive
To edit a contact, click on the Edit icon ![]() ❺.
❺.
To delete a contact, click on the Delete icon ![]() ❻.
❻.
Attached Files
Attached Files is where documents pertaining to the current property can be viewed, uploaded to the system, and downloaded from the system.
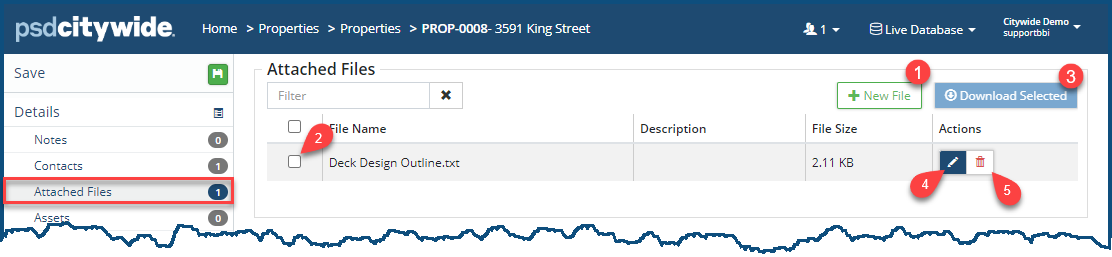
To add a new file:
- Click on +New File ❶. The Add Files dialog box appears:
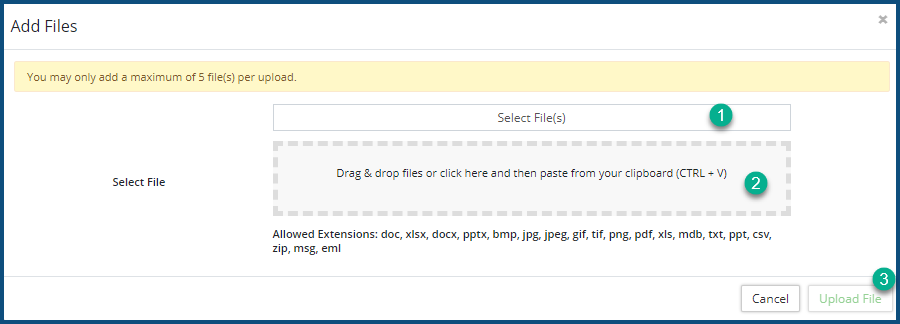
- Click on Select Files(s) ❶ to locate and select files using your File Manager, or drag and drop the files into the perforated box ❷.
- Click Upload File(s) ❸.
To download (an) existing file(s):
- Check ✅❷ the file(s) to be downloaded.
- Click Download Select ❸ and then select the folder to which the selected files are to be written.
To edit a the file Description, click on the Edit icon ![]() ❹.
❹.
To remove a file, click on the Delete icon ![]() ❺.
❺.
Assets
Numerous municipal assets may be situated on the property. These include water hydrants, water meters, service lines, etc. In the following example, it is a Photovoltaic Transformer. Clicking on the Asset ID number ❶ opens the asset, where additional information can be viewed and, permissions allowing, edited.
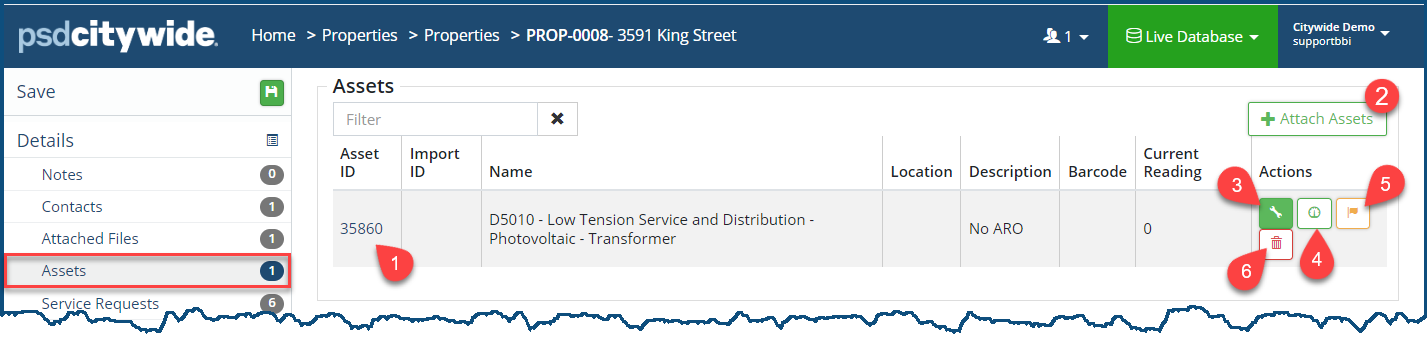
To attach an asset to this property:
- Click on + Attach Assets ❷. The Select Asset dialog box appears:
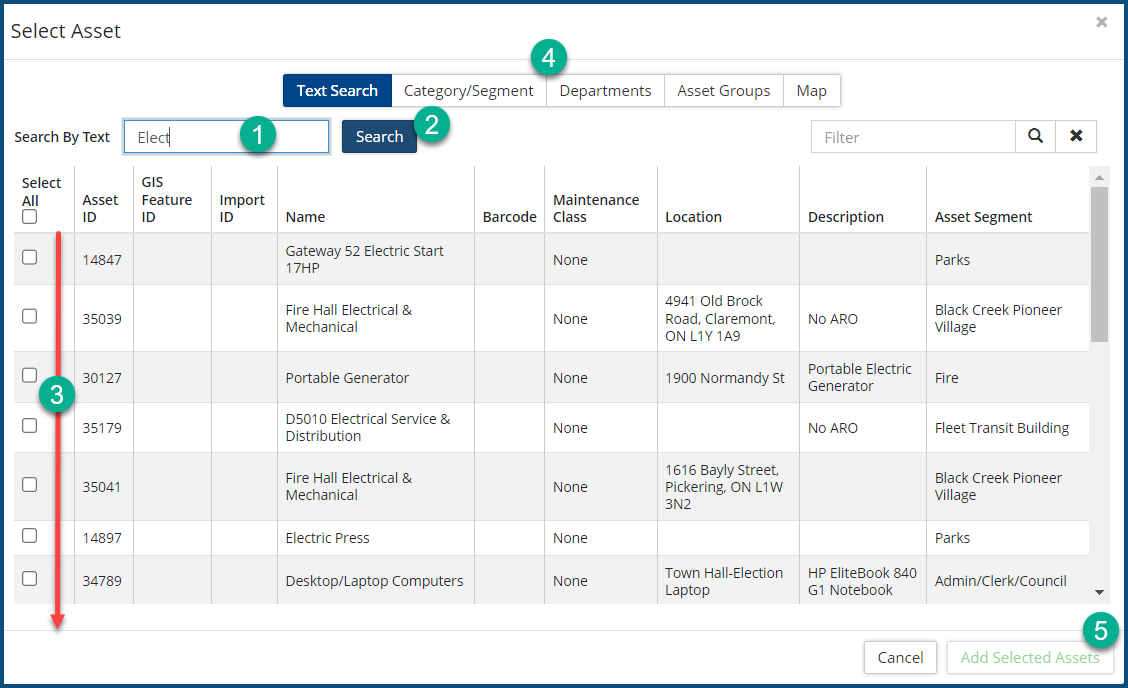
- Enter search text in Search By Text ❶ and then click on Search ❷. A list of assets complying with the search criterion will appear ❸.
- Check ✅ all the assets to be added ❸ and add additional details in the other tabs ❹.
- Click Add Select Assets ❺.
Click on the Wrench icon ![]() ❸ to designate the asset "out of service/downtime".
❸ to designate the asset "out of service/downtime".
Click on the Usage icon ![]() ❹ to add the readings and the reading date if this is a metered device, such as as water meter installed on the property.
❹ to add the readings and the reading date if this is a metered device, such as as water meter installed on the property.
Click on the Failure Codes icon ![]() ❺ to add Failure Codes pertaining to the asset.
❺ to add Failure Codes pertaining to the asset.
Click on the delete icon ![]() ❻ to delete the asset.
❻ to delete the asset.
Service Requests
Service Requests shows all the service requests associated with this property and key details pertaining to each of them on this page. Clicking on the Service Request number ❶ opens the service request, where additional information can be viewed and, permissions allowing, edited.

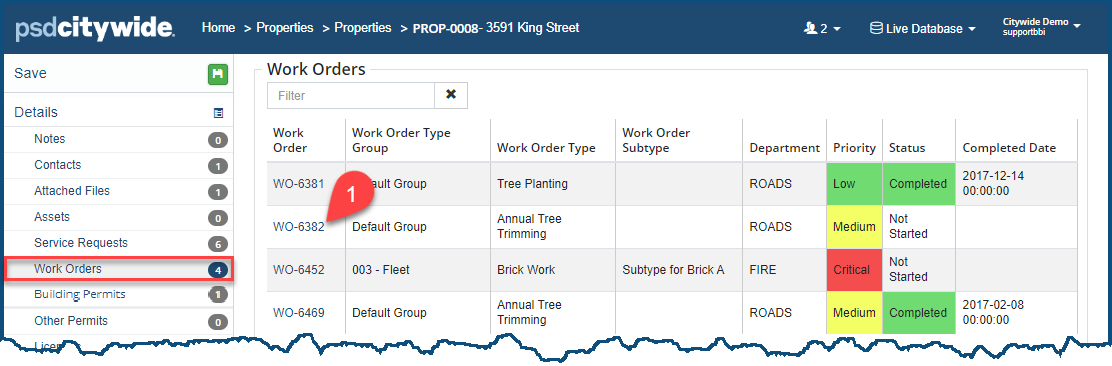
Work Orders
Work Orders shows all the work orders associated with this property and key details pertaining to each of them on this page. Clicking on the Word Order number ❶ opens the work order, where additional information can be viewed and, permissions allowing, edited.
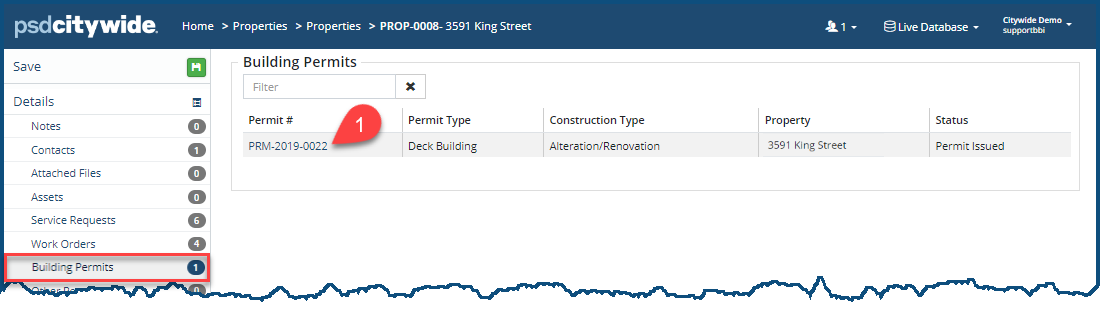
Building Permits
Building Permits shows all the building permits associated with this property and key details pertaining to each of them on this page. Clicking on the Building Permit number ❶ opens the permit, where additional information can be viewed and, permissions allowing, edited.
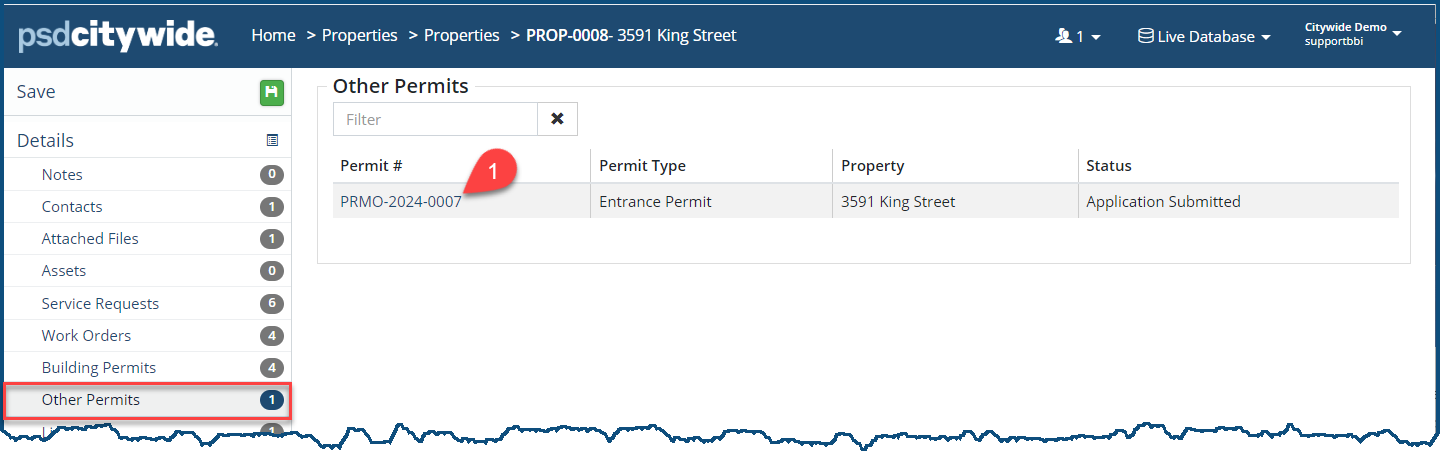
Other Permits
Other Permits shows all the Other permits associated with this property and key details pertaining to them on this page. Clicking on the Permit number ❶ opens the permit, where additional information can be viewed and, permissions allowing, edited.
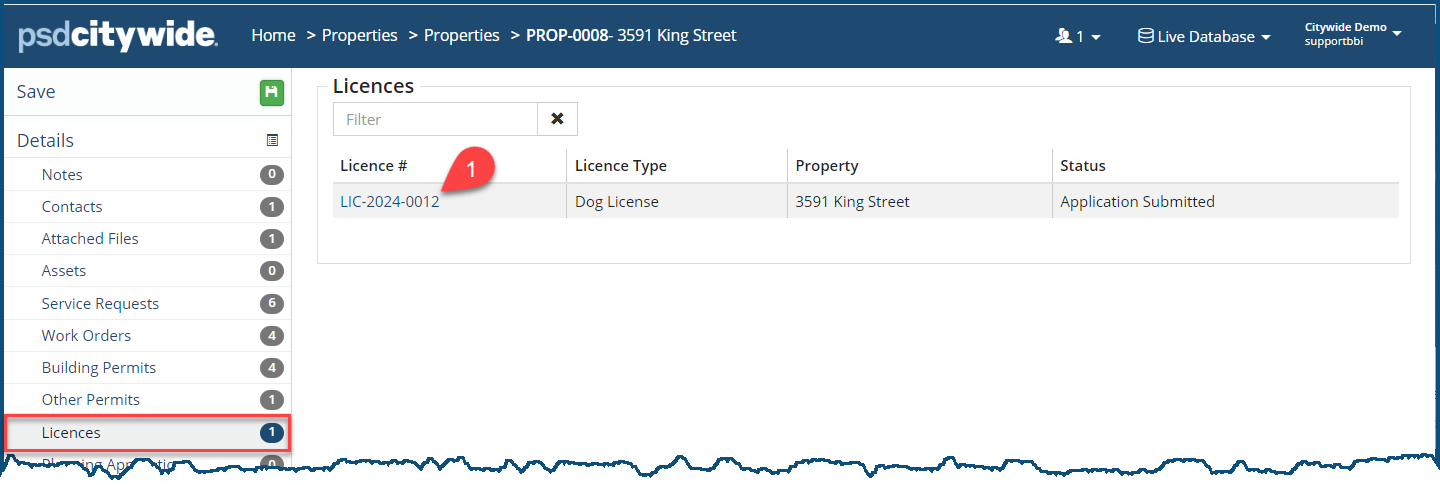
Licenses
Licences shows all the licence permits associated with this property and key details pertaining to each of them on this page. Clicking on the Licence number ❶ opens the permit, where additional information can be viewed and, permissions allowing, edited.
Planning Applications
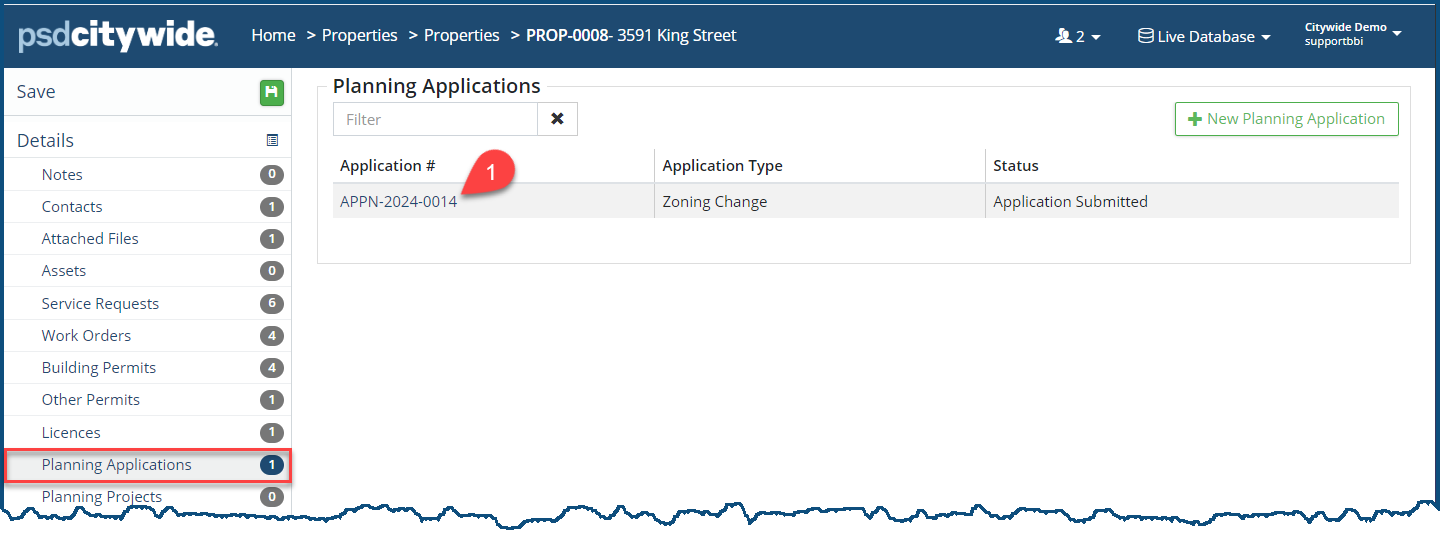
Planning Applications shows all the planning applications associated with this property and key details pertaining to each of them on this page. Clicking on the Application number ❶ opens the application, where additional information can be viewed and, permissions allowing, edited.
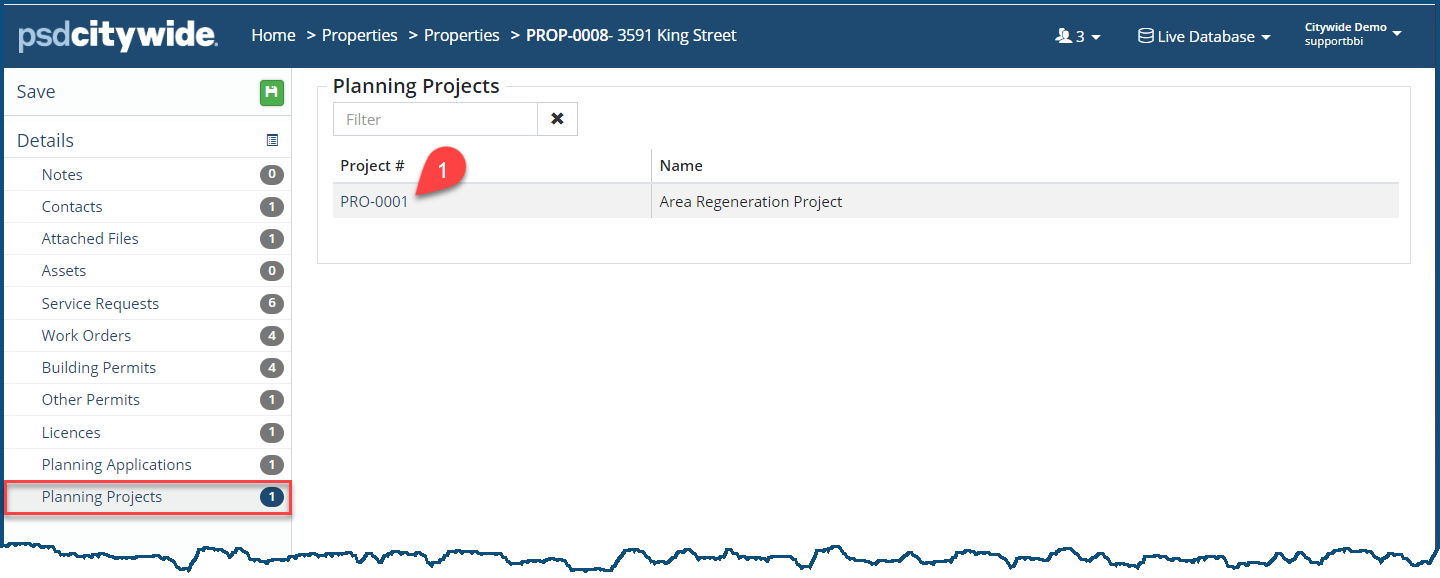
Planning Projects
Planning Projects shows all the planning projects associated with this property and key details pertaining to each of them on this page. Clicking on the Project number ❶ opens the application, where additional information can be viewed and, permissions allowing, edited.