
Overview
Slated inspections can be viewed, updated, and new ones added to individual building permits. Here, all inspections are accessible from this one page, which allows you to e.g. filter down to and view all inspections within a chosen time frame and/or a particular inspector, to (bulk) reassign inspections, etc.
All Inspections information can be entered directly in the desktop version, while inspections-activity information (tasks, deficiencies, etc.) can be entered by inspectors in the field using the Citywide Permit Mobile App.
Before you use inspections here and elsewhere in the system, you must set up the inspection types, inspection tasks, and the list of inspectors.
The Inspections Grid View
The Inspections grid provides you with an overview of all the inspections in the system. You can apply filters and customize the grid layout in a manner most suitable to the tasks at hand. 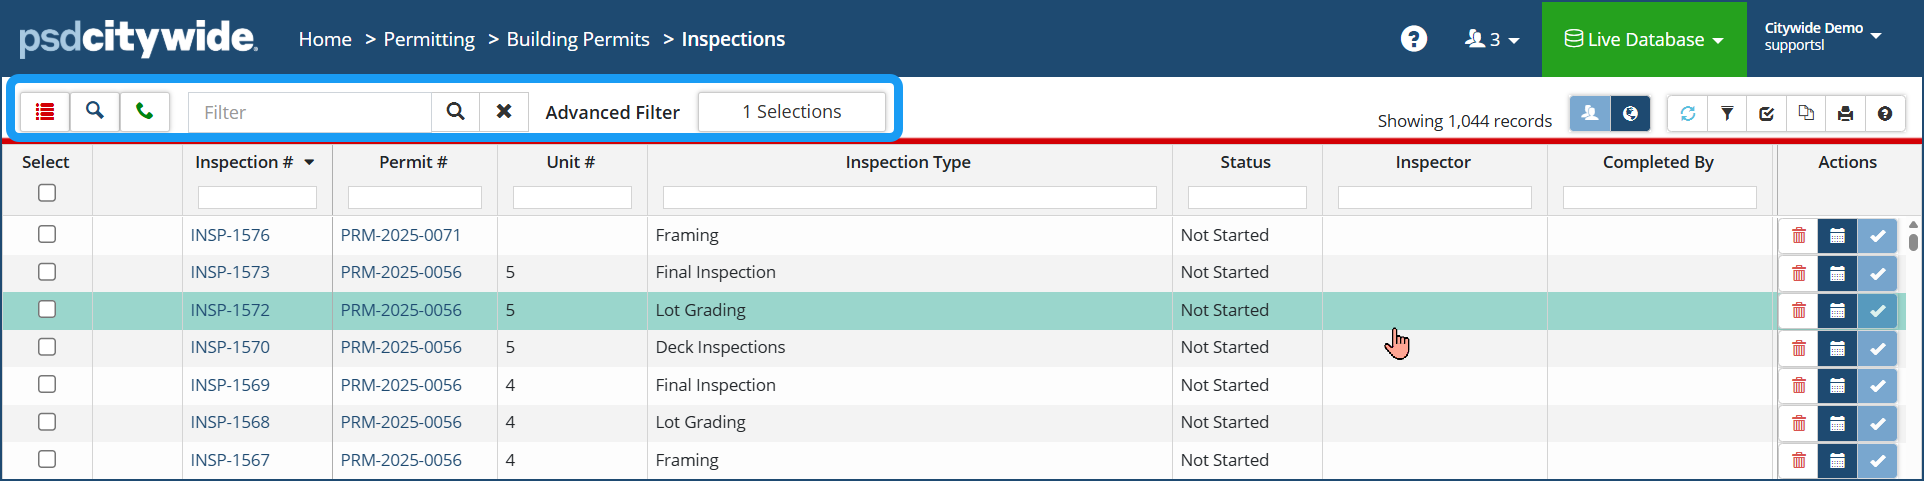 Available filters at the top left of the grid:
- Show All
 shows all inspections and requests
 - Show Inspections
 shows inspections only
 - Show Requests
 shows inspection requests only (if applicable via external portal)
 - Filter Search
 use keywords or numbers to filter/search the inspection list
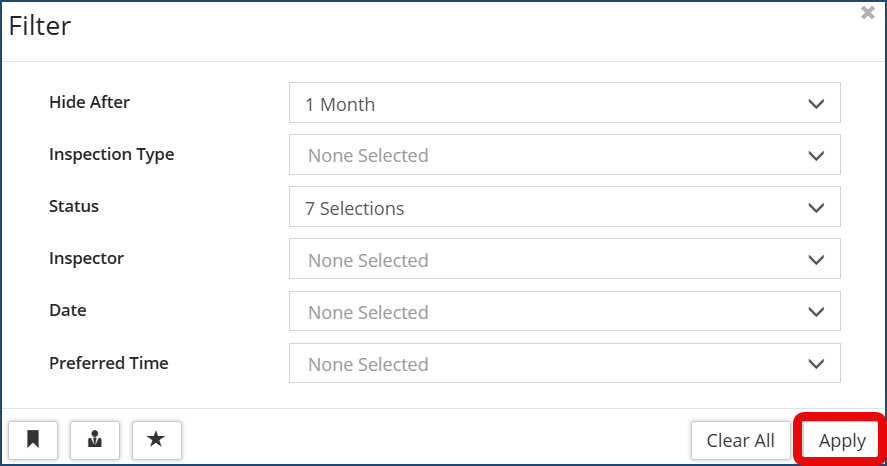
 - Advanced Filter: Select desired filter options on the drop downs and click Apply
Individual permits can have numerous inspections associated with them. Each inspection is treated and documented independently. Thus, you may find it quite useful at times to set up a dual sort order in which the Permit # column is used as the the primary sort ❶ and the Inspection # is set as the secondary sort ❷.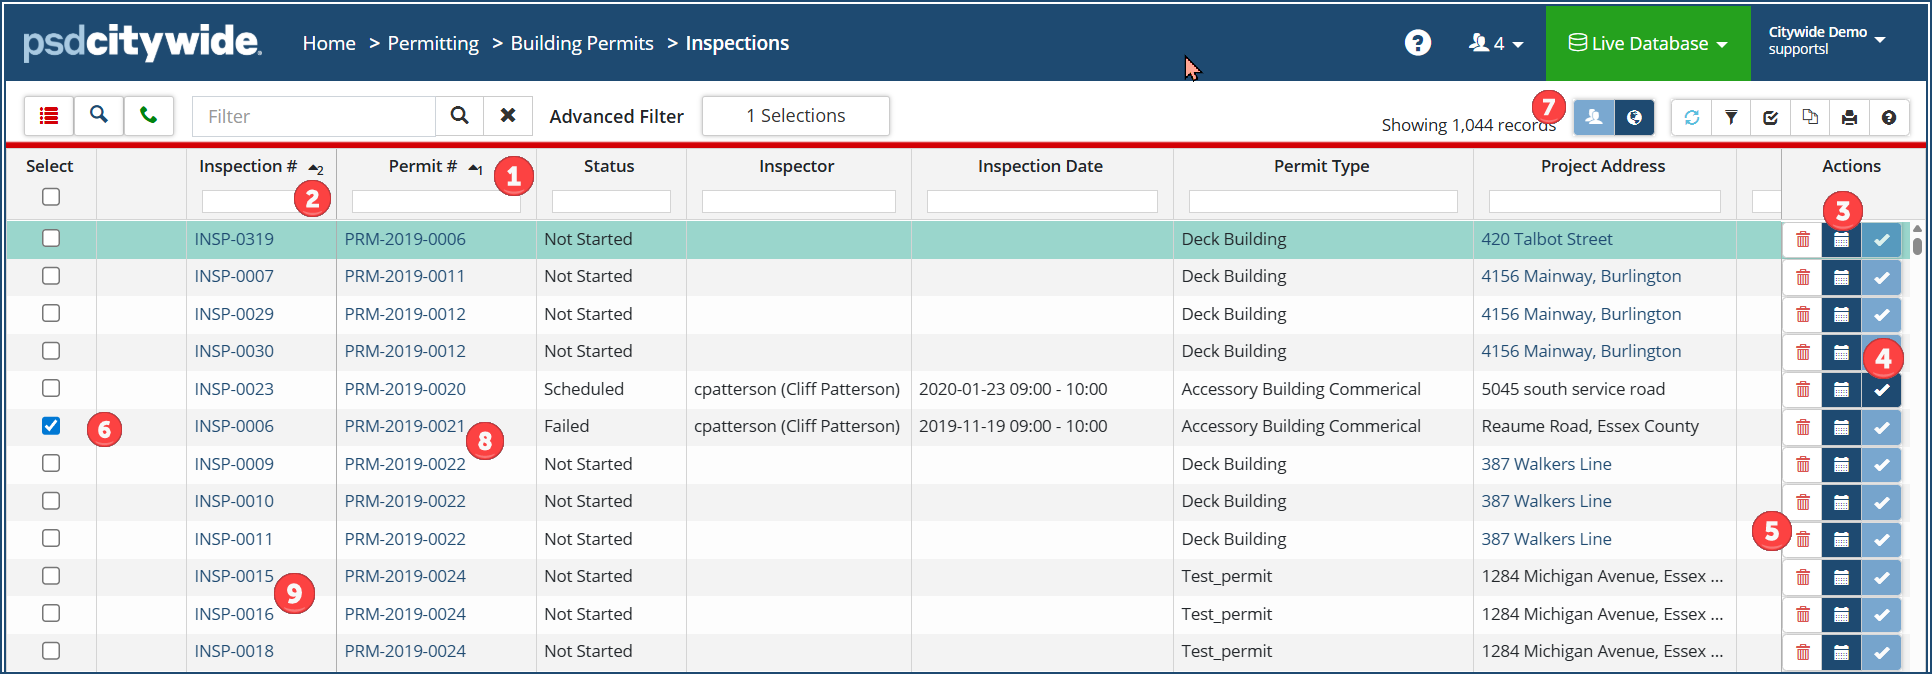
To schedule/re-schedule or cancel an inspection:
- Click on the calendar icon
 ❸ in the Actions column of the inspection. The Schedule Inspection dialog box appears:

- Click View ❶ to open the Inspection record.
- Select or re-assign an Inspector ❷.
- Set the Date, Start Time, and (anticipated) End Time ❸.
- Enter Comments ❹. (Comments can include any information that may be helpful to an inspector, who will be able to see them on the CW Mobile App).
- Click Apply ❺.
- Click Cancel Inspection ❻ to cancel the inspection. Inspection cancelation should not be confused with deletion. The inspection remains in the system; it is only vanquished from the schedule and its status returned to an unscheduled state.
To Complete an inspection:
- Click on the checkmark icon
 ❹. The Complete Inspection wizard appears, open on the Tasks tab:
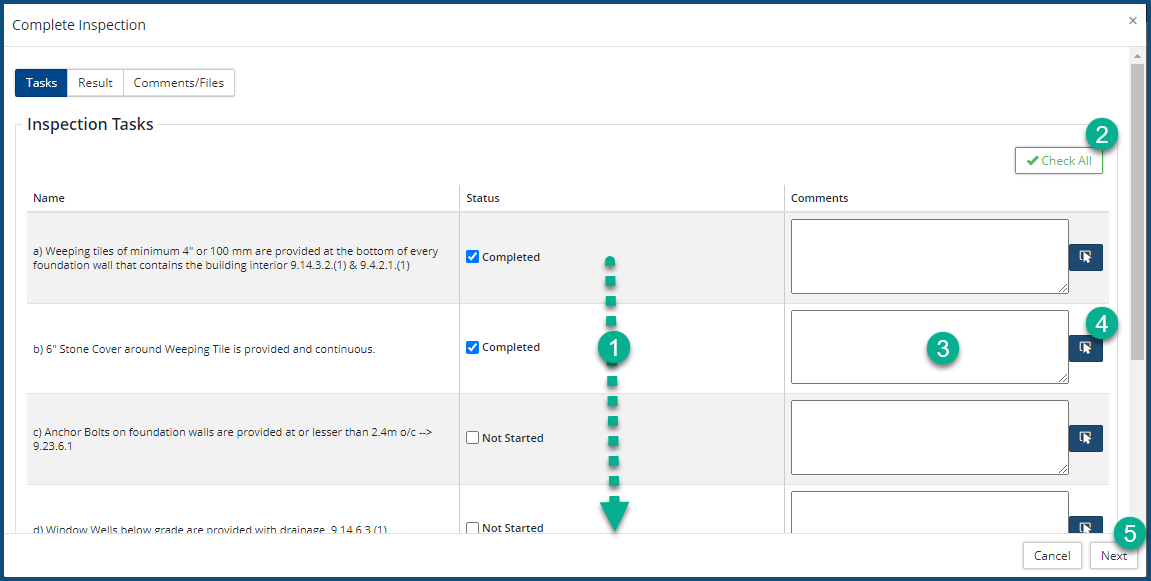
- Check ✅each of the completed tasks either individually ❶ or collectively ❷.
- Enter Comments ❸ and/or select Predefined Comments
 ❹ by clicking on the adjacent icon.
 - Click Next ❺. The contents of the Results tab appear:
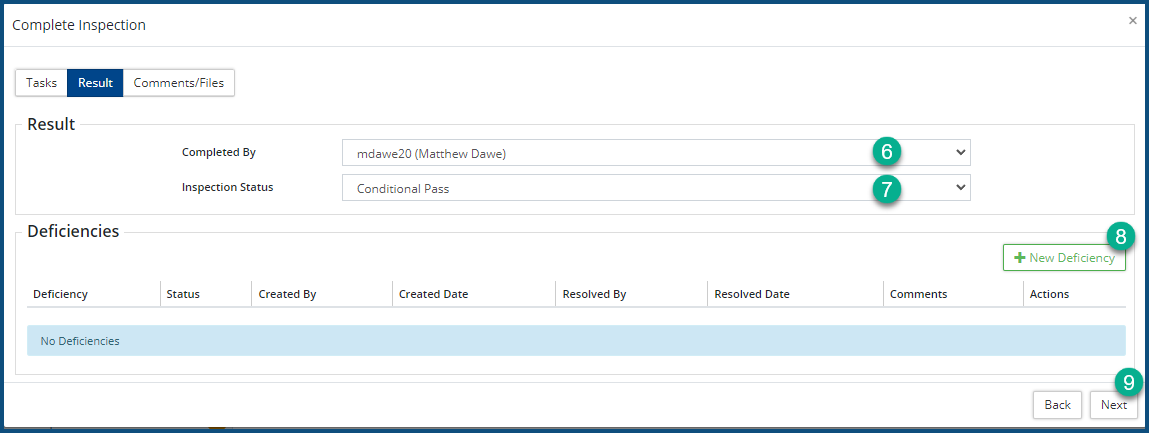
- Select the inspector(s) ❻ the inspection was Completed By.
- Select the Inspection Status ❼:
- Passed: indicated unqualified approval.
- Conditional Pass: indicated qualified or conditional approval, subject to correction of the Deficiencies added after clicking on + New Deficiency ❽.
- Failed: indicated unqualified disapproval on the basis of the Deficiencies added after clicking on + New Deficiency ❽.
- Click Next ❾. The contents of the Comments/Files tab appear:
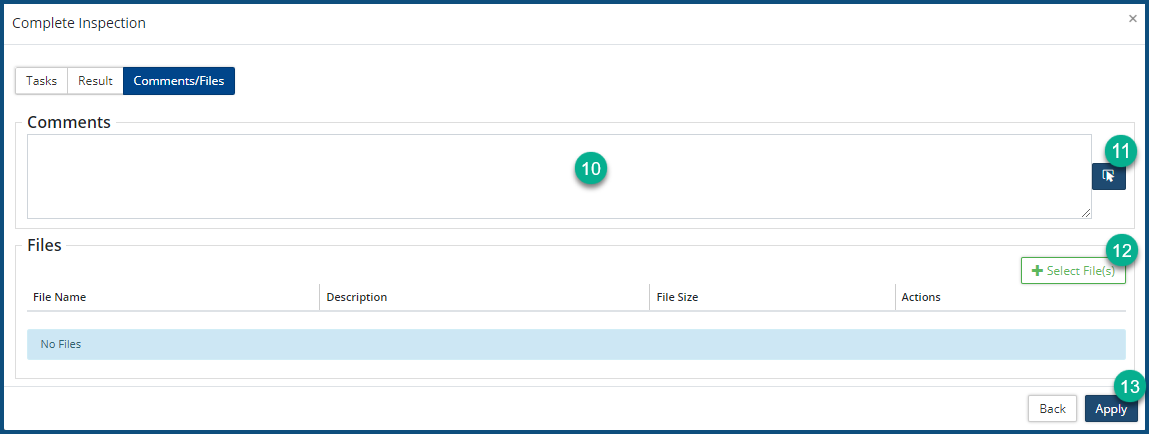
- Enter Comments ❿ and/or select Predefined Comments ⓫ by clicking on the adjacent icon.
- Click + Select File(s) ⓬ to add supporting information for the inspection results. These can be documents, videos, photos, etc.
- Click Apply ⓭.
To delete an inspection, click on the Delete icon ![]() ❺.
❺.
To reassign inspections from one inspector to another in bulk:
- Check ✅ ❻ the inspections. (The inspections must have a "Scheduled" status.)
- Click on the Bulk Reassignment icon
 ❼. The Bulk Reassignment dialog box appears:

- Select one or more Inspectors ❶ from the pull-down. To select more than one, hold down the CTRL key and click on additional choices.
- Click Apply ❷.
To open the Building Permit that is associated with an inspection:
- Click on the Permit number ❽. The Building Permit opens.
- Click here for information on building permits.
To view the Inspection record:
Details
- Click on the Inspection number ❾ in the Inspection # column. The associated Inspection record appears:
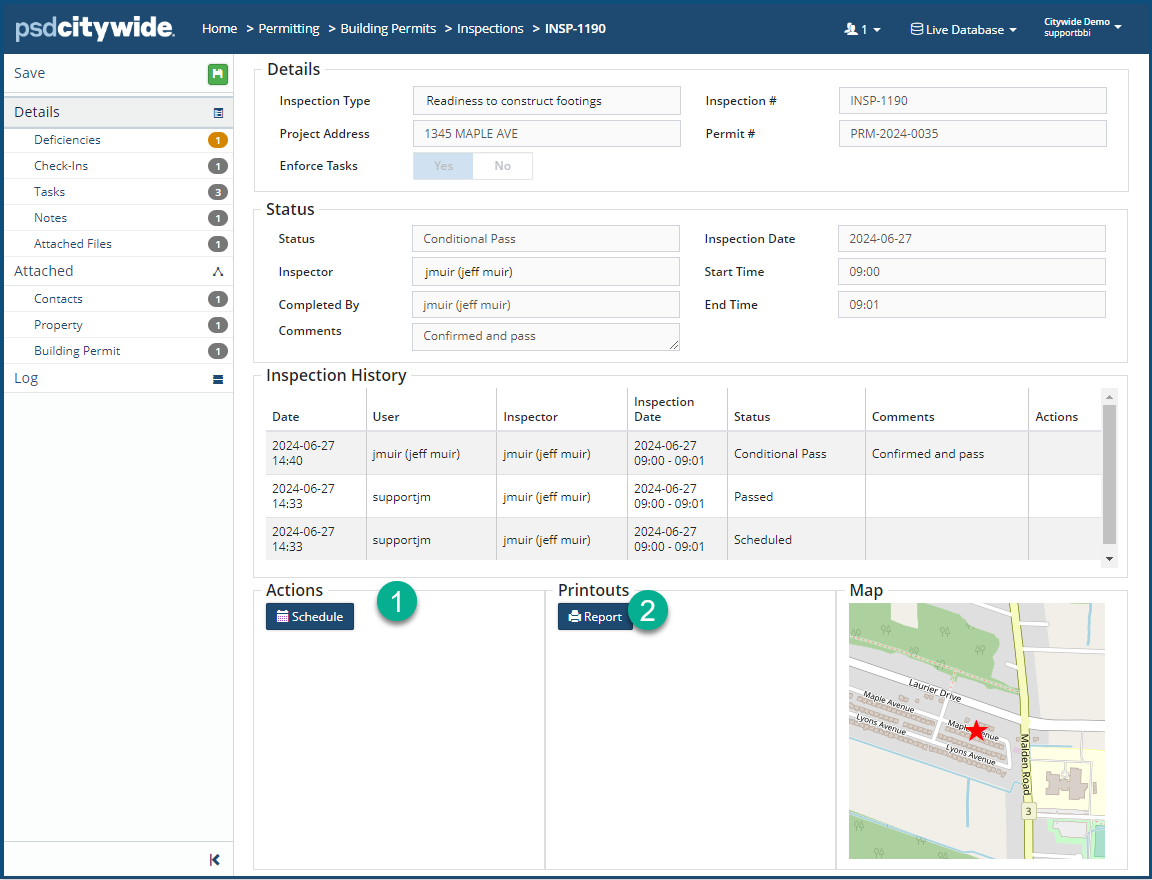
The information that appears in the fields here is strictly informational and cannot be edited. Specific types of information can, however, be modified through the use of the Action items that appear in the Actions box ❶ on the Details page and in various options within the Affiliate panel.
The Actions items that appears on the Details page depend on the current Status of the inspection. For example, Inspections whose status is:- Passed will not show any options in the Actions box.
- Not Started, Conditional Pass, Failed, or Cancelled will show Schedule in the Actions box.
- Scheduled will show Reschedule, Complete, and X Cancel in the Actions box.
- Click the appropriate Action ❶ button to effect the corresponding action.
- Click on Printouts/Report ❷ to produce a detailed up-to-date inspection report:
Inspection History
Inspection History shows the history for this single inspection in reverse chronological order. In the following example, the last three entries for this particular inspection appear. In this case, the history reflects the reassignment of inspectors as part of the history.
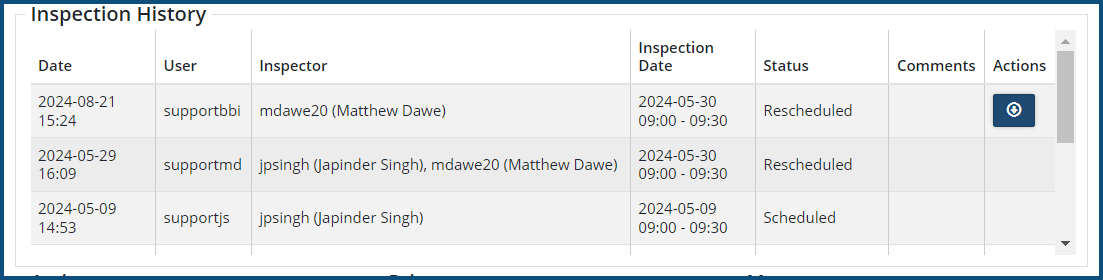
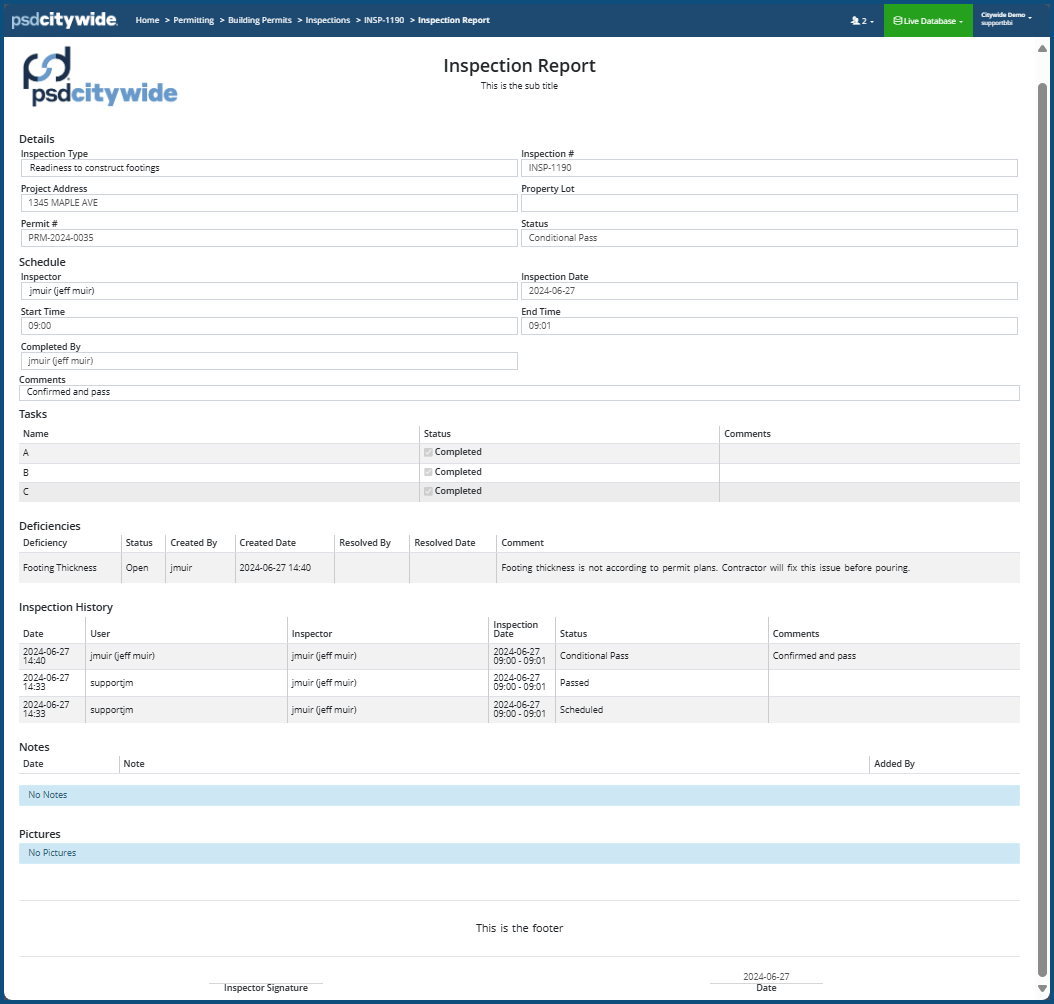
Clicking on the Actions icon ![]() will write a comprehensive historical report to a PDF file, along with all the details associated with the inspection. The PDF file can then be printed or attached to an email message. A sample report can be referenced from the Attachments section to the right.
will write a comprehensive historical report to a PDF file, along with all the details associated with the inspection. The PDF file can then be printed or attached to an email message. A sample report can be referenced from the Attachments section to the right.
Deficiencies
Deficiencies list all the deficiencies that have been recorded for the current inspection:
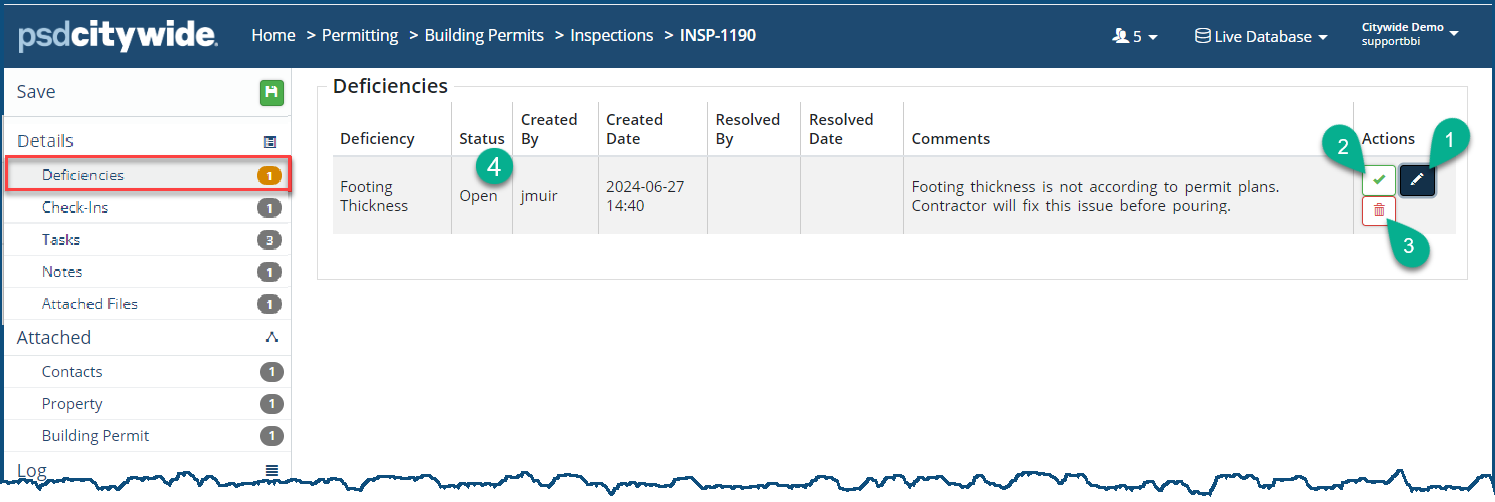
Click the Edit icon ![]() ❶ top edit the name of the deficiency.
❶ top edit the name of the deficiency.
Click the Checkmark icon ✅ ❷ to resolve the deficiency. The Resolve dialog box appears:
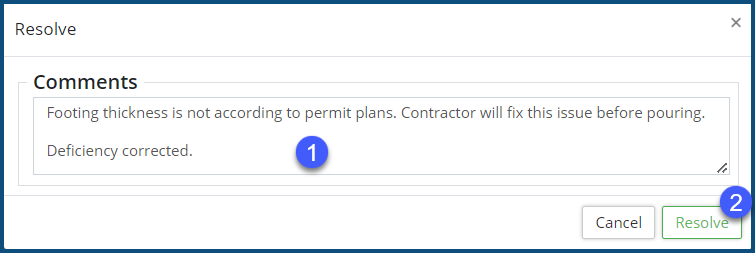
- You can add a comment to the already documented deficiency in the Comments ❶ field (optional) .
- Click Resolve ❷. The Status ❹ for the deficiency will change from "Open" to "Resolved."
Click the delete icon ![]() ❸ to delete the deficiency.
❸ to delete the deficiency.
Check-ins
Check-ins show the dates and amount of time taken to perform the inspection.
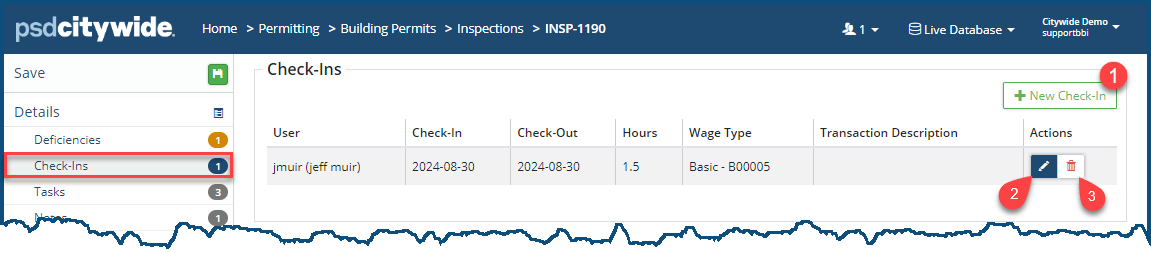
To add a new Check-In item:
- Click on + New Check-In ❶. The New Check-In dialog box appears:
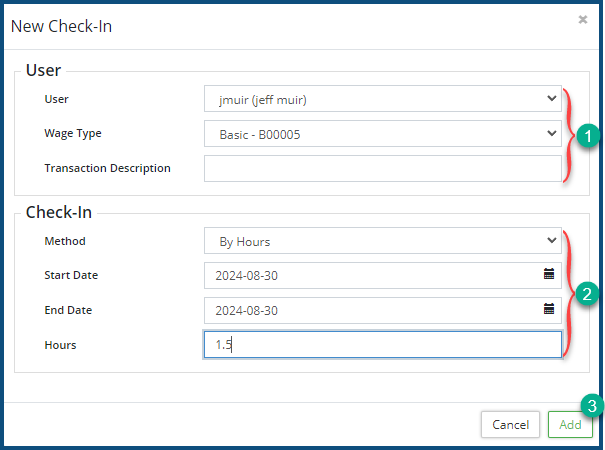
- Select the User, the Wage Type, and enter a Transaction Description ❶.
- Select the Check-in Method : Either "By Hours" or "By Time"
- If you've chosen By Hours:
- Enter the Start Date, End Date, and Hours ❷.
- If you've chosen By Time, the fields change:
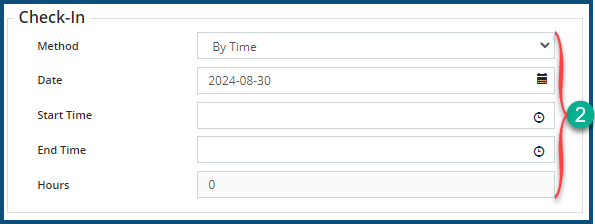
- Enter the Date, Start Time, End Time, and Hours ❷.
- If you've chosen By Hours:
- Click Add ❸.
Click the Edit icon ![]() ❷ to edit the Check-in.
❷ to edit the Check-in.
Click the Delete icon ![]() ❸ to delete the deficiency.
❸ to delete the deficiency.
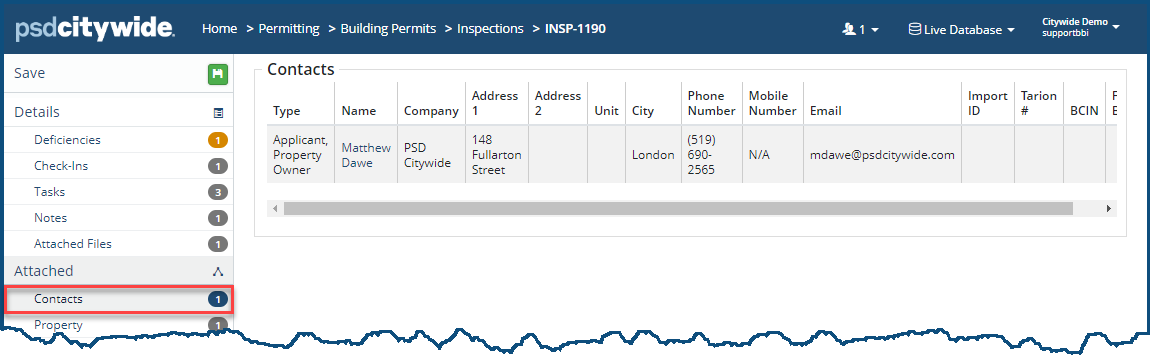
Contacts
Contacts simply shows all the contacts and essential information about each of the contacts. Contacts cannot be edited or added here. This page is simply informational.
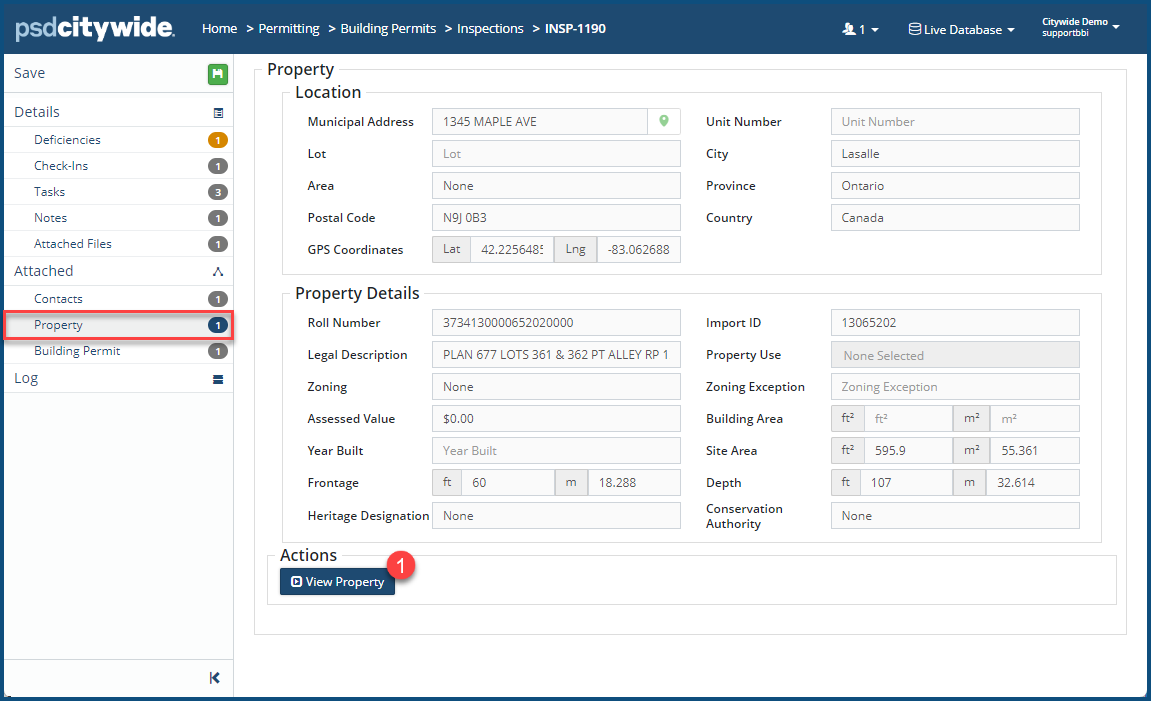
Property
Property simply shows essential information about the inspection property. The property information cannot be edited, amended, or augmented here. This page is simply informational. Clicking on the View Property ❶ button to view/edit the Property (if your account permits it).
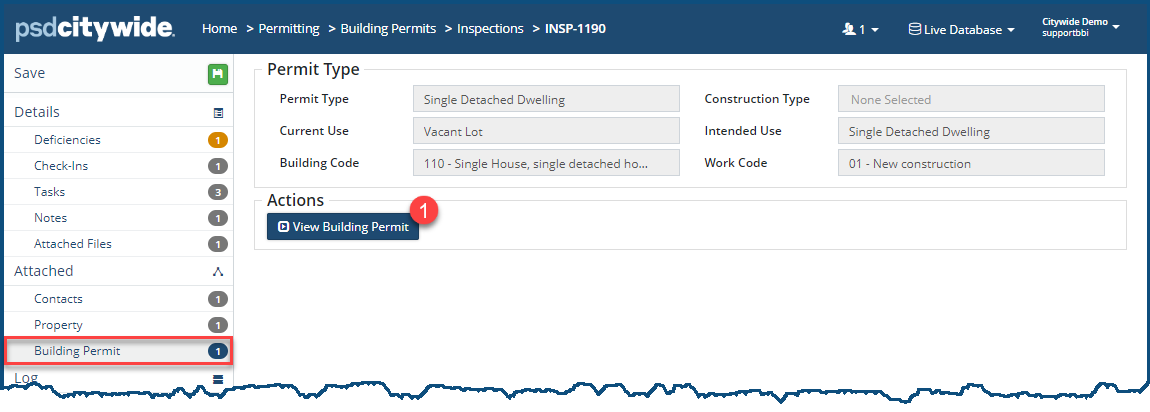
Building Permit
Building Permit simply shows essential information about the building permit associated with the inspection. The building permit information cannot be edited, amended, or augmented here. This page is simply informational. Clicking on the View Building Permit ❶ button to view/edit the Building Permit (if your account permits it).
Log
The log displays all activity in the system that relates specifically to Building Inspections. Its events appear in reverse chronological order, displaying the user who initiated the event, as well as specific description of the event.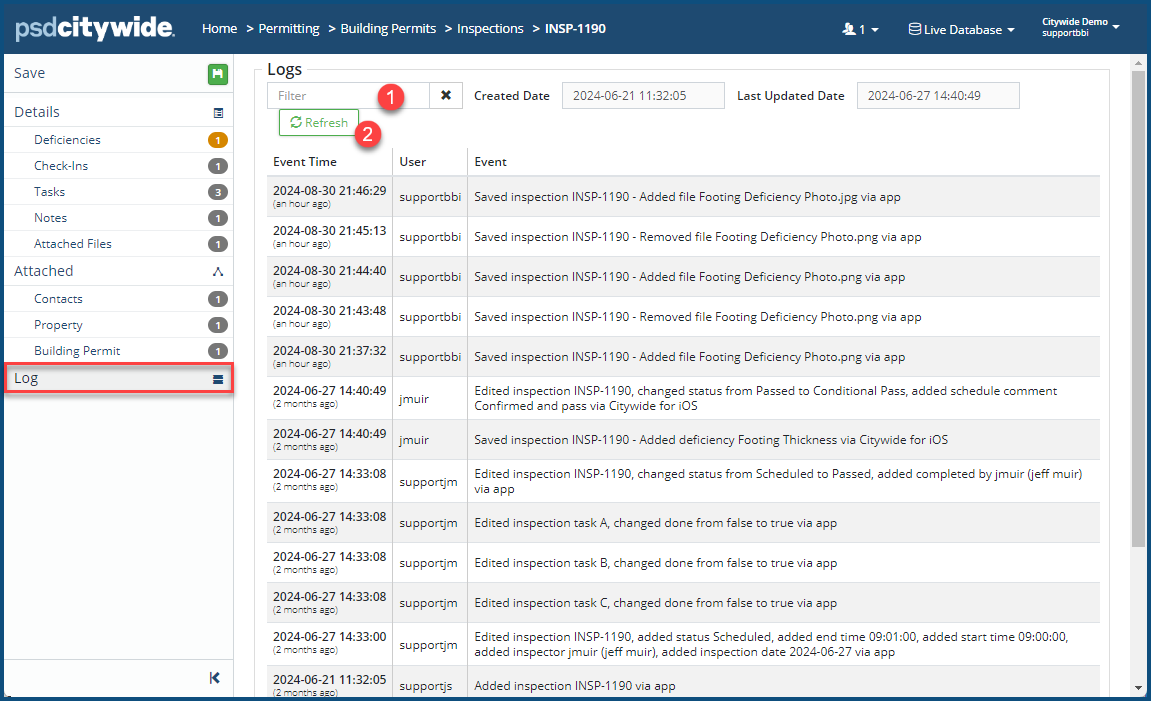
- Enter the text in the Filter box ❶ to filter the list down to the its matches.
- Click Refresh ❷ to see any entries that have been logged since this screen has been opened.


