Overview
Configuring Work Order Types provides a way to track:
- The type of labour performed
- Determine work priorities
- Assign a critical rating to each WO
Gathering and analyzing data about a work order type enables users to determine whether it’s best to replace or repair an asset.
Navigate to Home > Maintenance > Work Flow > Work Order Types
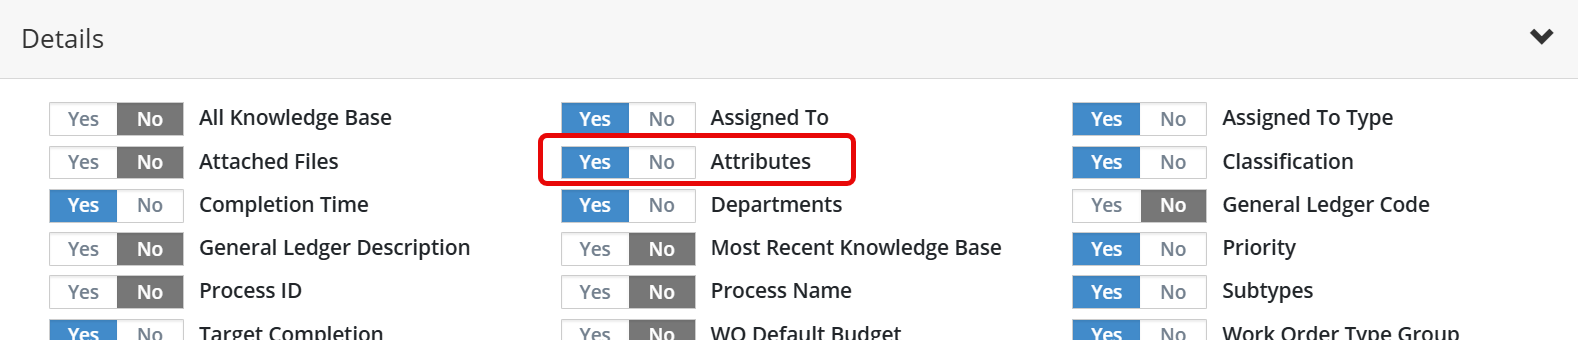
On the Work Order Type grid, customize columns allows users to select additional columns to display, such as Attributes.
Work Order Type Groups
Citywide Maintenance has another level of hierarchy for Work Order Types called Work Order Type Group. As a default, all existing work order types are associated to the Default work order group.
The table below shows an example of how to configure the work order types hierarchy to best suit your organizational, operational, and reporting needs:
| Department | Work Order Type Group | Work Order Type | Work Order Subtype |
|---|---|---|---|
| Public Works | Water | Water Quality Investigation | Region |
| Public Works | Water | Water Quality Investigation | Township |
| Public Works | Water | Watermain Break | |
| Public Works | Water | Water Service Line Replacement | Private, not billable |
| Public Works | Water | Water Service Line Replacement | Public, not billable |
| Public Works | Roads | Pothole Repair | |
| Public Works | Roads | Sign Repair | Regulatory |
| Public Works | Roads | Sign Repair | Information |
| Public Works | Roads | Patching |
To create a new work order type group:
- Click Manage Group on the Work Order Types screen to edit or add new groups.
- Click +New Group. Enter a Name.
- Click Add.
- When searching, use the Work Order Type Group filter to quickly filter the grid by a specific WO type group.
To create a new work order type:
- Click +Add on the Work Order Types
- Enter a name and select Work Order Type Details, GL Codes, Assigned To and set Options as needed.
- Click Add.
Details
Once a new WO type has been created and added, it opens on screen. Edits can be made as needed. The Details screen will show general information related to the WO, such Name, Department(s), GL Codes, Work/Activity Code, Classification, Priority, etc.
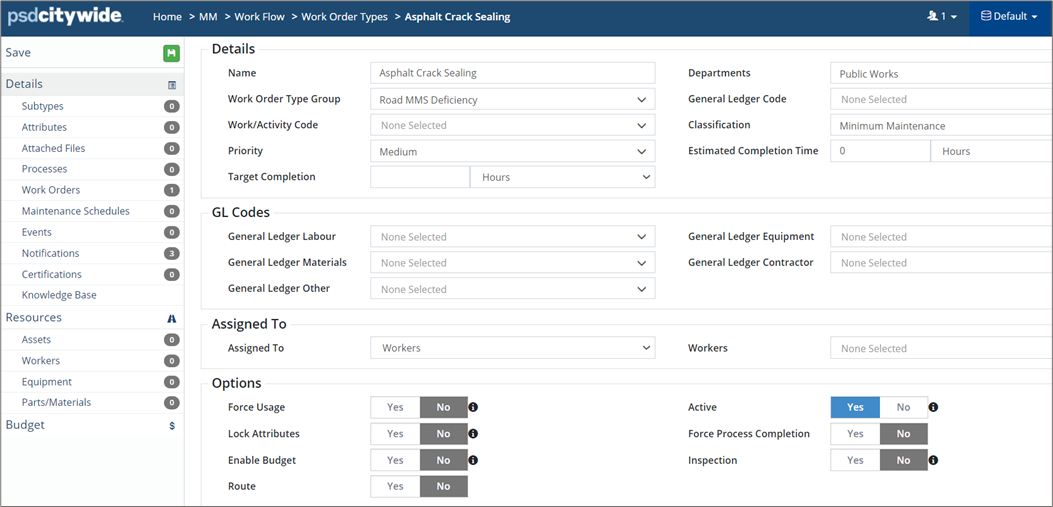
To modify details:
- Click a field, and type or select an option(s).
- Click Save to submit your change(s).
Subtypes
Work Order Subtypes provides another level of hierarchy for Work Order Types.

To setup a new Subtype:
- Click +New Subtype on the Subtypes
- Enter a Name and click Add.
Attributes
Attributes are used to collect additional information related to the work order and are set at the work order type level to ensure consistency. All Attributes saved to a specific Work Order Type are automatically appended when new WOs are created. See "Attributes" above for more information.

Attached Files
The Attached Files screen is used to upload and attach digital files to the Work Order Type. These files will be available on work orders created of the specific Work Order Type. Users with applicable permissions can also delete attached files.
Processes
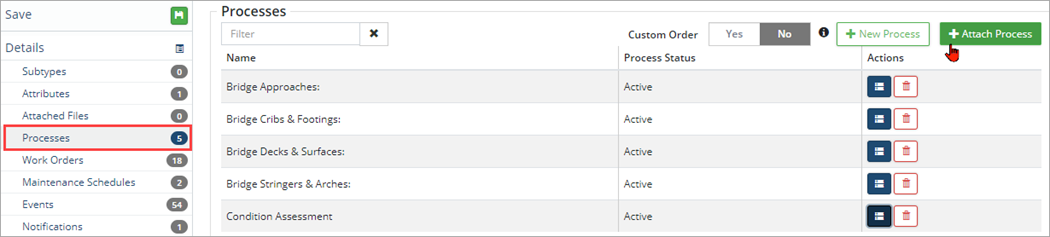
Processes are setup in advance and added to Work Order Types as needed. In the screenshot below, five Bridge inspection processes have been attached to the Work Order Type. The order of the processes can be changed by using Custom Order toggle. The tasks within each process can be viewed by clicking on the blue 'Show Tasks' icon under actions.
Work Orders
The Work Orders screen provides a summary of all the work orders that have been created from the current work order type.

Maintenance Schedules
The Maintenance Schedule screen provides a summary of all the maintenance schedules that have been created for the current work order type.

Events
The Event screen provides a summary of all events created for the current work order type.

Notifications
The Notifications screen lists all notifications linked to the current work order type.
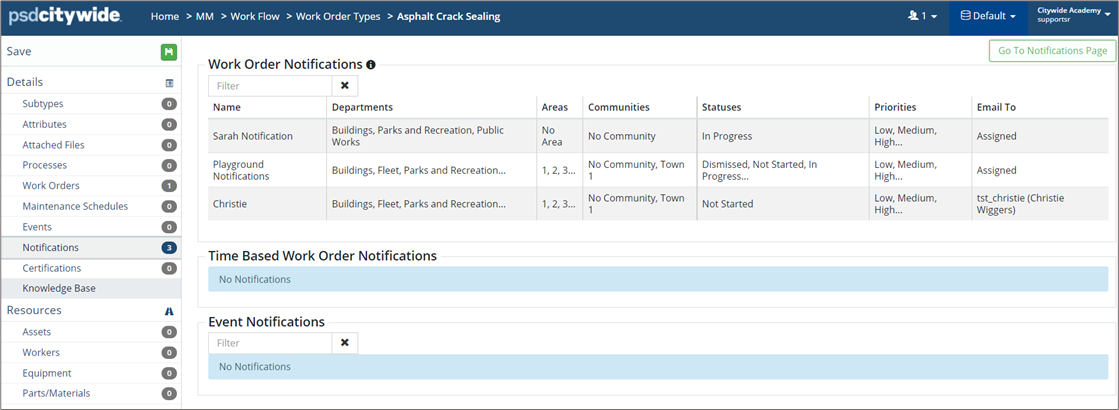
To add a notification:
- Click Go To Notifications on the Notifications screen. You’ll be navigated to Maintenance 🢡 Work Flow 🢡 Notifications. Hover over
 to see a description of the different notification types.
- To add a new work order notification, click +Add Work Order Notification and complete the New Work Order Notification. Click Add.
- To add a new time-based work order notification, click +Add Time Based Work Order notification. Complete the New Time-Based Work Order Notification. Click Add.
- To edit an existing notification, click Edit
 beside the notification rule and say, add the work order type to the existing selection in the Work Order Types field. Click Save.
Certifications
The Certifications screen provides a summary of all the certifications that have been linked to the current work order type.
- To add a certification to a work order type where applicable, click +Attach Certification.
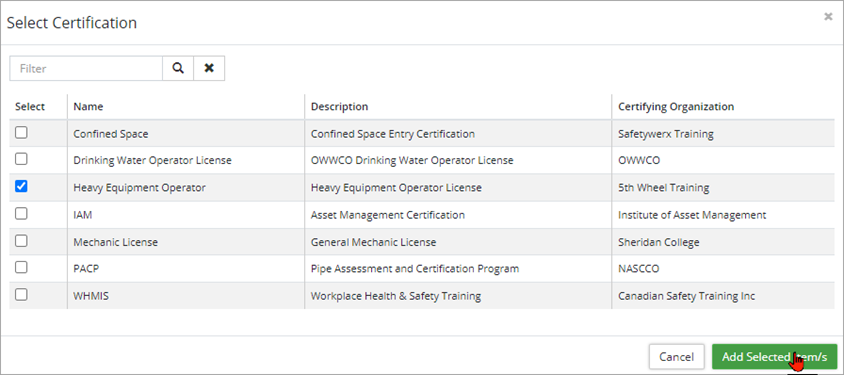
- Use the Select column to check þ the appropriate certification(s). Use the Filter to narrow down the list of options.
- Click Add Selected Item(s).
- Click Save.
Knowledge Base
The Knowledge Base screen is used to add important information, instructions, or specifications regarding the current work order type. This information is saved in the Work Order Type, and used by staff when creating or completing work orders of this type.
To create a knowledge base entry:
- Click +New Knowledge Base Entry. Enter a Note.
- Click Save.
Resources
The Resources section is used to attach Assets, Workers, Equipment and Parts/Material as needed for the current work order type.
Assets
Users with the appropriate permissions can link a work order type to one or more Assets.
To select/modify asset selection:
- Click +Attach Assets.
- Search for asset(s) using the Text Search, Category/Segment, Department, or Asset Groups drop-downs and click on the Search You can also select assets directly from the map by clicking Map 🢡 Select from the Map.
- You can also use a generic search to find your assets
- Use the Select column to check þ each asset(s).
- Click Add Selected Asset(s).
- Click Save to submit your change(s).
Workers
The Workers screen lists all workers that have been added to the work order type. Depending on permission settings, users may also be able to view worker details. Workers, Crews, and Vendor/Contractors are added on the Details screen.
Equipment
Users with the appropriate permissions can link a Work Order Type to one or multiple pieces of Equipment; this allows us to track costs. To select/modify equipment selection:
- Click the + Attach Equipment button
 .
.
Optional: Search for equipment using the Equipment Groups drop-down.
- Use the Select column to select the corresponding equipment.
- Finally, click on the Add Selected Item(s) button
 .
. - Click the Save icon
 to submit your change(s).
Parts/Materials
Users with the appropriate permissions can link a Work Order Type to Parts and Material; this allows us to track our inventory, costs, etc. To select/modify material selection:
- Click the + Attach Material button
 .
.
Optional: Search for material using the Material Groups drop-down.
- Use the Select column to select the corresponding parts/material.
- Finally, click on the Add Selected Item(s) button
 .
. - Click the Save icon
 to submit your change(s).
Note: you can also create New Material ![]() from this screen.
from this screen.
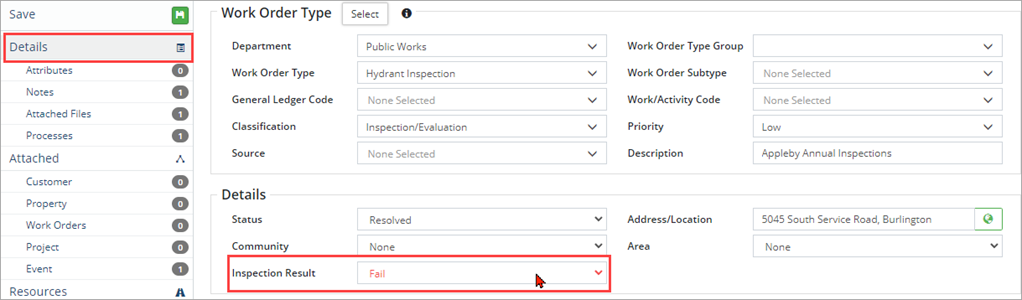
Inspection Work Order Type
An Inspection Work Order is created when the Inspection Flag is set to Yes on a new work order type or on the Details screen for existing work order types. Inspection work orders force process completion meaning that the status of the work order can’t be set to completed until all tasks within the linked process(es) have been marked complete.

When the Inspection flag is set to Yes, the Force Process Completion flag automatically sets to Yes. This means that the inspection can’t be completed until the set of required processes/tasks have been completed by the worker. A Process(es) must be attached to an Inspection WOT.
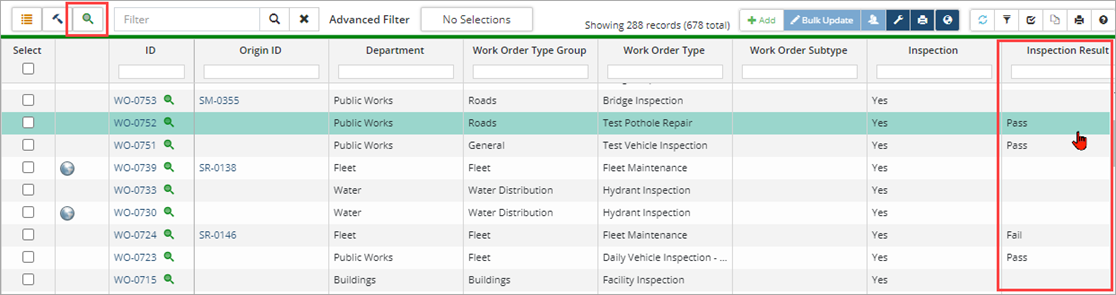
Inspection Result based on the completed processes displays on the Details page of the work order and will show a Pass or Fail based on whether the attached process is passed or failed. Processes can be configured to have inspection tasks which can be assigned a Pass or Fail result.
The WO grid can be customized to include the Inspection Result column. Click ![]() to filter the grid by inspection work orders.
to filter the grid by inspection work orders.
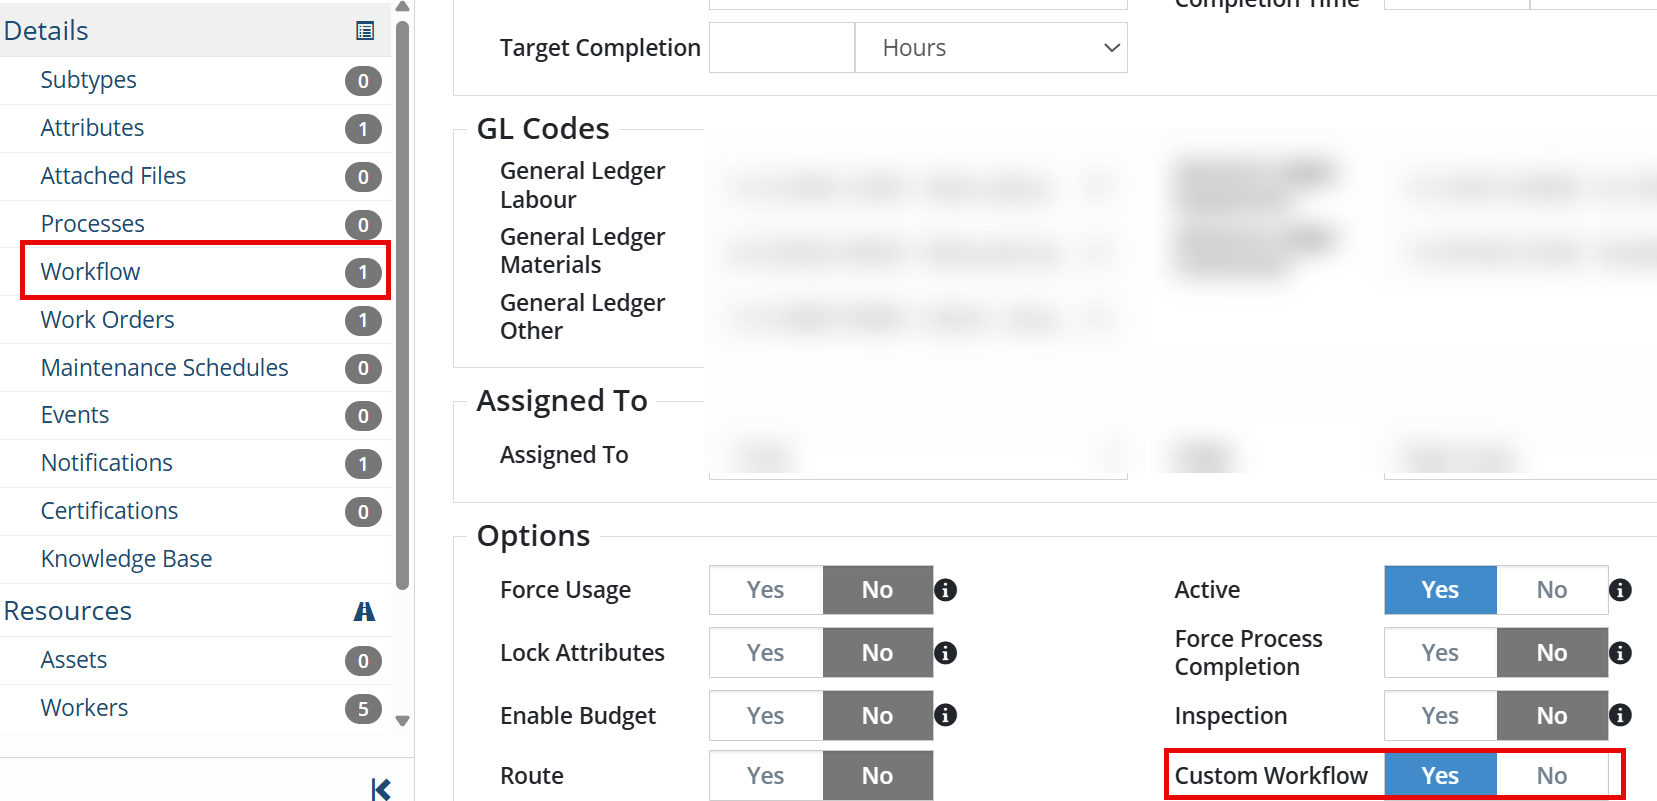
Custom Workflow
Within a Work Order Type, the Custom Workflow option allows you to define a Work Order status list. The Workflow section within Details allows you to Attach a Work Order Status. *Note: by default, Not Started is selected. Dismissed and Completed status are required.