
Overview
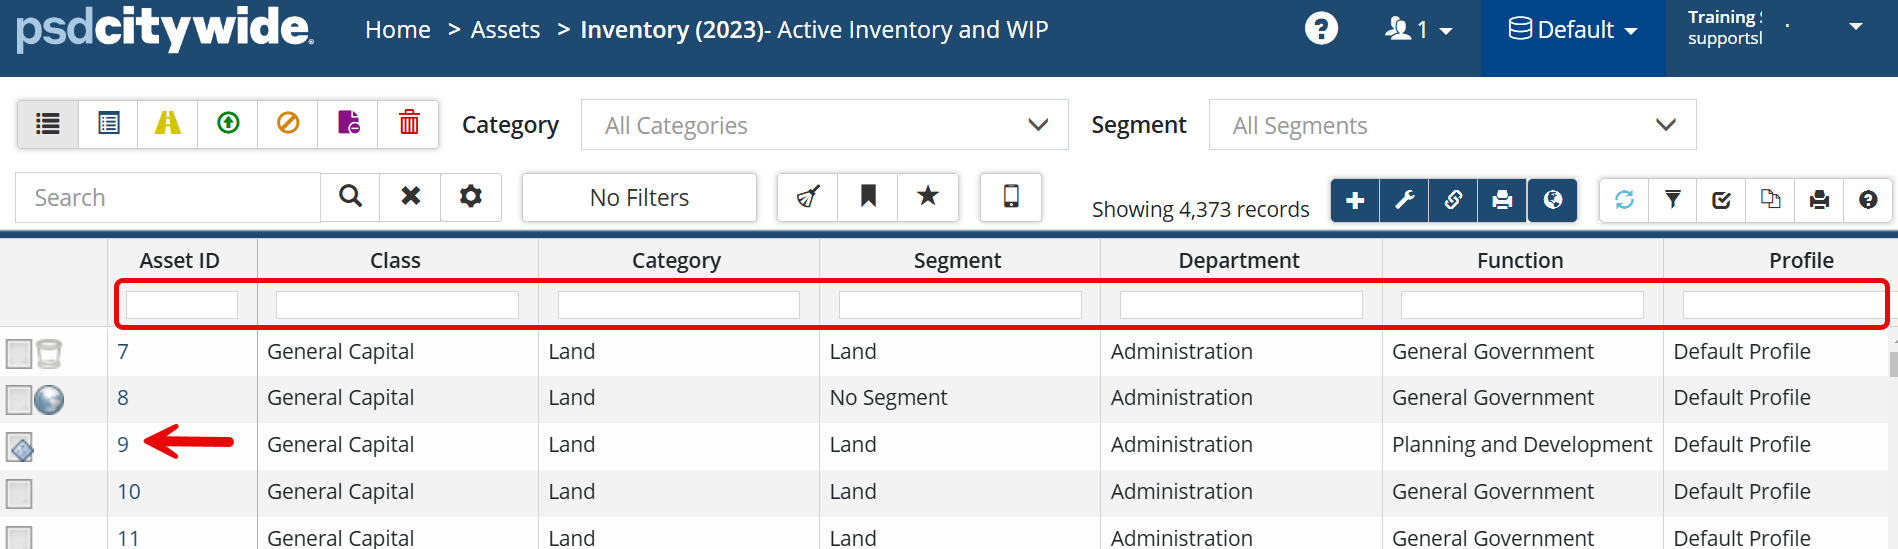
In Citywide, Assets appear in a list in the Inventory grid. It is from this list that all the data associated with individual assets can be viewed, managed, and updated. To access an individual asset's information, search the inventory grid using the filter box in the desired column to locate the asset, then click its Asset ID #. The Asset ID column is the only column from whose links you can open the asset details view.
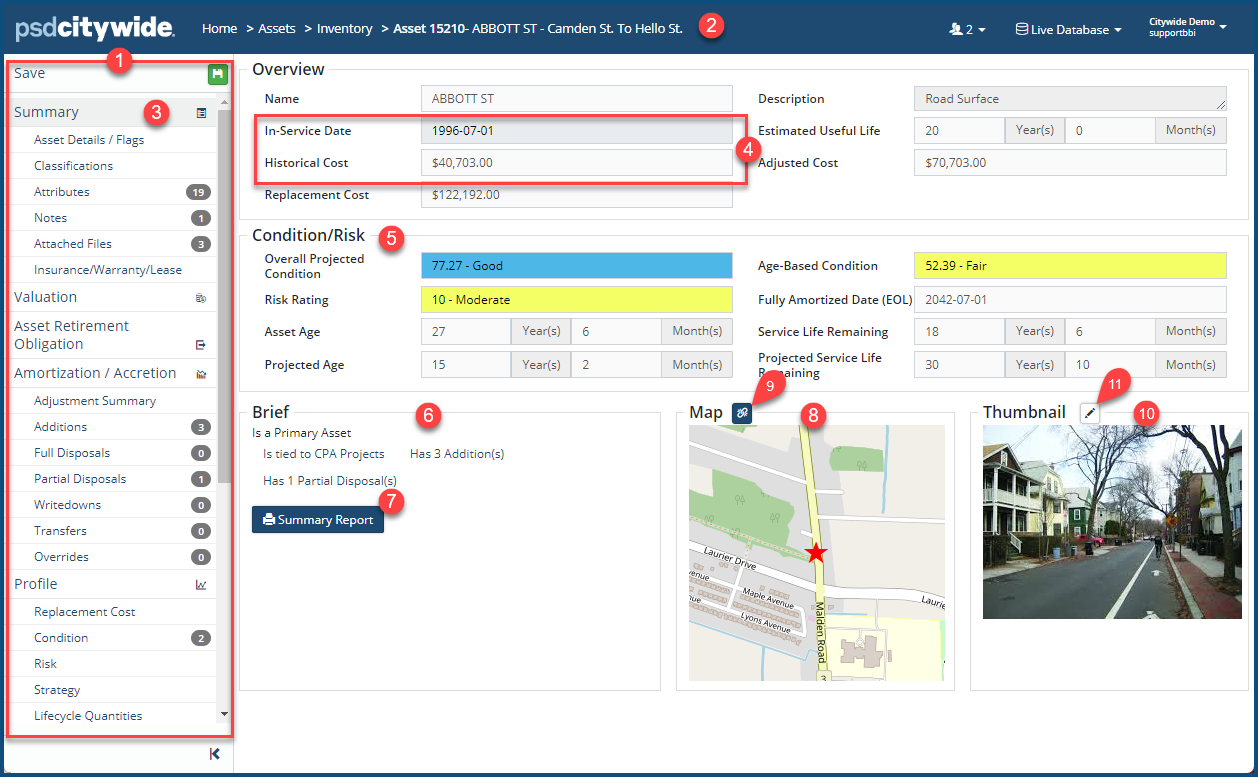
Once in the Asset View, the Affiliate panel ❶ appears on the left, which provides access to all the data related to the selected asset. The Asset ID, the Name, and location (if entered) of the asset ❷ appear in the banner, where they are always visible.
The Summary Page
Asset Views always default to the Summary Page ❸, which displays summary data concerning the current asset in read-only form. It shows when the asset went into service, the historical cost and estimated useful life ❹, as well as the overall condition, risk rating and service life remaining of the asset ❺. The Brief box ❻ contains various incidental types of information, as well as a launching button for the Summary Report ❼,which shows a summary of the asset detail that include classifications assigned to the asset, amortization, any TCA adjustments or ARO details, as well as attribute information.
Link to GIS
If the asset is linked to a GIS feature then a linked map appears in the Map box ❽; click to navigate into the GIS viewer and view the asset's location on the map. If the asset is not linked and an integration with GIS exists, you can link it. To do so:
- Click Link to GIS feature icon
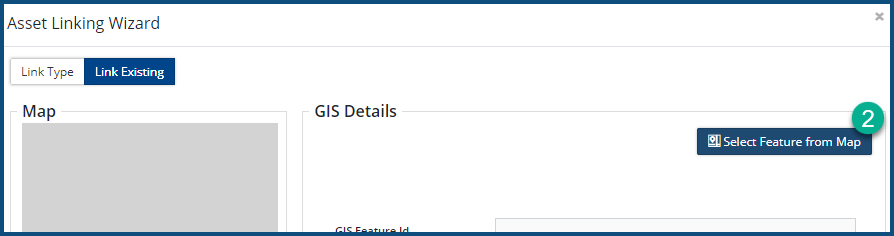
 ❾ to access the Asset Linking Wizard.

- Click Link Existing ❶ and then Select Feature from Map ❷. A map of your jurisdiction will appear.
- Select a map Layer from the legend on the right to display all assets assigned to the layer. If needed, zoom into an area to locate your asset.
(Refer to the Map Window section of GIS Viewer for further instructions on selecting the map and the various layers on the map)
- Click the Map Select Tool (at the top left) and then click an asset on the map. In the Attributes table below, view the AM_ASSET column to see if the asset is linked/not linked.
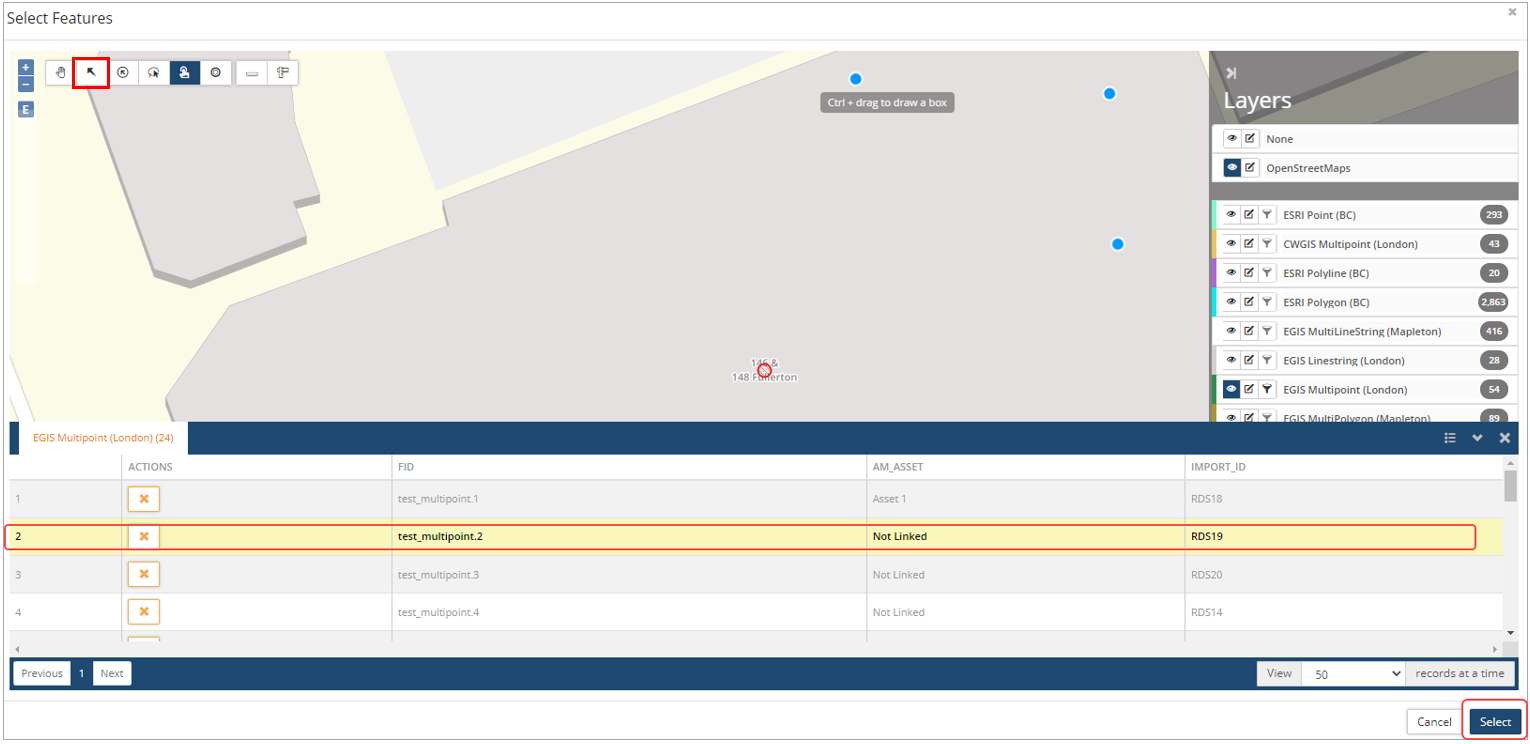
5. If not linked, highlight the asset in the Attributes table and click Select. This will return you to the Asset Linking Wizard.
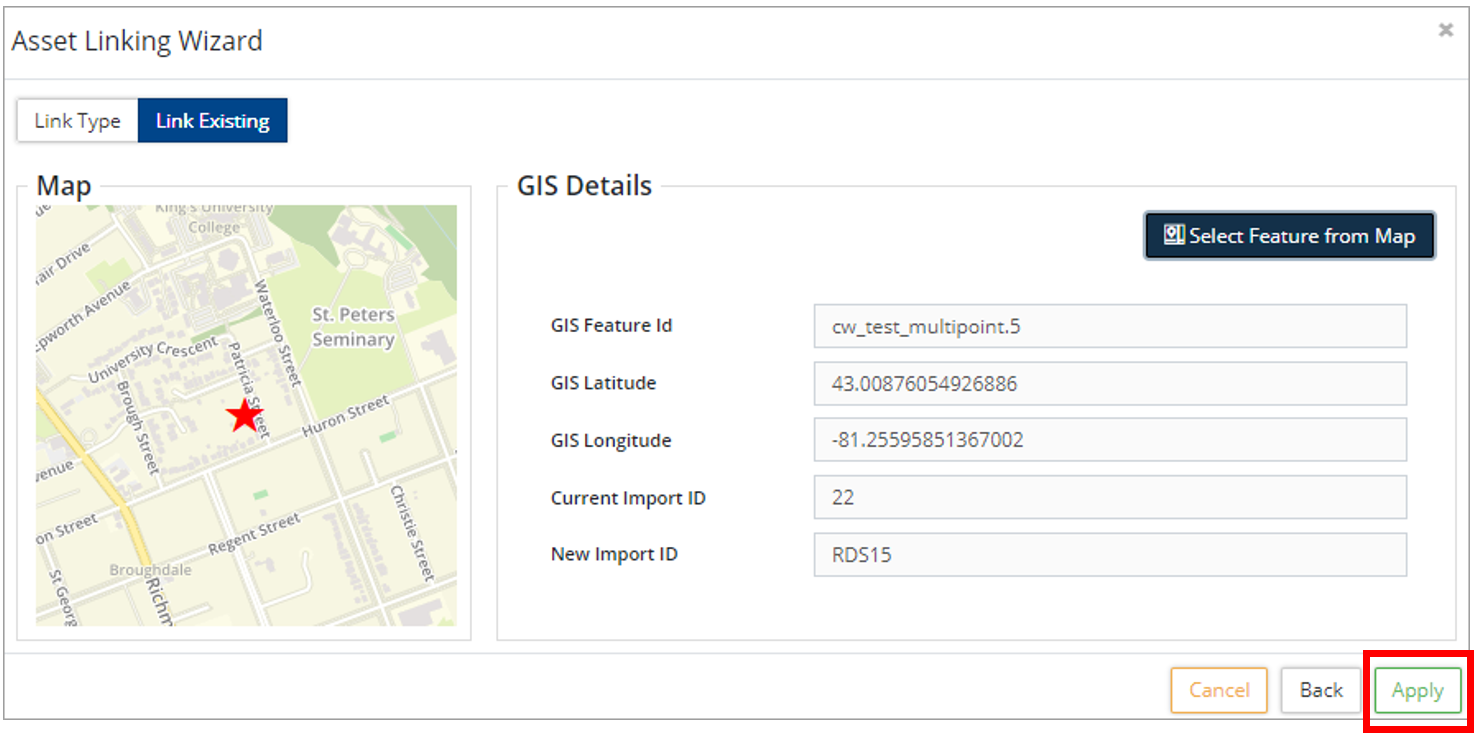
6. Click Apply to save your changes.
Add a Thumbnail Image
Finally, you can insert a image of the asset in the Thumbnail box ❿, or change the existing image. In both cases, you will be choosing an image that has already been attached to the current asset through the Attached Files option in the Affiliate panel. Once an image has been attached to the asset it can be added as a thumbnail here. To do so:
- Click Set File as Thumbnail
 ⓫ icon. The Set Thumbnail dialog box appears:
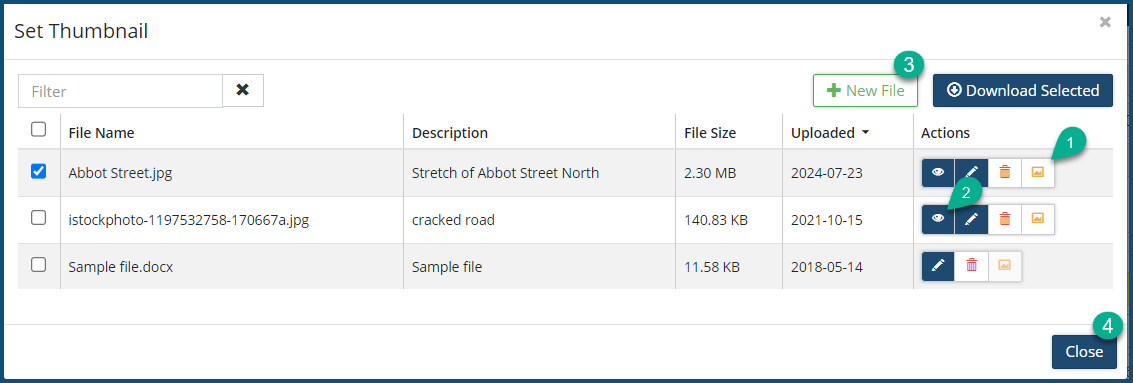
- Click on the Set Thumbnail ❶ icon to insert the image.
- Click on the Preview icon ❷ to preview the image.
- Optional: To upload a new file, click + New File ❸ and upload (select or drag-and-drop) a new image. (Citywide supports JPG, JPEG, GIF, and PNG file types.)
- Click Close ❹.
Asset Details/Flags
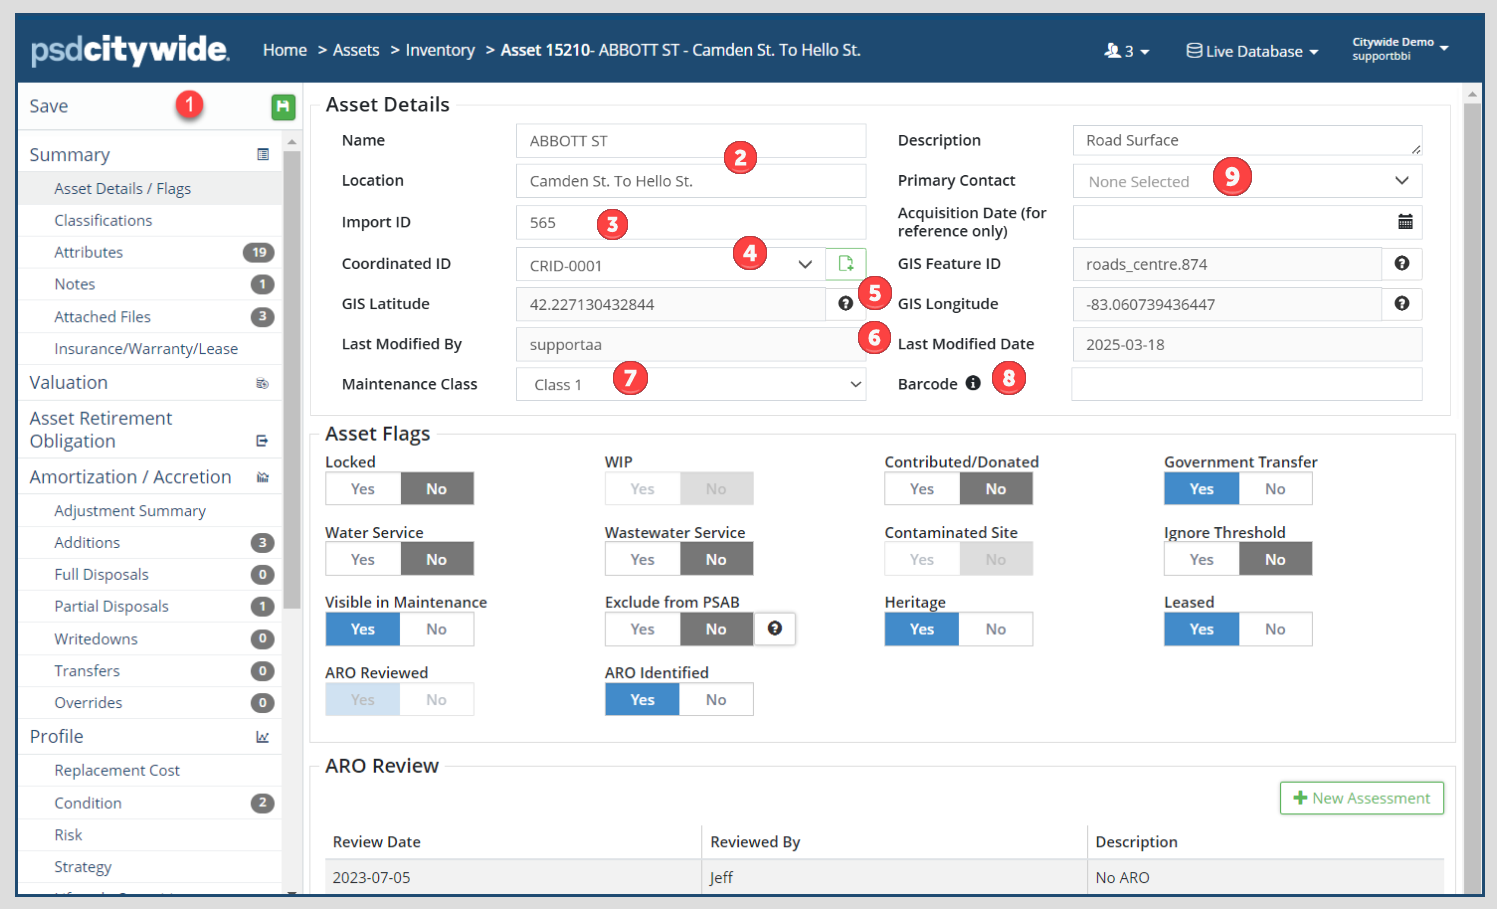
General information on an asset is captured in the Asset Details/Flags screen. Users with edit level permissions can modify fields such as Name, Location, Description and assign Asset Flags as needed. Click Save ❶ to apply any changes made on the asset.
Asset Details
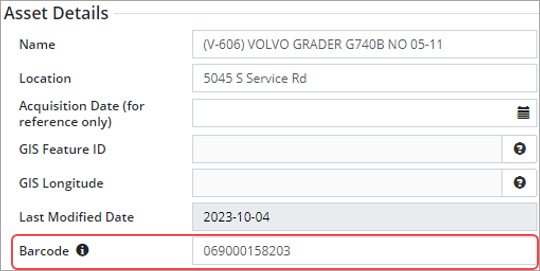
The Name, Location, and Description fields are used to identify the asset. Searches can be performed on these fields in the Inventory grid. The Name and Location fields appear in the banner ❷ at the top, which is always visible when in the asset view.
The Import ID ❸ field is an identifier and can also be a linking key within a GIS asset layer.
The Acquisition Date is for reference purposes only and is often the date that the asset was acquired. (The In-Service-Date found on the Valuation screen is used to start amortization in Citywide.)
Coordinated IDs ❹ are an asset management tool used to group co-located assets for reporting purposes. For example, different segments of a road can be grouped with its nearby sublinear assets so that condition, risk, and capital replacement reports can be generated for the group.
To add a Coordinated ID:
- Click the Coordinated ID ❹ dropdown and select an ID.
- If the dropdown list is empty, click
 to add a Coordinated ID.
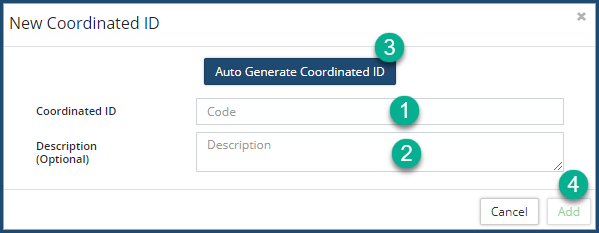
- Enter a code in the Coordinated ID ❶ field. Coordinated IDs can contain letters, numbers, special characters or spaces.
- Alternatively, click Auto Generate Coordinated ID ❷ and the system will add a new alphanumeric ID starting with CRID-0001.
- Enter a Description ❸ (optional).
- Click Add ❹.
- Click Save at the top left of the affiliate panel to apply the change.
Coordinated IDs are managed on the Assets landing page (Home ð Assets: Manage).
GIS Feature ID, GIS Latitude, and GIS Longitude ❺ are set automatically when the asset is linked to GIS. These fields cannot be edited.
Last Modified By and Last Modified Date ❻ shows when the asset data was last modified and by which user. The data in these fields are system generated and cannot be edited.
Maintenance Class ❼ is available for use on Road assets to identify the road class for Citywide Maintenance and Route Patrol modules.
The Barcode field ❽ is used for barcode scanning to identify the asset. If an asset with a barcode is linked to equipment in the Maintenance module, the asset barcode will be shared, and any changes to one will affect the other. Supported barcodes include UPC-E, CODE39, EAN13, EAN8, CODE93, CODE128, PDF417, QR, AZTEC, ITF and DATAMATRIX barcode types.
Primary Contact ❾ Select a primary contact for this asset from the drop down list of Citywide users.
Asset Flags
Asset flags are used to tag and group assets for reporting purposes. The following table lists all available flag properties:
| Flag | Description |
| Locked | Prevents any edits to the asset. Only admin users can unlock the asset. |
| WIP | Work-in-Progress (WIP) assets incur costs but are not being amortized because they are not yet in-service (i.e., a construction project). WIP assets display with a yellow rectangular icon in the inventory view. |
| Contributed/Donated | Include the asset when generating a Contributed/Donated financial report. |
| Government Transfer | Include the asset when generating a Government Transfer financial report. |
| Water Service | Include the asset when generating a Water Service financial report. |
| Wastewater Service | Include the asset when generating a Wastewater Service financial report. |
| Contaminated Site | Include the asset when generating a Contaminated Site financial report. |
| Ignore Threshold | Use to ignore a Capitalization Threshold. For example, if an asset such as a phone or laptop is purchased in multiples, individually the asset is below the capitalization threshold but when grouped together the amount is higher. Apply the Ignore Threshold flag when adding the asset to the Inventory so it doesn’t aggregate when reporting. |
| Visible in Maintenance module | The asset is visible in the Maintenance module. (Only applicable for clients using Maintenance). |
| Exclude from PSAB | Assets with this flag will not be included in financial reports. |
| Heritage | Include the asset when generating a Heritage financial report. |
| Leased | Include the asset when generating a Leased financial report. |
| ARO Reviewed | Under PS 3280 all assets will need to be reviewed and an Asset Retirement Obligation determined. Use this flag to identify those assets that have been reviewed. Note: Once the flag is set to Yes and the asset saved, it cannot be toggled off. |
| ARO Identified | Use this flag to identify and report on assets with a retirement obligation. Note: This flag activates once the asset is reviewed and the ARO Reviewed flag is set to yes. |
Classifications
The Classifications page displays all classifications assigned to an asset such as Class, Category, Segment, Function, etc. Classifications group similar assets together for filtering and reporting purposes.
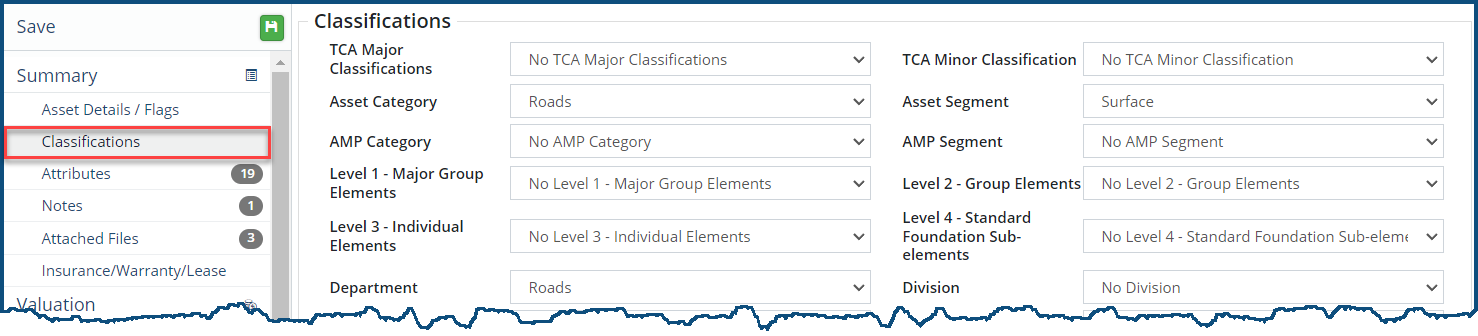
To change a misclassified asset:
- Click a field and select the correct classification from the dropdown.
- Click Save to apply the change(s).
-
Changes on the Classification screen are retroactive. If the asset has a year-end lock, you will not be able to make any changes that may have a financial impact on the asset. This does not apply to assets with an in-service date that comes after the year-end lock date. Click here for steps on how to temporarily disable year-end locking.
Attributes
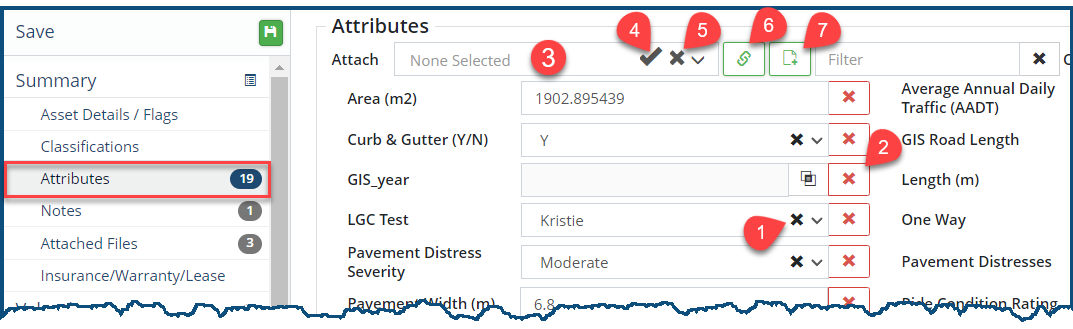
The Attributes page displays all attributes assigned to an asset. Attributes are custom fields used to capture additional information characteristic of the asset. Examples of attributes include Material, Length (m), VIN#, Contractor, etc. A user with the applicable permission levels can also add or remove attributes from this screen.
Clients who have GIS configured and integrated with Citywide may want to create specific asset attributes that populate with GIS data. Actionable attributes can be configured to link AM attributes with GIS fields and have the information updated nightly. Click here for more information.
To make a change:
- Click an attribute and edit as needed. Attributes can be setup as Text, Number, Dropdown, Currency, Link, Date or Toggle so fill in the value(s) accordingly. Click here for a review of Attributes.
- Click X ❶ to clear the attribute.
- Click X ❷ to remove the attribute.
- To attach a new Attribute, click the Attach ❸ drop down list.
- Scroll through the list and click an option. To select multiple attributes, hold Ctrl on the keyboard while clicking individual attributes. You can narrow the list by typing in text.
- Click ✅ ❹ to select all.
- Click the X ❺ to clear the selections.
- Once all attributes have been selected, click Select Attributes ❻. Fill in the new fields.
- Use Add New Attribute ❼ to create a new attribute. Enter a name and attribute type. The new attribute will be available for use on any asset in the Inventory.
- Click Save at the top of the Affiliate panel to apply the change(s).
Notes
Notes specific to an asset can be captured on the Notes page. Users with the appropriate permissions can also remove notes.

To add a Note:
- Click + New Note ❶. The Add Note dialog box appears:

- The Date and Added By ❶ fields populate automatically, but the date can be changed if needed by clicking on the calendar icon ❷. The Added By field, which bear your username, cannot be altered.
- Type and paste in your note in the text box ❸.
- Click Add ❹.
- Click Save.
To edit or remove a Note:
- To remove a note, click the Delete icon
 ❷.
❷. - To edit a note, click the Edit icon
 ❸.
❸. - Click Save.
Attached Files
Files such as assessments, photos, quotes, etc., can be uploaded and attached to a specific asset using the Attached Files page. A variety of file formats are supported. Users with the appropriate permission settings can also remove files.
To add a file:
- Click the desired Asset ID from the inventory grid
- Click 'Attached Files' in the affiliate panel
- Click + New File . The Add Files dialog box appears:
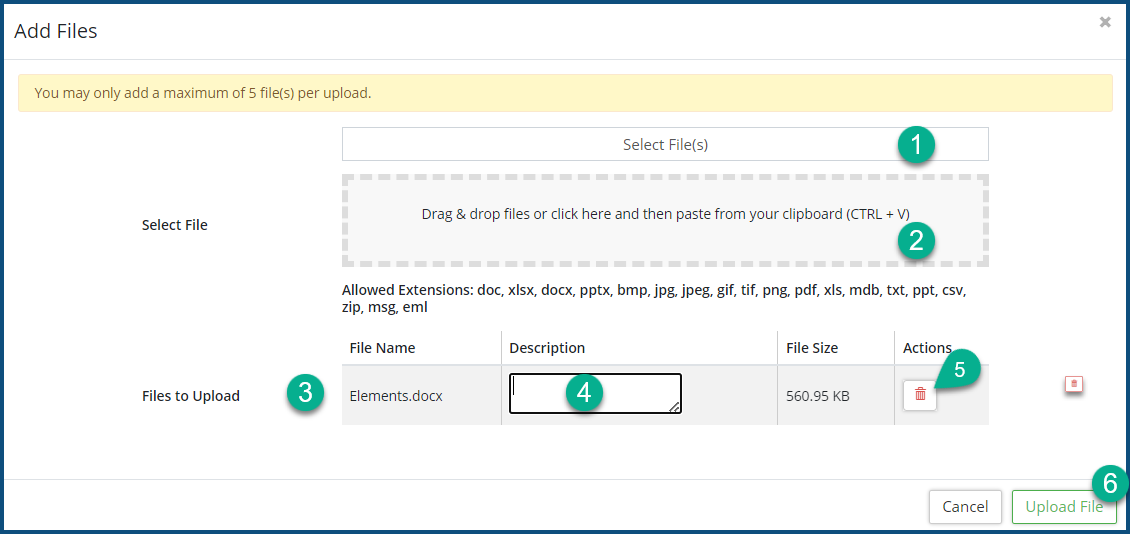
- Click on Select File(s) ❶ to select files using your operating system file manager, or drag and drop you files in to perforated box ❶. The following file types are supported: doc, xlsx, docx, pptx, bmp, jpg, jpeg, gif, tif, png, pdf, xls, mdb, txt, ppt, csv, zip, msg and eml.
- The selected files will appear in the File to Upload list ❸, where you can enter a clarifying Description ❹ for each.
- Click on the Delete icon
 ❺ in the Actions column to remove the prospective attachment from the upload list.
 - Click Upload File ❻. Continue to add files as needed.
- Click Save.
To manage attachments:

- To edit a file, click the Edit icon
 .
. - To delete a file, click Delete icon
 .
. - To download or preview one or more files to your computer, checkmark
 the desired file(s) to the left of the file name and then click Download Selected .
Insurance/Warranty/Lease
Insurance, Warranty and Lease information can be added on the Insurance/Warranty/Lease screen. Information such as Insured Value, Insurance Premium, Policy Number, Effective Date and Term can be added for any asset.
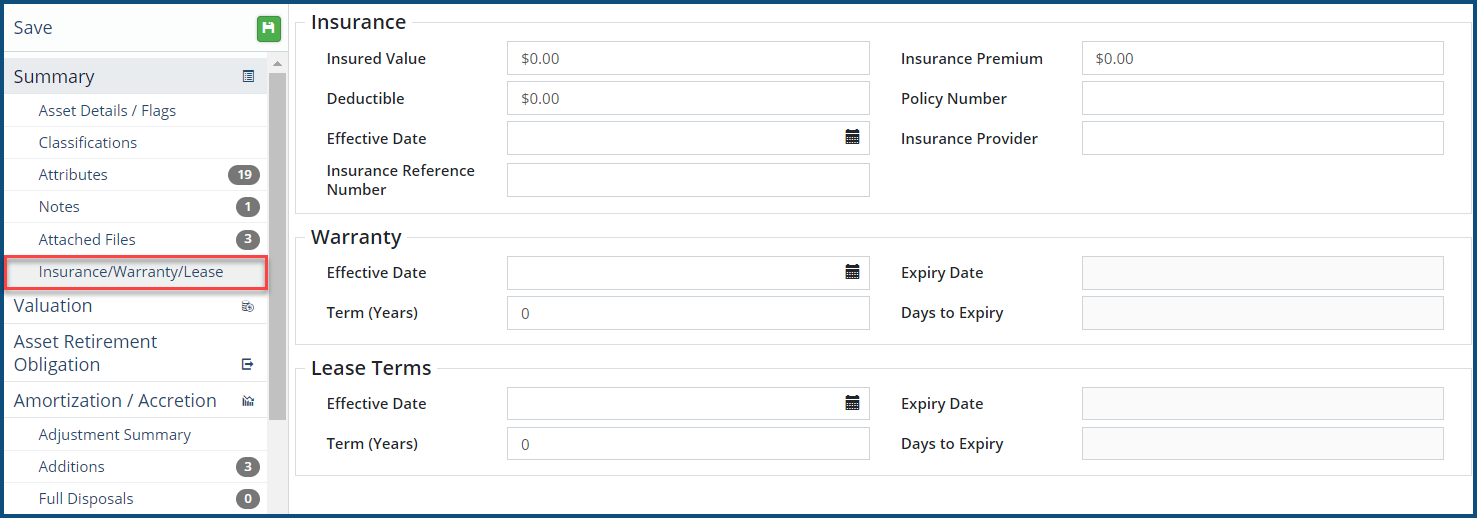
To add Insurance/Warranty/Lease details:
- Fill in the applicable fields.
- Click Save.
- Use Attached Files to add supporting documentation.
Valuation
Valuation information of an asset is captured on the Valuation screen. It includes fields such as In-Service Date, Historical Cost, Estimated Useful Life, Initial Quantity, Unit of Measure, etc. The information can be edited as needed, provided that the database is not year-end locked.
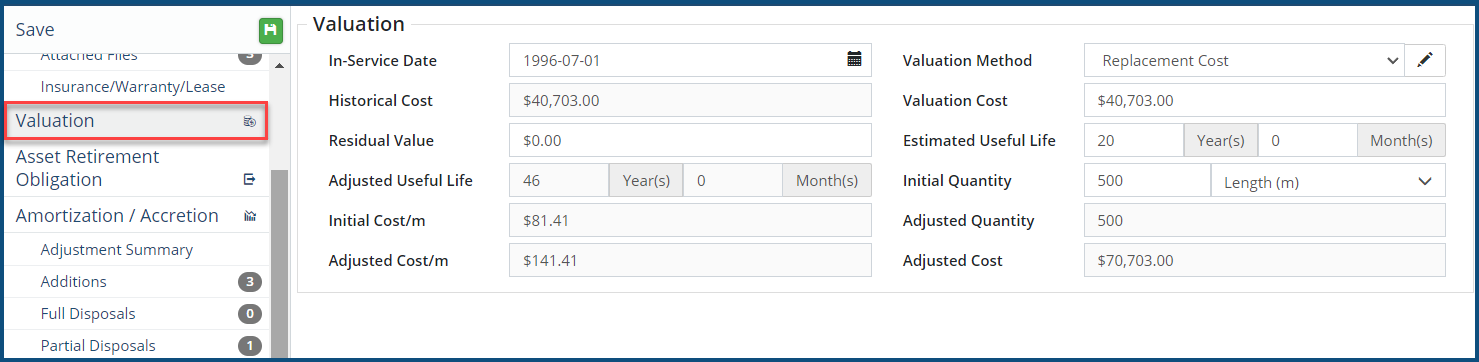
To edit Valuation details:
- Click in a field and enter the new information.Changes made on this screen will retroactively change the financial data of the asset.
- Click Save.
-
If the asset has a year-end lock, you will not be able to make any changes that may have a financial impact on the asset. This does not apply to assets with an in-service date that comes after the year-end lock date. Click here for steps on how to temporarily disable year-end locking.
Amortization
The Amortization section displays the amortization schedule with the Opening Net Book Value (NBV), Amortization Expense, Amortization Percentage, Accumulated Amortization and Closing NBV. The view can be customized to show/hide different columns of information.
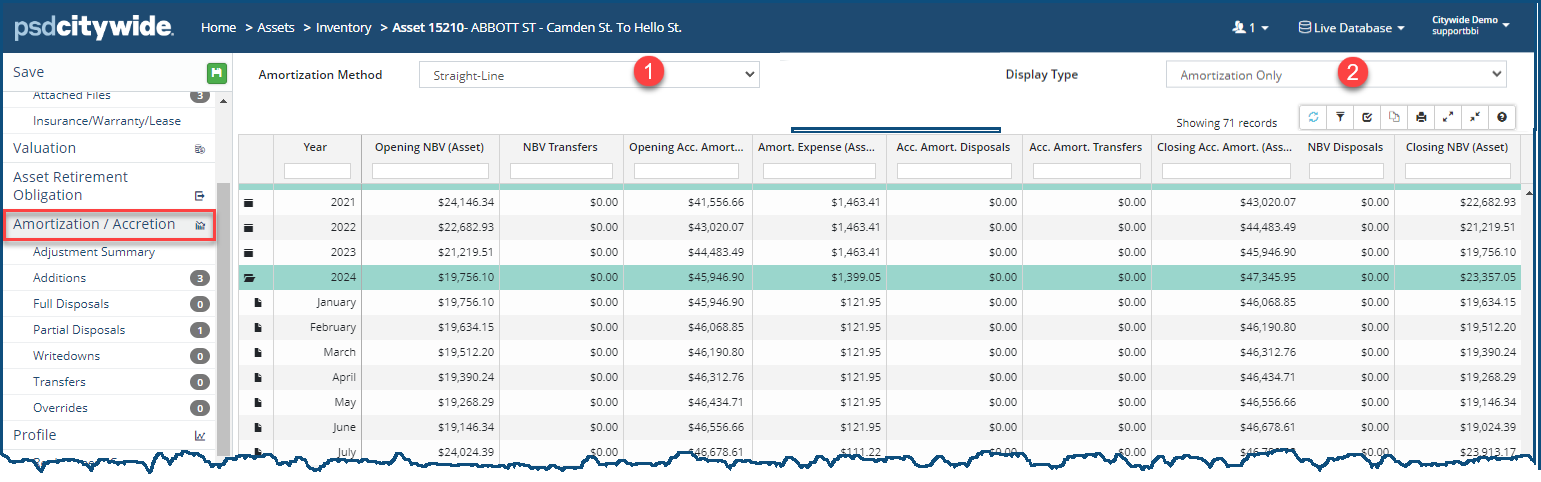
The amortization schedule is calculated based on the in-service date, historical cost, and the estimated useful life of the asset. It also takes into consideration any additions, disposals, writedowns, or partial disposals.
To change the Amortization Method:
- Select an option from the Amortization Method ❶ dropdown. Your options are:
- Non-Amortized: The asset will not be amortized.
- Straight-Line: Assumes an asset’s value deteriorates at a constant rate over its EUL. It is the most common method and will spread the amortization expense evenly across the EUL of the asset using the in-service date as the starting point.
- Declining Balance: The amortization expense is higher in the beginning of the amortization schedule and lower in later years. This method will calculate the annual amortization expense based on the previous year’s closing net book value. When this method is selected an Amortization Percent is required.

- Unit of Output: The asset is amortized based on the asset’s practical usage (i.e., hours of service, or specific volume of units) rather than an EUL. When this method is selected additional fields such as Unit of Output Capacity, Unit of Output Annual Usage, etc. are required to calculate the amortization rate across the asset’s EUL.

- Once an Amortization Method has been set, click Save.
To change the Display Type:
- Select an option from the Display Type ❷ field and select an option from the dropdown.
- Cost and Amortization: Displays the amortization schedule and cost information including the amortization expense, opening/closing values and opening/closing NBV.
- Cost Only: Displays the opening/closing cost of the asset.
- Amortization Only: Displays the amortization schedule including the opening/closing NBV.
- Graph: Displays Closing Acct Amortization (ACC) and Closing NBV in a data chart.
- Click Save.
-
In Citywide, the amortization expense is calculated on a monthly basis.
-
If the asset has a year-end lock, you will not be able to make any changes that may have a financial impact on the asset. This does not apply to assets with an in-service date that comes after the year-end lock date. Click here for steps on how to temporarily disable year-end locking.
-
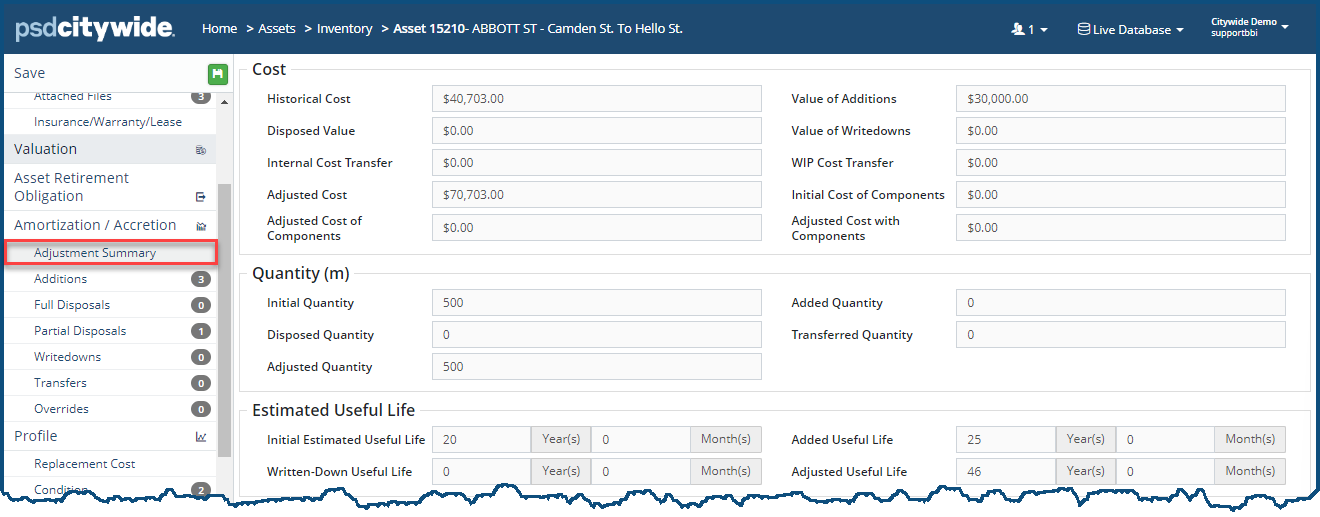
Adjustment Summary
The Adjustment Summary page displays an overview of adjustments to the Cost, Quantity and/or Estimated Useful Life of the asset. This section summarizes information from the sections below and is read only.
-
Financial adjustments can be completed individually at the asset level, or in bulk using the Upload Center. Each adjustment has its own upload template, accessible from the Upload Center.
Additions or betterments are completed in the Additions section of the asset. Value, estimated useful life, and/or quantity can be added to an asset.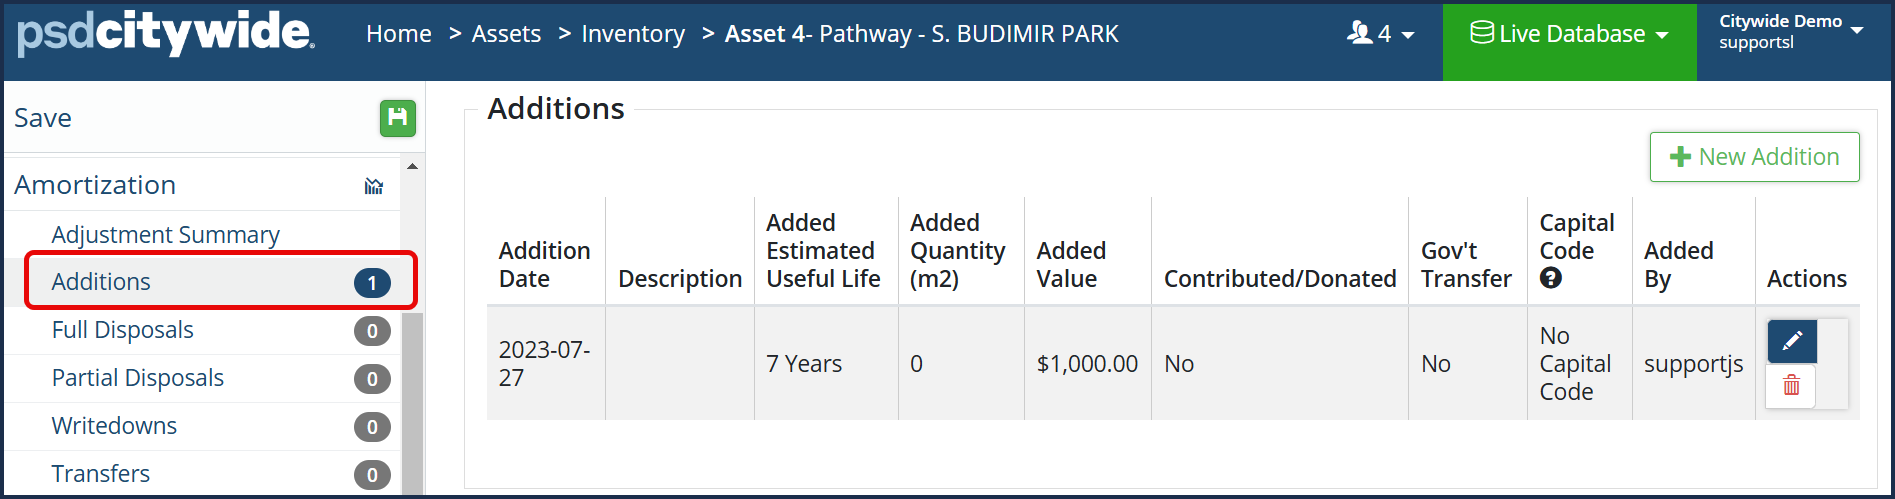
Complete an Addition:
- Click +New Addition . The Addition dialog box appears:
- Select the Addition Type ❶. Your choices are Asset Cost or ARO Adjustments.
- If you've selected Asset Cost, these fields will appear:
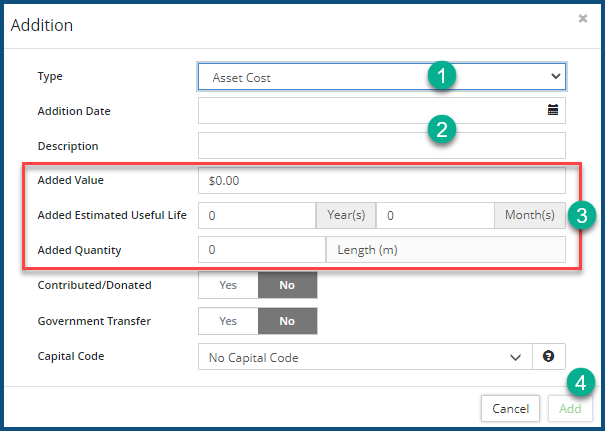
- Enter a Date and a Description ❷. Cost information will adjust and is reflected on the amortization schedule from the entered date onward.
- Indicate whether the addition adds Value, EUL, and/or Quantity ❸. If the asset is still amortizing, or if value and eul have been added, the amortization schedule will recalculate from the addition date until the asset is fully amortized. Complete the remaining fields as needed.
-
Added Estimated Useful Life extends the life and amortization schedule of the asset by the number entered. Leave the field blank if the addition does not extend the life of the asset.
-
- Click Add ❹. A table summary is added.
- If you've selected ARO Adjustment, these fields will appear:
- Enter a Date and a Description ❶.
- Fill in the Adjustment variables ❷.
- Click Add ❸.
- Click Save in the top left to apply the change(s).
- If you've selected Asset Cost, these fields will appear:
To edit an Addition, click on the Edit icon ![]() .
.
To delete an Addition, click on the Delete icon ![]() .
.
Full Disposals
Disposal of an asset is completed on the Full Disposals screen. Net proceeds can also be recorded when disposing of an asset.
Complete a Full Disposal:
- Click +New Full Disposal ❶. The Full Disposal dialog box appears:
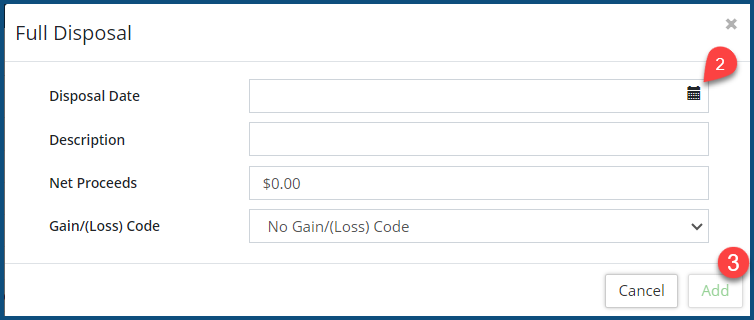
- Enter a Disposal Date, or select one by clicking on the calendar icon ❷.
- Enter a Description and, if applicable, Net Proceeds information, as well as a Gain/(Loss) Code. Click here for steps on how to add new gain/(loss) codes.
- Click Add ❸.
- Click Save at the top of the Affiliate panel to apply the change(s).
- Once a full disposal is submitted and the asset is saved, the system will prompt you to create a new asset to replace the disposed asset.
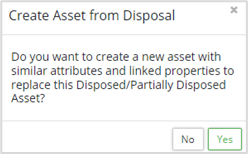
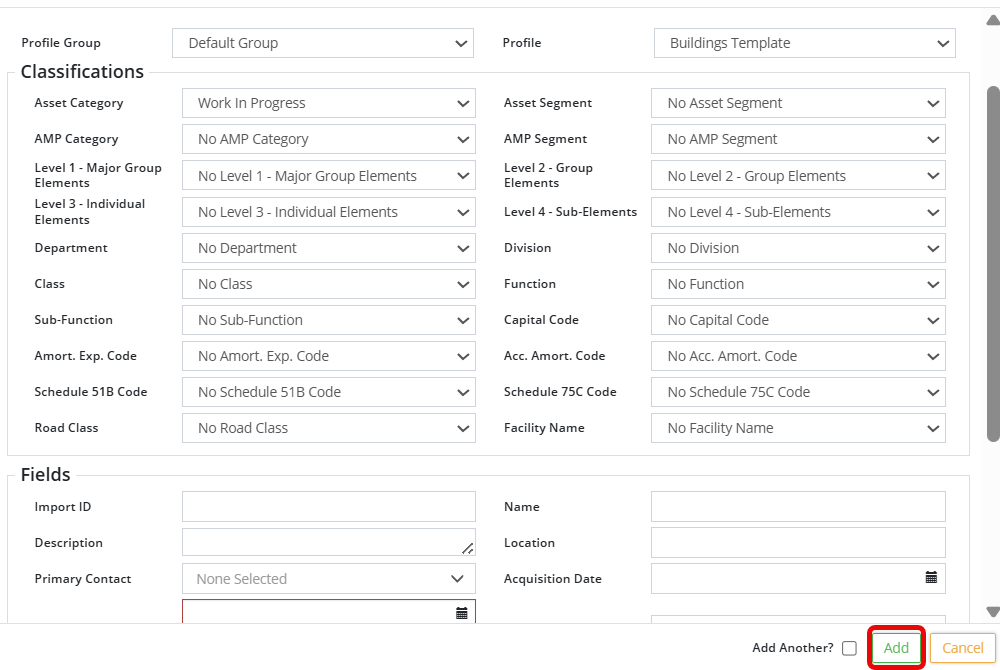
- Click Yes to create a new asset with similar attributes and properties. The Add Asset dialog box appears:
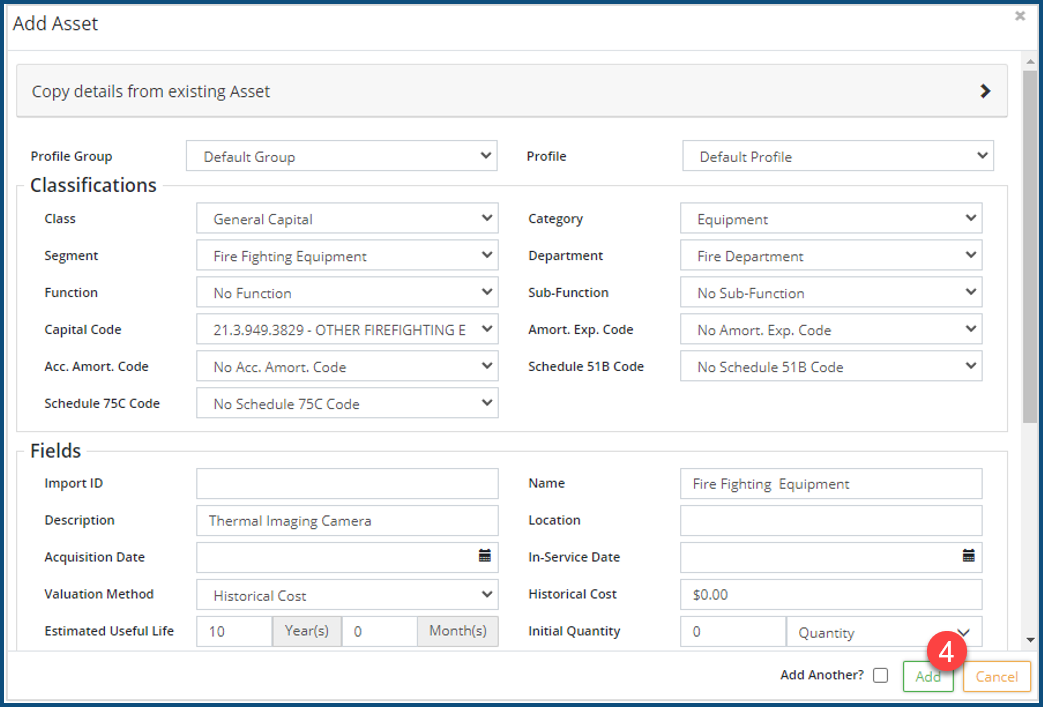
- The Add Asset window is partially completed with information from the disposed asset. Fill in the remaining fields as needed.
- Click Add ❹.
-
Assets that have been fully disposed, can be viewed by clicking the Show Disposed Assets pre-set filter button, in the top left corner of the Inventory view.
-
When replacing a GIS-linked asset, create a new asset with the same linking key and the GIS feature will automatically link to the new asset overnight. The linking key is often a GIS attribute or an Import ID. (I.e., when replacing an asset, complete the disposal first, and then make sure to click Yes when prompted to create a new asset after the disposal has been saved. This will copy several properties, including attributes, of the disposed asset to the new asset. If the linking key is found in the Import ID field, make sure to manually copy this once the new asset has been added to the inventory. As a final step, check that the linking key field (e.g., GIS attribute, or Import ID) of the new asset has the correct linking value.)
Partial Disposals
A partial disposal of an asset is completed in the Partial Disposals section. Disposal methods include Dollars, Quantity, and Percent. Net proceeds can also be recorded when completing a partial disposal.
Complete a Partial Disposal
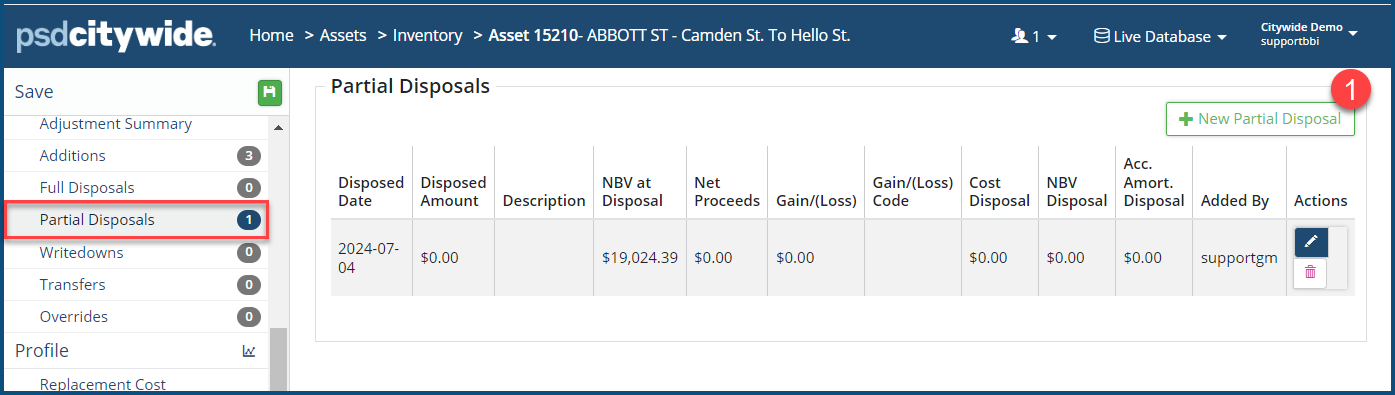
- Click +New Partial Disposal ❶. The Partial Disposal dialog box appears:
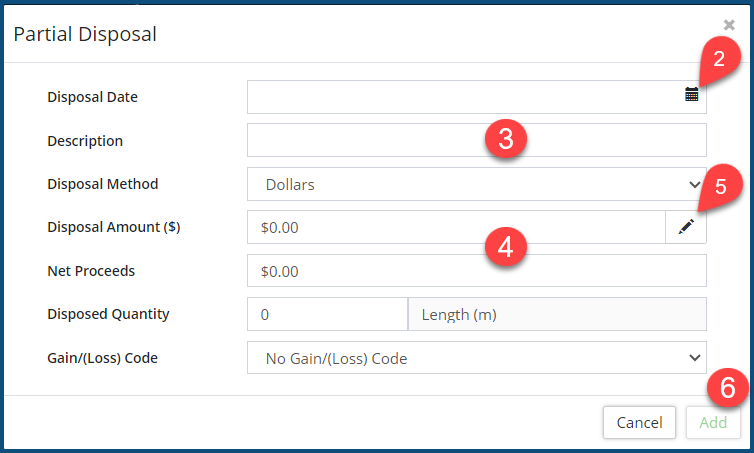
- Enter a Disposal Date, or select a date by clicking on the calendar icon ❷.
- Enter a Description ❸.
- Select a Disposal Method and enter the Disposal Amount ❹.
- If the historical disposal amount is unknown, but a current cost is known, click on the Calculate Using CPI icon
 ❺ to deflate the current cost back to the original In-Service Date. The Calculate Using CPI dialog box appears:
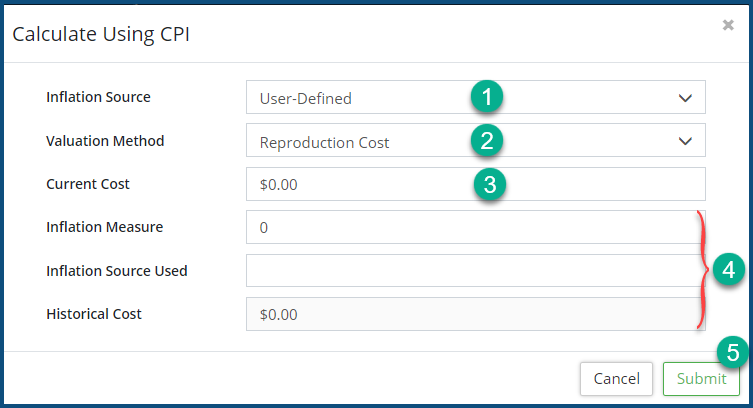
- Fill in the form including Inflation Source ❶, Valuation Method ❷, Current Cost ❸, and the Inflation and Historical Cost ❹.
- Click Submit ❺.
- If the historical disposal amount is unknown, but a current cost is known, click on the Calculate Using CPI icon
- Click Add ❻ to submit the partial disposal.
- Click the Save button at the top of the Affiliate panel to apply your change(s). Once a full disposal is submitted and the asset is saved, the system will prompt you to create a new asset to replace the disposed asset.

- Click Yes if you would like to create a new asset with similar attributes and properties. The Add Asset window displays and is partially completed with information from the partially disposed asset. Fill in the remaining fields as needed.
- Click Add .
- Click Save at the top of the Affiliate panel to apply the change(s).
-
Assets with partial disposals display with a
 icon in the Inventory view.
Writedowns
Writedown of an asset can include cost and/or estimated useful life.
Complete a Writedown
- Click +New Writedown ❶. The Writedown dialog box appears:

- Select the Writedown Type ❶. Your choices are Asset Cost or ARO/ARC Adjustments.
- If you've selected Asset Cost, these fields will appear:
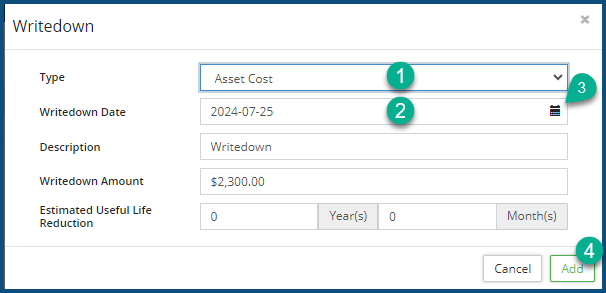
- Enter a Date ❷ or select it by clicking on the calendar icon ❸.
- Enter a Description, the Writedown Amount, and/or the Estimated Useful Life Reduction span.
- Click Add ❹. A table summary is added.
- Click Save near the top of the Affiliate panel to apply the change(s).
- If you've selected ARO Adjustment, these fields will appear:
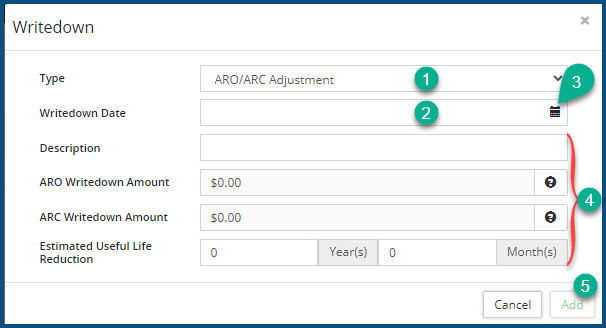
- Enter a Date ❷ or select it by clicking on the calendar icon ❸.
- Fill in the ARO/ARC Adjustment variables ❷.
- Click Add ❸.
- If you've selected Asset Cost, these fields will appear:
-
To edit a Writedown, click on the Edit icon
 ❷.
❷.To delete a Writedown, click on the Delete icon
 ❸.
❸.
Transfers
The Transfers page allows you to transfer cost and/or quantity from the current asset to a new asset. The screen shows classification information on the current asset which is copied and adjusted as needed to the newly transferred asset.

Create an Internal Transfer
- Click on +New Transfer ❶.
- Select a transfer type ❷, either Full Transfer (Basic or Detailed) or Partial Transfer (Basic or Detailed). The Current Asset section ❸ is read-only, and shows how the asset is currently classified, as well as the original in-service-date.
- In the Transferred Asset section ❹:
- For full transfers, fill in the Category, Segment, Department, and Transfer Date.
- For partial transfers, fill in the new Category, Segment, Department, and Transfer Date plus the new EUL, and the Transfer Quantity and Cost.
- For basic transfers, fill in the above fields in (a) or (b).
- For detailed transfers, fill in the above fields in (c) plus fields such as Function, Sub-Function, Capital Code, Exp. Code, Acc. Amort. Code, Schedule 51B Code, and Transfer Date.
- Click Add ❺. A new asset will be created and once saved an Asset ID is assigned.
- Click Save at the top of the Affiliate panel.
-
Assets that have been fully or partially transferred will have a 🡆 (Transferred Out) or 🡄 (Transferred In) icon display in the Inventory list view.
WIP Transfers to Service
Work in Progress (WIP) assets incur costs, but do not amortize until placed into service. Transfer to service information of a WIP asset is completed in the Transfers to Service section.

Transfer a WIP Asset to Service:
- Click +New Transfer to Service ❶. The Transfers to Service dialog box appears:
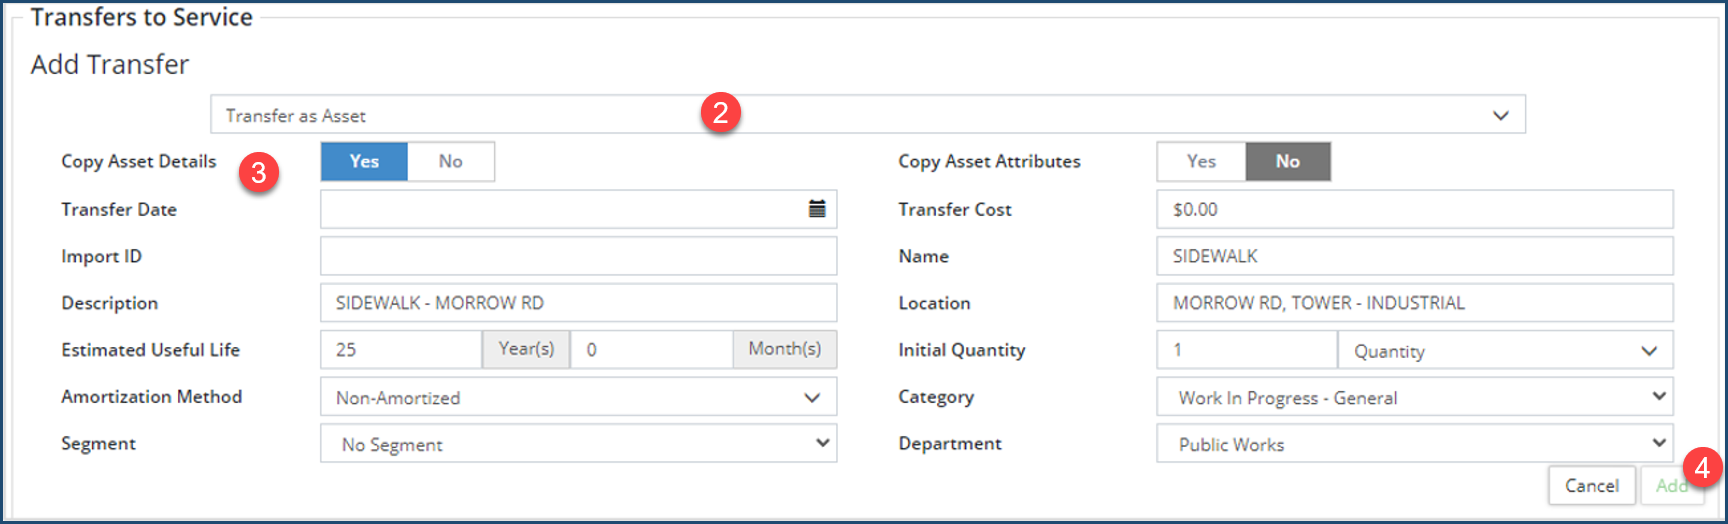
- Select Transfer as Asset or Transfer as Addition ❷.
- If Transfer as Asset is selected, then fill in the Transfer Date and Cost, Import ID, Name, Estimated Useful Life, Quantity, Method, Category, Segment, and Department. Once saved, a new asset is created with a unique Asset ID. This new asset will begin to amortize as of the Transfer Date.
- If Transfer as Addition is selected fill in the transfer information along with the Asset ID of the existing asset to which you are transferring this addition.
- Click Add ❹.
- Click Save at the top of the Affiliate panel.
-
Copy Asset Details ❸ (and Copy Asset Attributes), available when Transfer as Asset is selected, will copy the Cost, Name, Description, and Location fields from the WIP asset to the new asset. If the WIP is mapped using an attribute as the linking key, be sure to set the copy asset attributes flag to Yes.
Adjustment Scenarios
Scenario 1: Replace an IT server that has reached its EUL of 5 years. In this scenario, since the existing asset will be replaced, complete the disposal first. When the disposal is saved, the system will prompt you to create a new asset based on the disposed one. All details including classifications and attributes, will be copied to the new asset, and can be adjusted as needed.
- Select Full Disposals in the asset view.
- Click +New Full Disposal in the top right.
- Enter a disposal date and add a description (optional).
- If the asset will be sold at auction or has a trade-in value, enter the amount received in the net proceeds
- Select a gain/(loss) code (optional). Gain/(loss) codes are setup on the Assets page.
- Click Add. The details are summarized on the Full Disposals
- Click Save in the top left. A prompt to archive replacement cost may display. Click yes or no as needed. A second prompt to create asset from disposal Click Yes .
- An Add Asset window displays. The classifications, fields, and attributes have been copied from the disposed asset. Review and adjust as needed. Enter an in-service date, historical cost, and initial quantity. Review all attributes. In instances where the asset is linked to GIS with an attribute, review the attribute linking key.
- Click Add .
- Click Save.
Scenario 2: A portion of a road segment in poor condition has been resurfaced. In this scenario, a partial disposal can be completed on the asset to account for the section that has been removed, and then an addition can be completed to report on the new surface.
- Select Partial Disposals in the asset view.
- Click +New Full Disposal in the top right.
- Enter a disposal date and add a description (optional).
- Select a Disposal Method:
- Dollars: Enter the dollar amount of the partial disposal.
- Quantity: Enter a quantity for the partial disposal. (Quantity and unit of measure are recorded on the Valuation screen).
- Percent: Enter a % of the asset’s cost that will be disposes and/or a quantity.
- Enter net proceeds (optional).
- Click Add . The details are summarized on the Partial Disposals
- Click Save. A prompt to create asset from disposal
- Click No since the asset will continue to be managed as a single asset.
- To record the cost of the resurfaced amount, click Additions, and then click +Add New Addition .
- In the Addition window, the Type field defaults to Asset Cost. Enter a date and a description.
- Record a value, eul, and/or quantity for the newly received portion of the road asset.
- Complete the remaining fields as needed. Click Add .
- Click Save.
Scenario 3: A larger road asset will be split into two assets. In this scenario, a larger road segment will be managed as two individual assets. Use the Transfer screen to move cost and/or quantity from the existing asset to a new asset. These steps can also be used to segment pooled assets.
- Select Transfers in the asset view.
- Click +New Transfer in the top right.
- Select Partial Transfer (Basic) to review category, segment, and department. or Partial Transfer (Detailed) to display and review all classifications. The left side shows how the asset is currently classified and the classifications are copied on the right for the new asset.
- Enter a transfer date. The system will automatically calculate a new estimated useful life based on the in-service date of the original asset (the in-service date of the original asset is shown on the left). The amortization schedule for the new asset will follow the original asset.
- Enter a Transfer Quantity.
- Enter a Transfer Cost.
- Click Add . The details are summarized on the Transfers Note in the table that the new Asset ID is pending.
- Review the Amortization
- Click Save. The new asset is created and cost and quantity are transferred to the new asset.
- The original asset will have a Transferred Out (🢡) icon while the new asset has a Transferred In (ï) icon in the inventory list view. Also, on the summary page of the new asset the In-Service Date as well as the Original In-Service Date will be shown.
Profile
The Profile section displays an overview of the annual requirements of an asset. The annual requirement of an asset is the Replacement Cost divided by the Estimated Useful Life (or the Lifecycle Useful Life if it’s different from the EUL). This gives an idea of the yearly investment required to eventually be able to replace the asset.
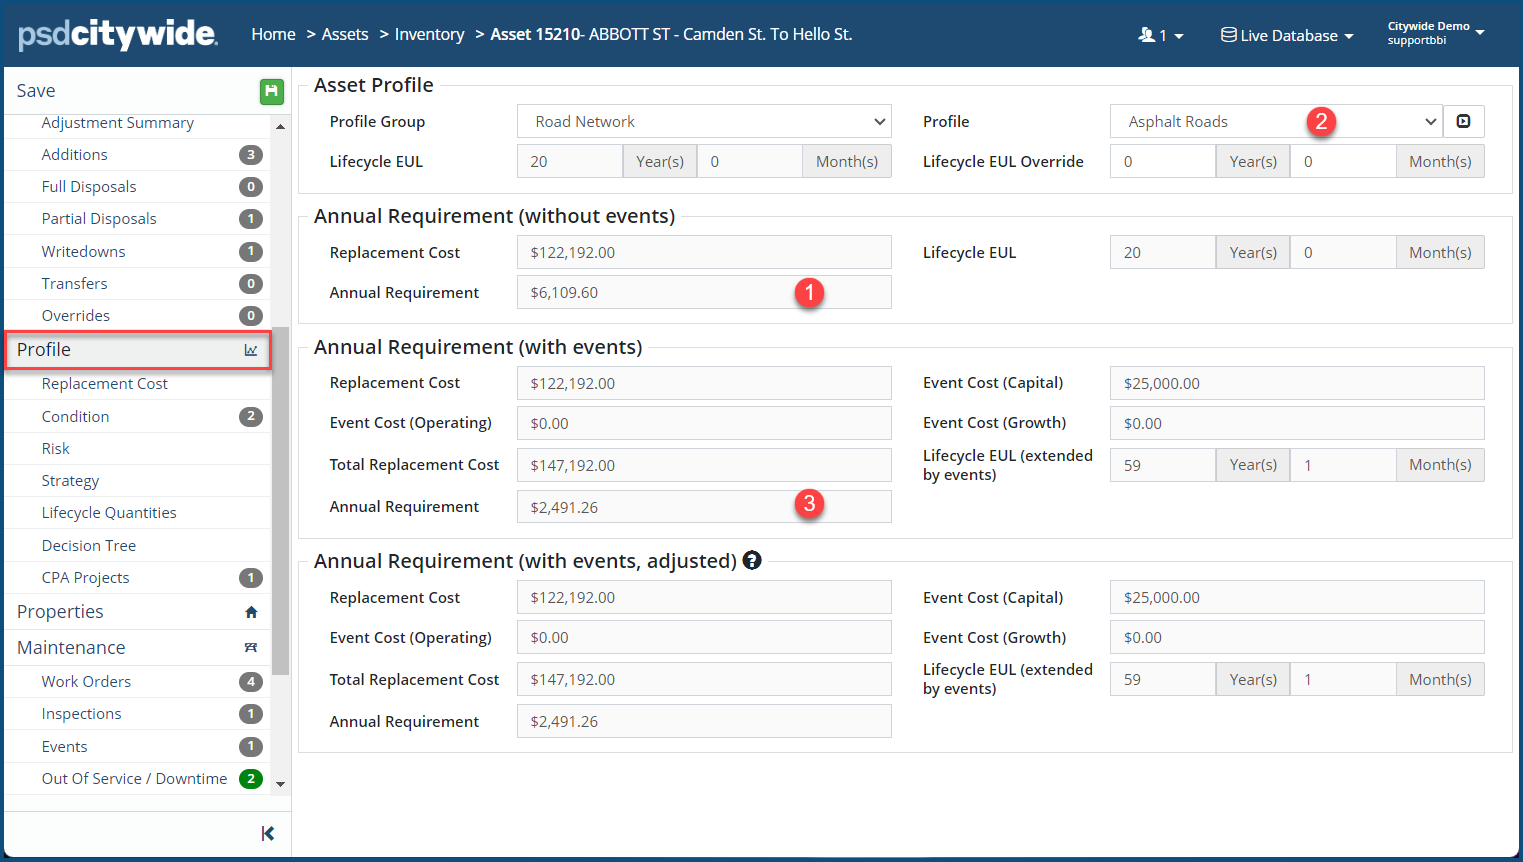
In the above screenshot, $6,109.60 is the annual investment requirement for this asset ❶
However, this asset belongs to a profile ❷ with a lifecycle strategy that includes lifecycle events. Generally, lifecycle events extend the life of the asset and so the annual requirement calculation will include any added events and be divided by the extended EUL. In the example above, the Annual Requirement (with events) ❸ calculation now shows $2,491.26 as the annual investment requirement for this asset (Total Replacement Cost (122,192.00 + 0 + 25,000) / Lifecycle EUL (extended by events) (59.1) = Annual Requirement ($2,491.26).
-
Setting the Profile Group and Profile on an asset determines which lifecycle information is applied (i.e., Events, Strategy, Risk Metrics, etc.). Users with appropriate permission settings can edit profile details in the Profile section. Click here for steps on how to create profile groups.
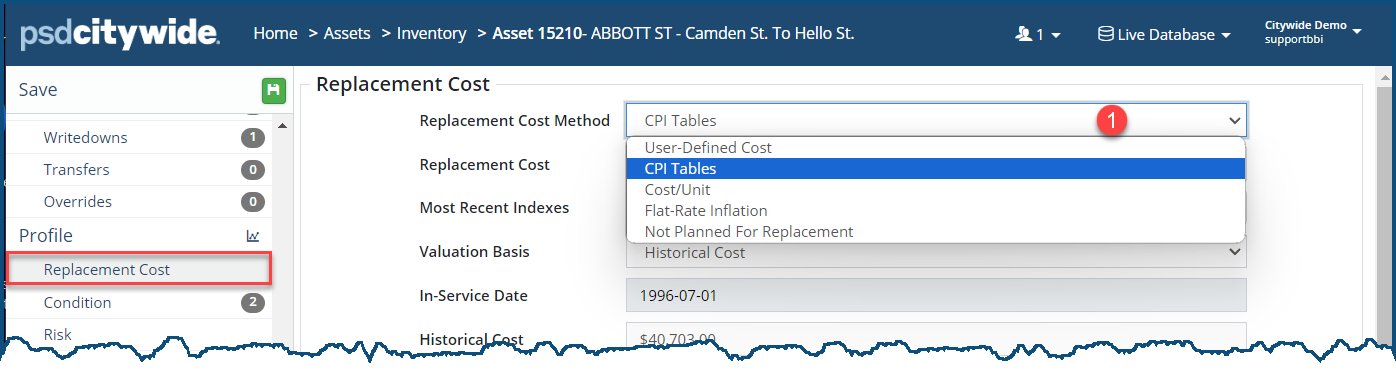
The Replacement Cost screen shows the current replacement cost of the asset and effective date. Any archived replacement costs are listed at the bottom. Several options are available for calculating replacement cost, all accessible from the Replacement Cost Method pulldown ❶:
-
Update replacement cost at least once a year so that capital projections which often help inform capital budgets are based on the best available information.
Set a User-Defined Replacement Cost:
- Select the User-Defined Cost option from the Replacement Cost Method ❶ pulldown.

- Enter a Replacement Cost ($) ❷ and an effective replacement Date ❸.
- Optionally, in the Replacement Cost Source ❹, you can provide a description of the source used to determine the cost.
- Click Save at the top of the Affiliate panel.
Set a CPI Table Replacement Cost
- Select the CPI Tables option from the Replacement Cost Method ❶ pulldown.
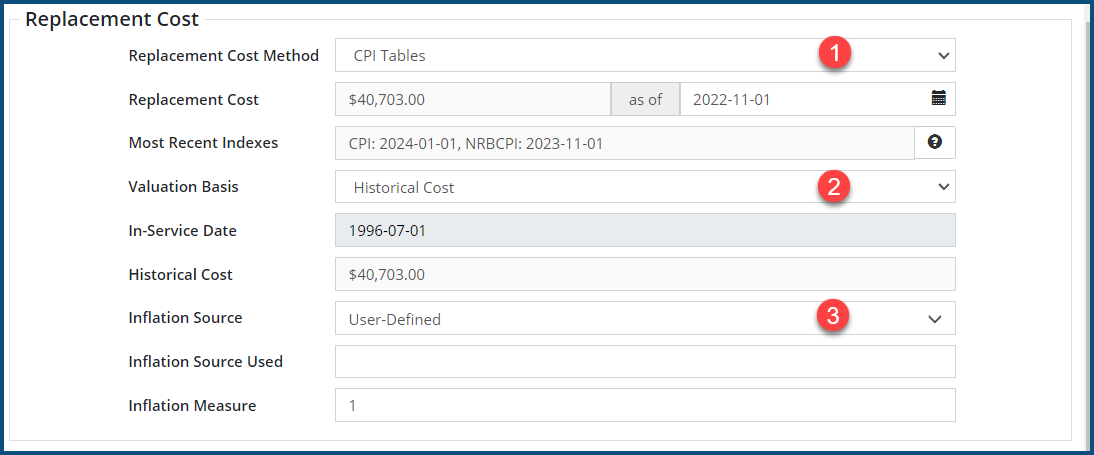
- Click the Valuation Basis ❷ and select one of the following options:
- Historical Cost: to inflate the historical cost using CPI.
- Adjusted Cost: to inflate the historical cost and add any cost adjustments that have been recorded in Citywide.
- User-Defined: to enter your own Base valuation date and cost.
- Select a CPI or NRBCPI from the Inflation Source ❸ pulldown.
- Select either User-Defined to enter your own inflation measure, or select one of the predefined sources.
- The Inflation Measure and as of date fields will fill in based on the selected inflation source.
- Click Save at the top of the Affiliate panel.
Asset Not Planned for Replacement
- Select Asset Not Planned For Replacement from the Replacement Cost Method ❶ pulldown.

- Click Save at the top of the Affiliate panel.
Cost/Unit Replacement Cost
- Select Cost/Unit from the Replacement Cost Method ❶ pulldown.
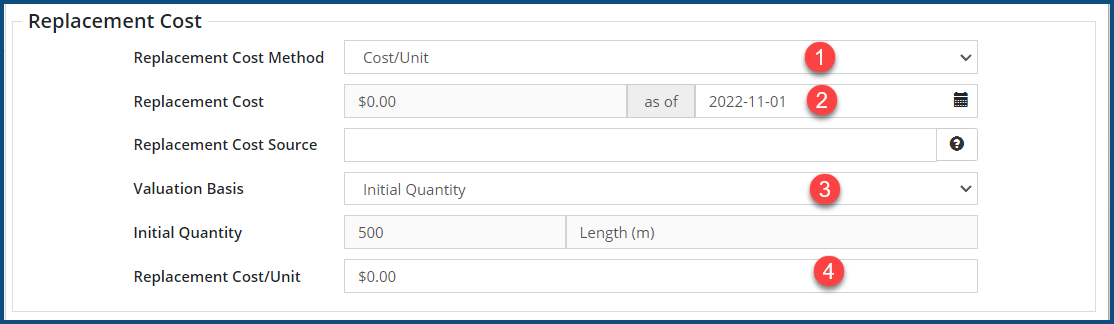
- Enter an as of ❷ date.
- Click the Valuation Basis ❸ and select one of the following options:
- Initial Quantity: to use the original, unadjusted quantity of this asset.
- Adjusted Quantity: to use the original quantity plus/minus any adjustments.
- Lifecycle Quantity: to use lifecycle quantities specified for asset management purposes.
- Enter the Replacement Cost/Unit ($) ❹.
- Click Save at the top of the Affiliate panel.
Flat-Rate Inflation Replacement Cost
- Select Flat Rate Inflation from the Replacement Cost Method ❶ pulldown.
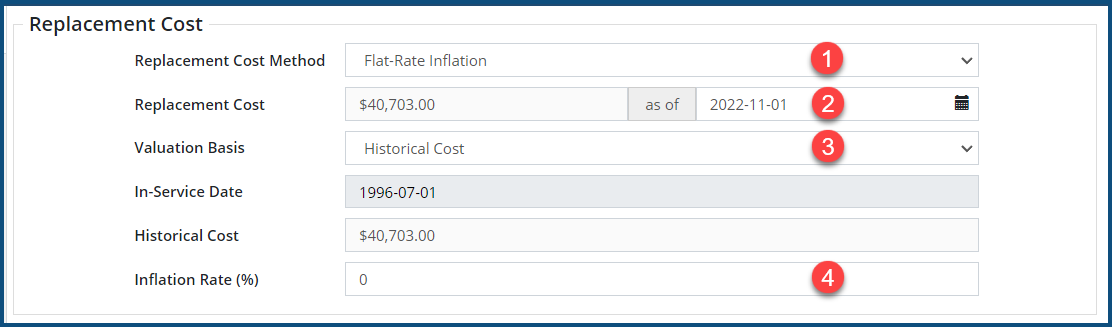
- Enter an as of ❷ date.
- Click Valuation Basis ❸ and select one of the following options:
- Historical Cost to inflate the historical cost using CPI.
- Adjusted Cost to inflate the historical cost and add any cost adjustments that have been recorded in Citywide.
- User-Defined to enter your own Base valuation date and cost.
- Enter the Inflation Rate (%) ❹.
- Click Save at the top of the Affiliate panel.
Condition
The Condition screen shows current condition assessment information of the asset and includes:
- Financial Condition: Based on the age of the asset.
- Projected Condition: Based on condition assessments.
- Condition Assessments: List of all condition assessments ordered by assessment date.
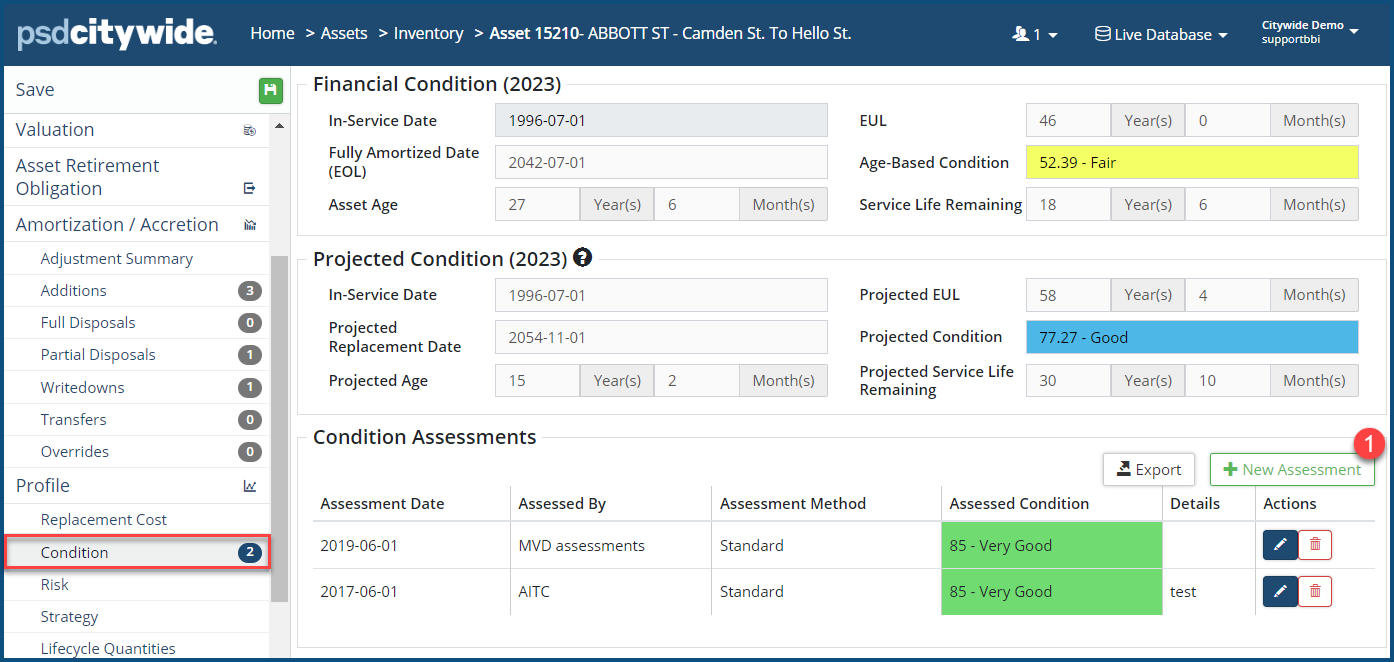
The Financial Condition uses the in-service date and EUL to calculate a condition rating based on the asset’s age. The Projected Condition is based on the values assigned to the asset after an internal/external assessment. Click here to learn how to modify condition ranges.
Add a new assessment:
- Click +New Assessment ❶. The New Assessment dialog box appears:
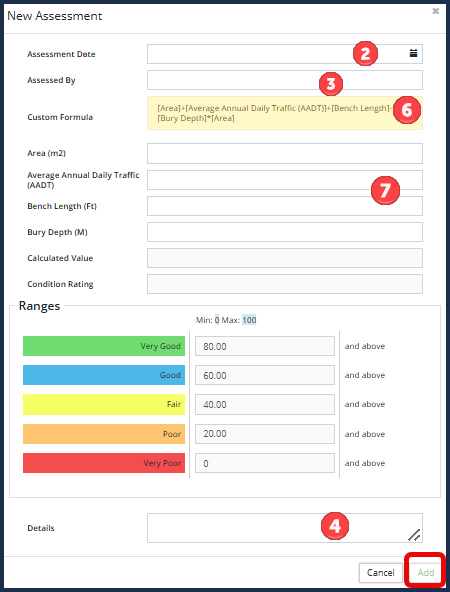
- Enter the Assessment Date ❷, Assessed By ❸, and Condition Rating (refer to the Ranges section as a guide when assigning a condition rating).
- Enter Details, if required ❹.
- Click Add . Citywide will archive assessment history and use the most recent assessment, based on the assessment date, to project condition information for the asset.
- Click Save at the top of the Affiliate panel.
Add a new assessment using a custom formula:
- Click +New Assessment ❶.
- Enter the Assessment Date ❷, Assessed By ❸.
- The Custom Formula ❻ field displays the condition assessment formula. Complete the corresponding attributes ❼.
- Click Add . Citywide will calculate the condition value and rating.
-
When adding assessments in bulk with the Asset Sync upload template, the system will only allow for the use of the standard method.
Risk
Within the infrastructure industry, Risk is often defined as the probability of failure multiplied by the consequence of failure. The Risk screen shows current risk assessment information and includes:
- Probability of Failure: Typically relates to the current condition of each asset and is a good indicator of whether the asset will fail soon.
- Consequence of Failure: Relates to the magnitude or overall effect the failure of this asset will have on the municipality.
- Risk Rating: Visualization of the risk rating for the asset.
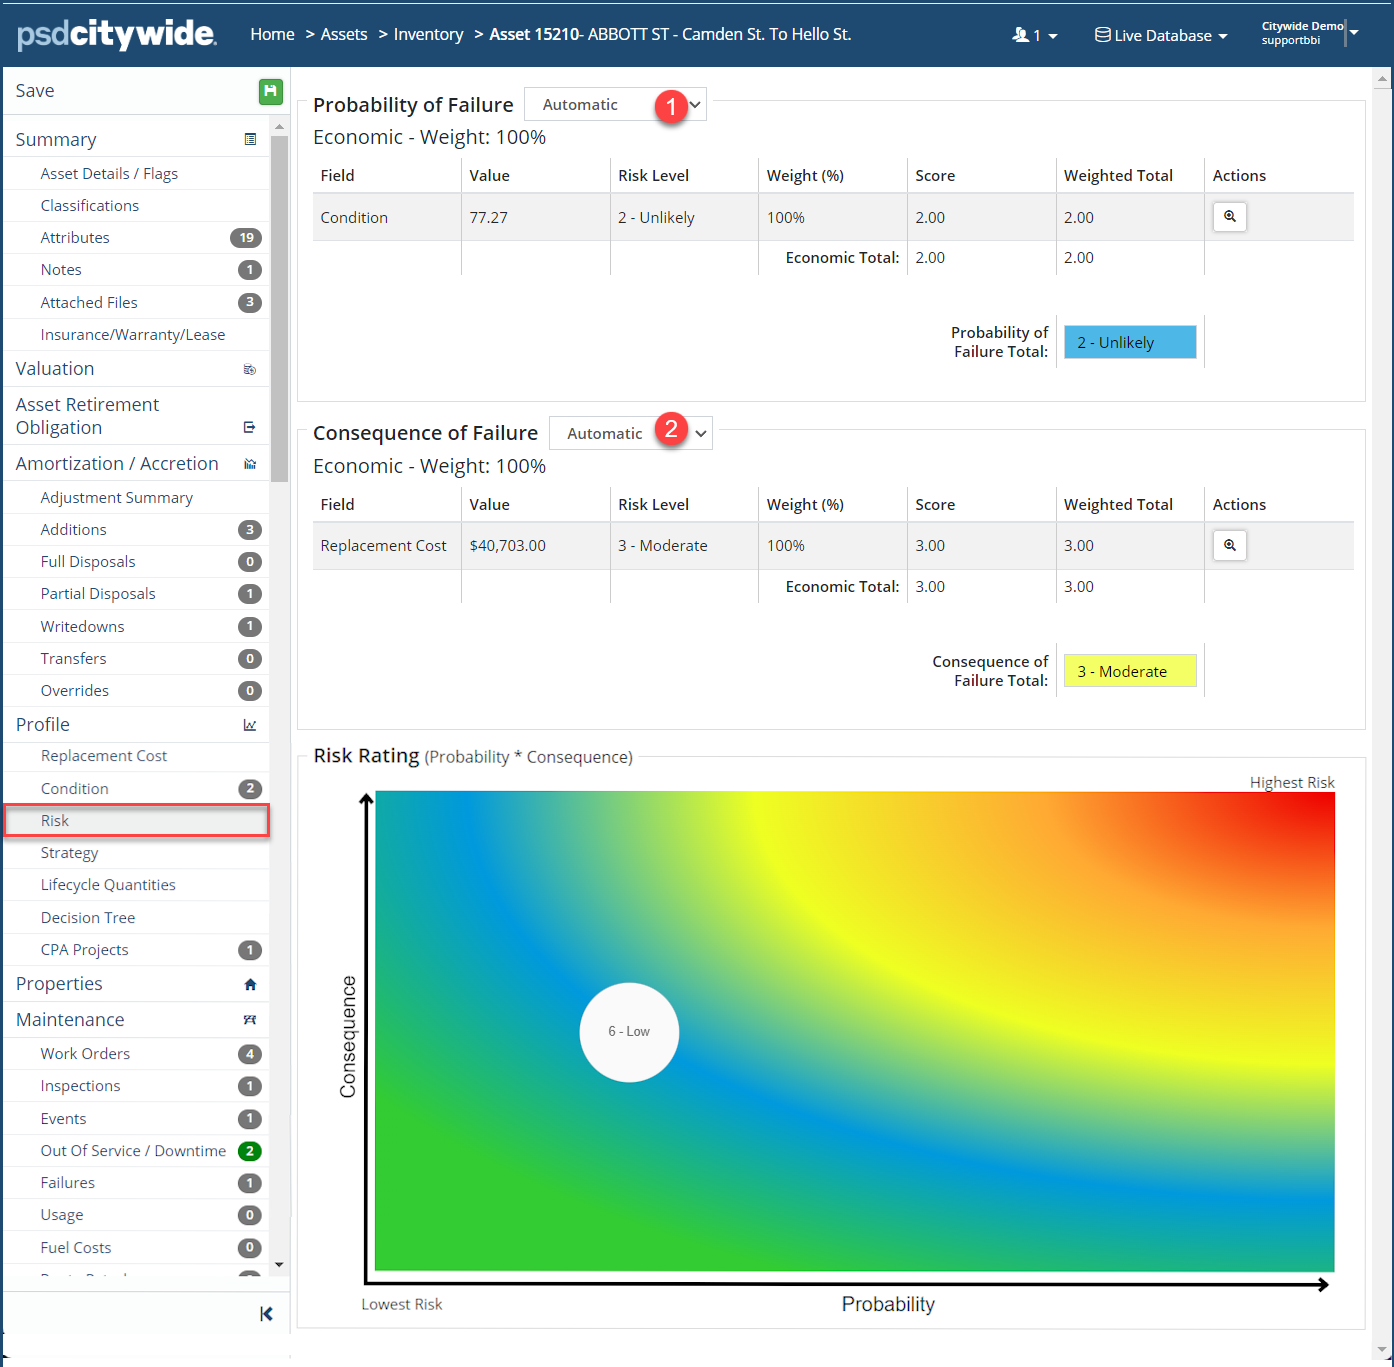
The Probability of Failure ❶ is based on metrics such as age and condition to determine when the asset might fail. The Consequence of Failure ❷ measures the economic, social, operating, or environmental impact this asset will have if it fails. For example, a small diameter watermain break in a subdivision may cause a few customers to be without water service for a short period of time, whereas a large trunk watermain break outside a hospital could have disastrous effects. By default, the Citywide assigns each asset a risk rating using condition as the probability of failure, and replacement cost for consequence to assign each asset a risk rating. Use the dropdowns in each section to override these values.
Additional metrics such as pipe diameter, road material, and any other asset attribute, can be incorporated at the Asset Profile level. Click here to learn more about Attributes.
Strategy
The asset management strategy of an asset is defined in the Strategy section. The strategy is made up of Lifecycle Events including maintenance, preventative maintenance, rehabilitation, growth, and regulatory events that may extend the service life of the asset.
To schedule a new lifecycle event: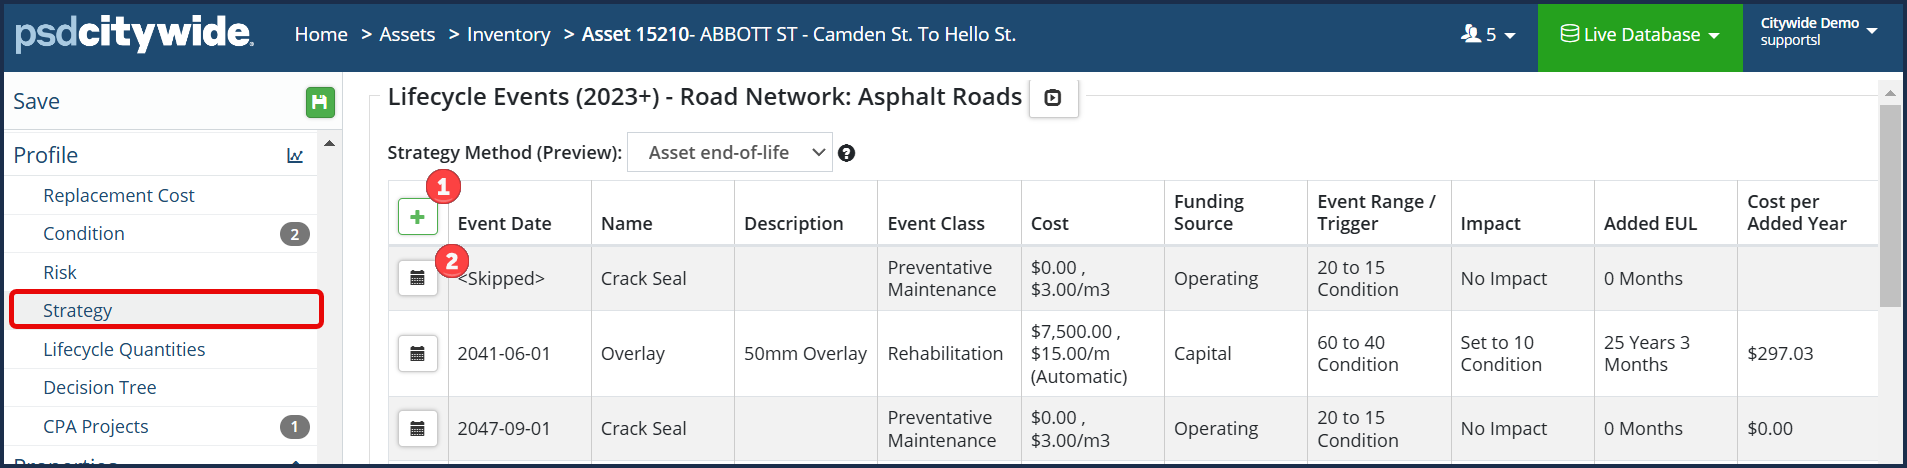
- Click +Add Event ❶ or Schedule Event ❷.
- The Schedule Lifecycle Event dialog box appears:
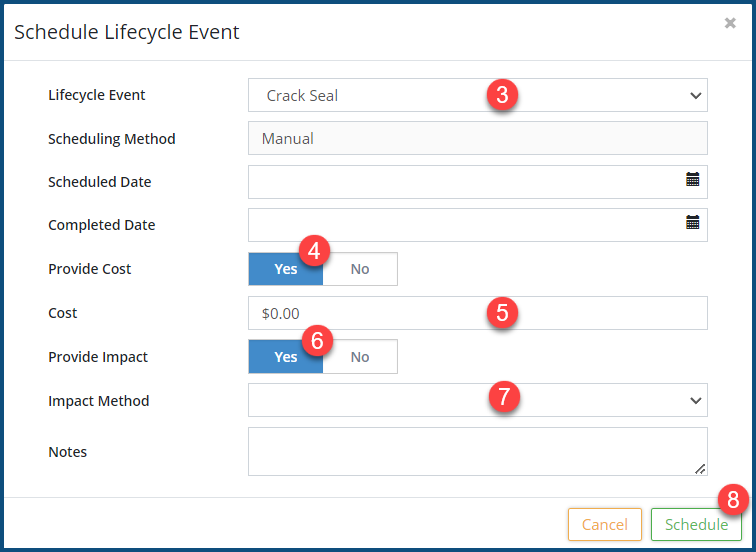
- Select a Lifecycle Event ❸ from the pulldown. Enter a Scheduled Date and/or Completed Date.
- Select Yes for Provide Cost ❹ to enter a cost. The Cost ❺ field then appears, where you can enter the cost.
- Select Yes for Provide Impact ❻ to select and impact. The Impact Method ❼ pulldown then appears from which you can select an impact method.
- Click Schedule ❽.
- Click Save at the top of the Affiliate panel to apply your change(s).
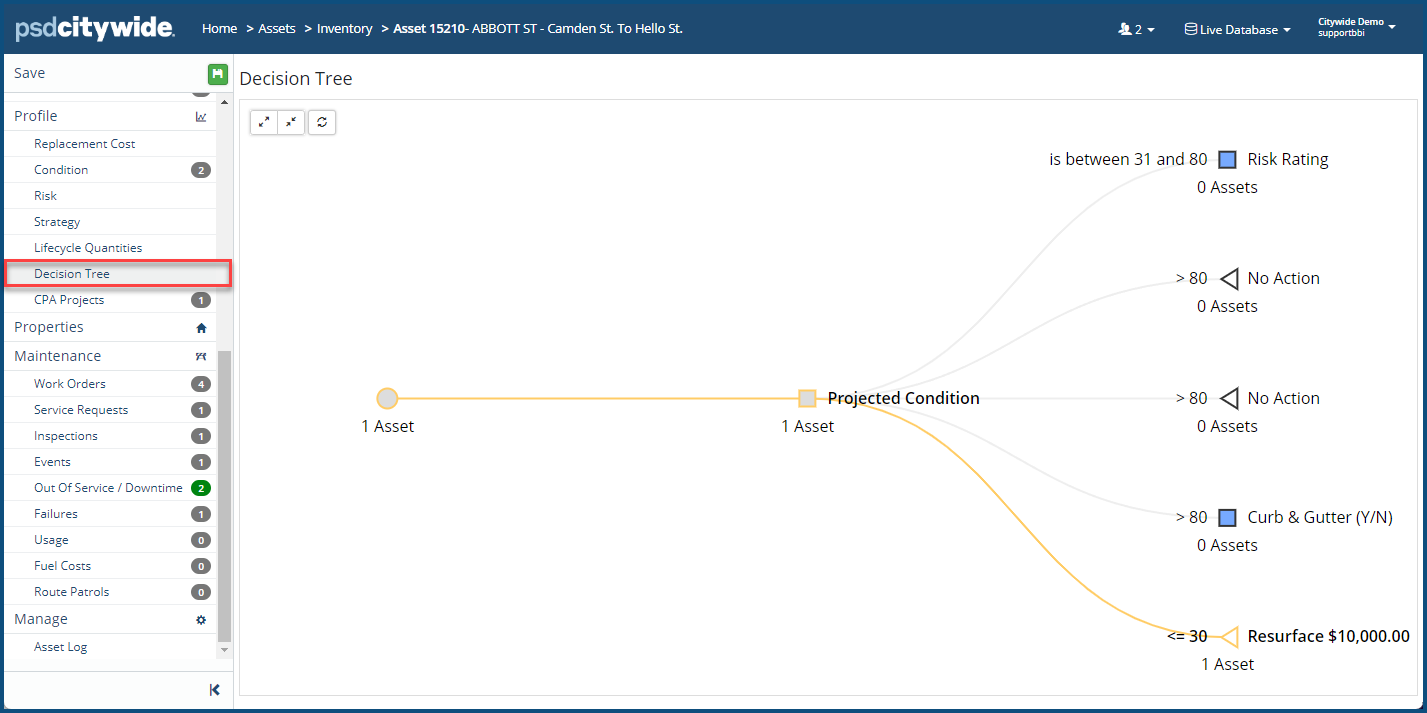
Decision Tree
The Decision Tree section shows the decision flow chart that makes up the Strategy of an asset. This flow chart is defined in the Asset Profiles section.
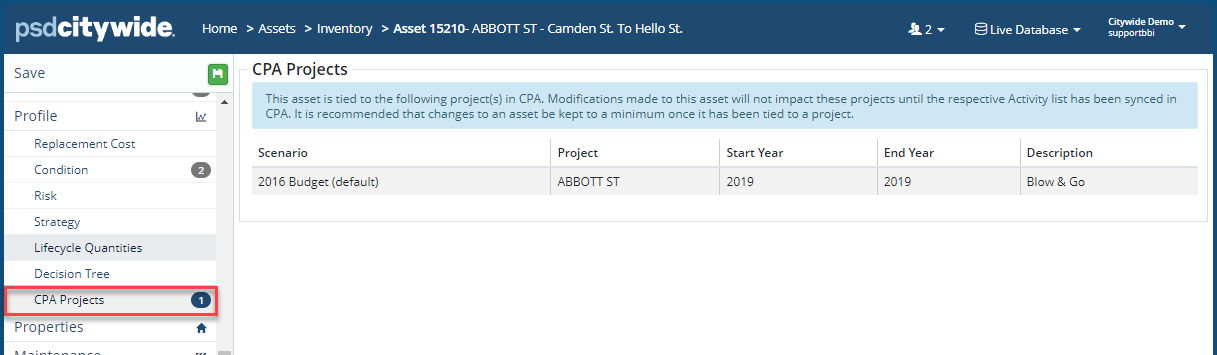
CPA Projects
In this section, users can find CPA Projects created in the CPA module and attached to the asset. The project name is linked and can be clicked on to view the project in the CPA module.
-
This section is available if the Citywide CPA module has been implemented.
Maintenance
The Maintenance section is available to clients who have implemented the Maintenance module. Use this section to manage Work Orders attached to the asset.
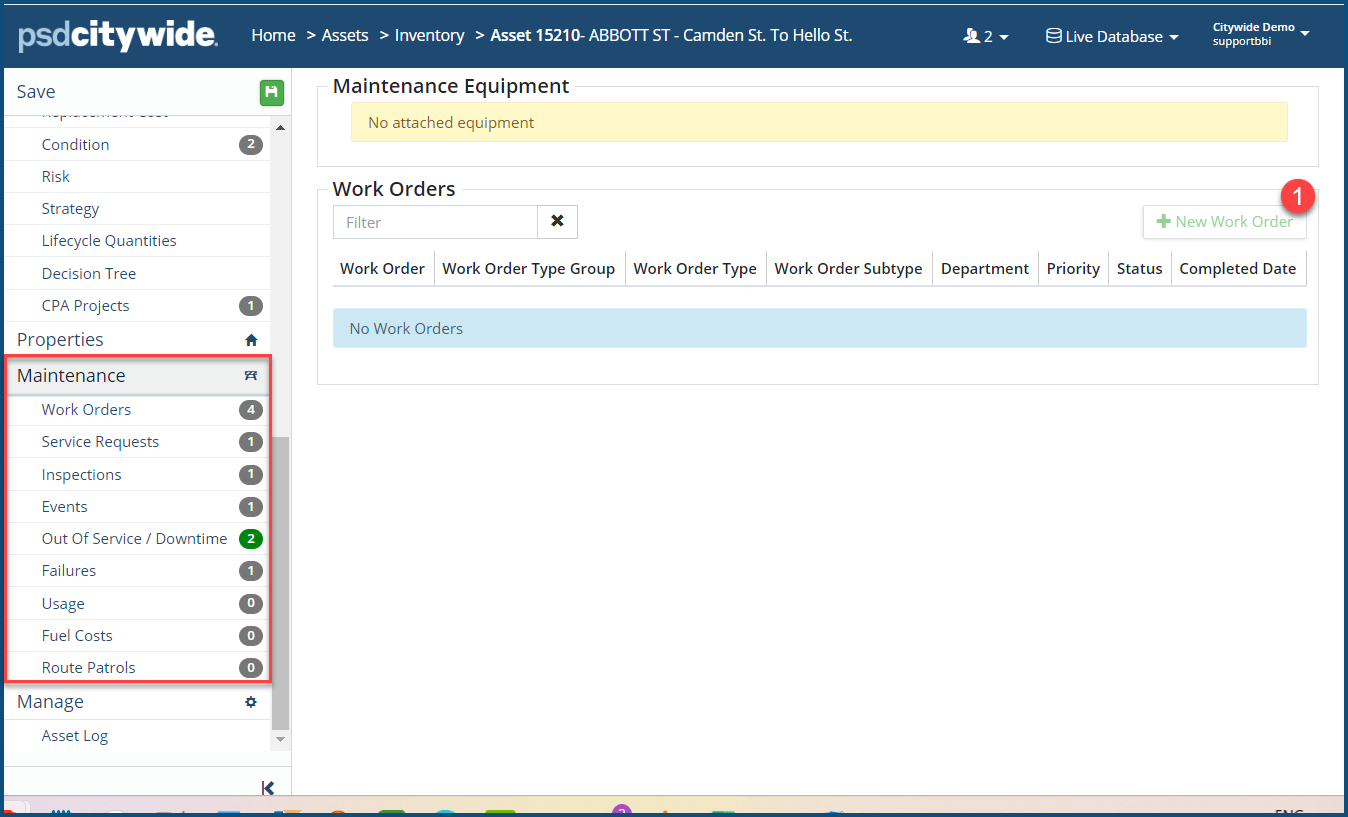
Work Orders
Work Orders attached to the asset can be accessed on this page.
To attach a new work order:
- Click Work Orders.
- Click + New Work Order ❶. The New Work Order dialog box appears:
- Fill-in the fields as needed across the four-tabbed wizard ❷:
- Refer to the Maintenance 🢡 Work Orders article for complete details on filling in these tabs
- Customer: Enter information about the person initiating the request. Click Skip Customer if no customer information is necessary.
- Issue Address/Location: Set the address/location of where the work is to be completed. Click to map the location.
- Details: Enter details of the work to be done, such as Department, Work Order Type, Scheduled Start Date, etc. Assign workers, add notes and/or attach files to the work order as needed.
- Resources: Select Equipment and/or Materials, as well as assign a Route needed to complete the work order.
- Click Add .
- Click Save at the top of the Affiliate panel .
Inspections
This section displays Inspections attached to the asset.
Events
There are two types of Maintenance Events in the system Preventative Maintenance Events and Scheduled Maintenance Events. Both types of events can be associated with the current asset, and both will appear in a single list of this screen:
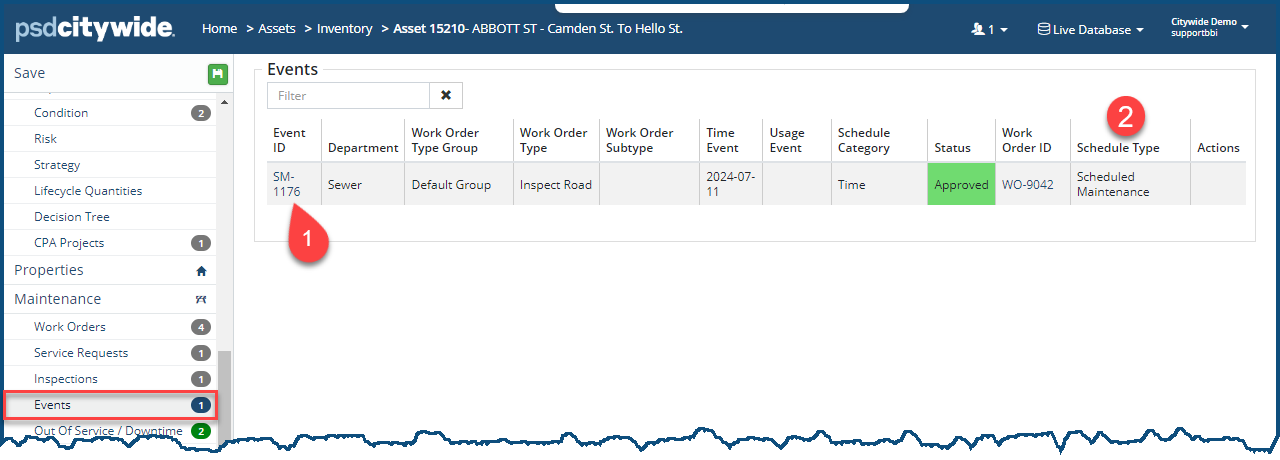
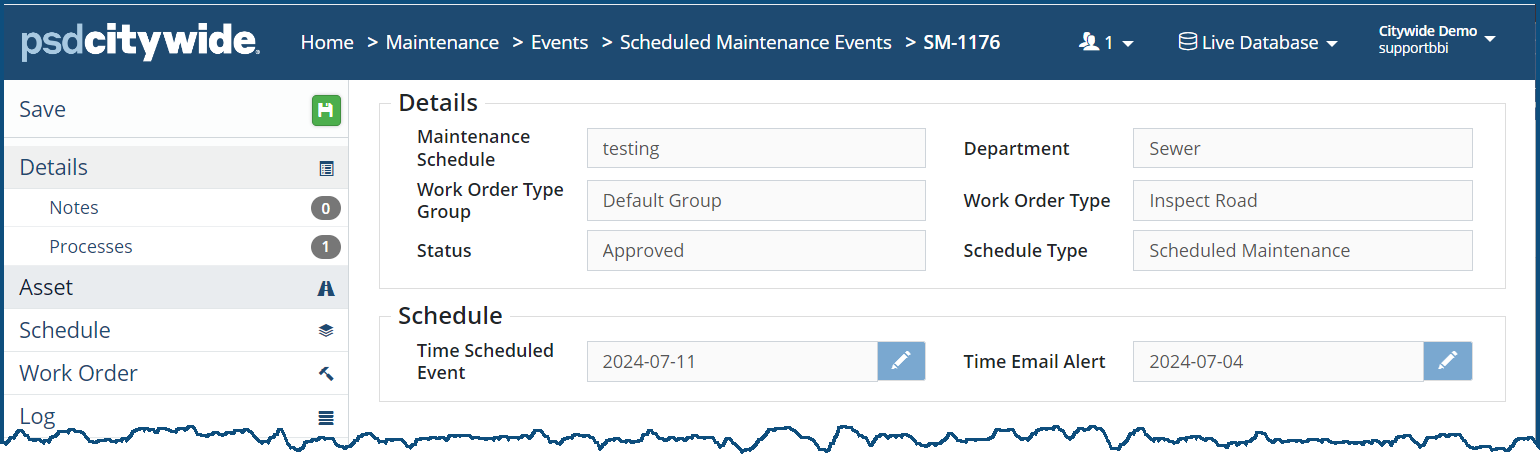
The two types of events are distinguishable in two ways: Preventative maintenance events' IDs ❶ will be predicated with "PM," while Scheduled maintenance events will be predicated with "SM'; and their type will also be specified in the Schedule Type ❷ column. Clicking on the link in the Event ID column will open up the corresponding maintenance Event record, as in this example:
Out of Service/Downtime
This section displays Out of Service/Downtime information created in the Maintenance module and assigned to this Asset. (This section is only available to clients that have subscribed to Maintenance Manager.) Here, for example, two Downtime entries ❶ have been recorded, and the Asset Status ❷ shows that this is a "Currently in Service."
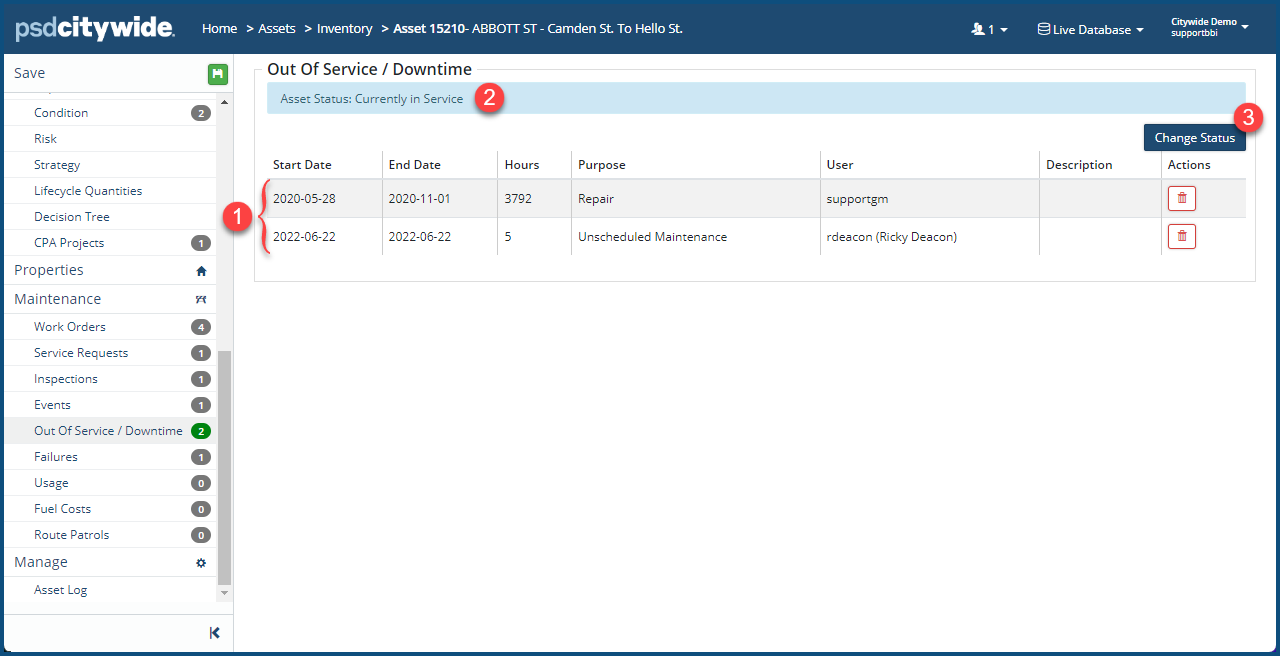
To change the status of the asset (available only to this with Admin access):
- Click the Change Status ❸. The Out of Service/Downtime dialog box appears:
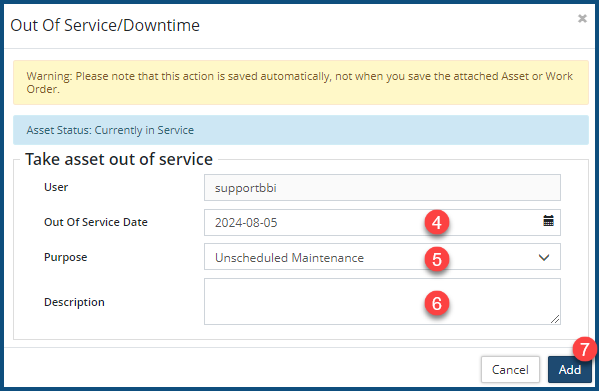
- Set the Out of Service Date ❹.
- Select the Purpose ❺ from its pulldown .
- Optionally, enter a Description ❻.
- Click Add ❼.
- Click the Save button at the top of the Affiliate panel to apply your change(s).
Failures
This section displays all the failure that have been attributed to this asset. Those that have had work orders set up in which the failures were dealt with will have a work order number and link appearing in the Work Order column ❶. Clicking on the link will open the corresponding work order.
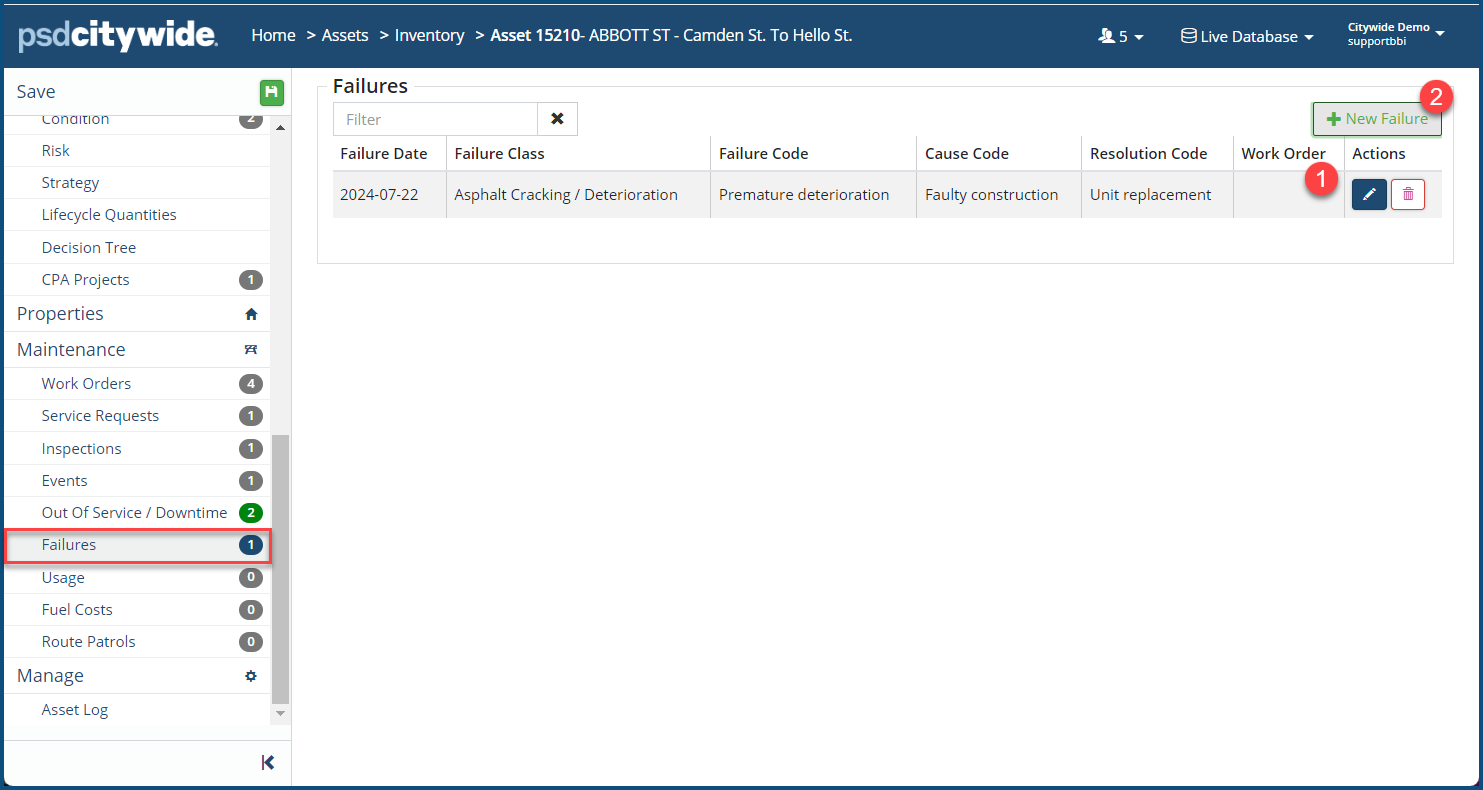
To add a failure code:
- Click on + New Failure ❷. The Add Failure dialog box appears:
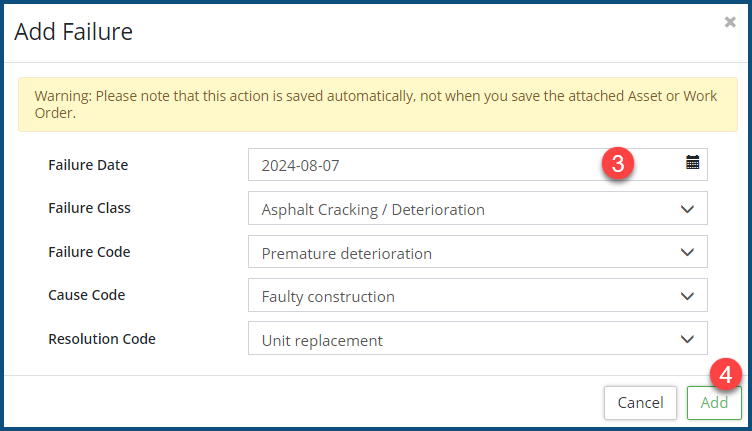
- Fill in the Failure Date ❸. Note: it's the failure date you want, not the current date (which clicking on the calendar defaults to).
- Fill in the remaining fields.
- Click Add ❹.
- Repeat the above steps to add additional failures for this asset.
Usage
This section displays Usage information created in Maintenance and assigned to this asset. This section is only available to clients that have subscribed to the Maintenance module.
- To attach usage, click the + New Usage
- Fill out all fields of the form, including the date and usage amount.
- When you are finished, click the Add button.
- Click the Save button to apply your change(s).
Fuel Costs
This section displays Fuel Cost information created in Maintenance and assigned to this asset. This section is only available to clients that have subscribed to the Maintenance module.
Route Patrol
This section displays any Route Patrol information created in Maintenance and assigned to this asset. Information such as the Last Patrolled Date, Patrol frequency, as well as route details are shown here. This section is only available to clients that have subscribed to the Maintenance module. Click the Asset Patrol Summary Report button to save the summary as a PDF.
Manage
The Manage screen includes additional tools such as Recycle Asset and Add/Become Component.
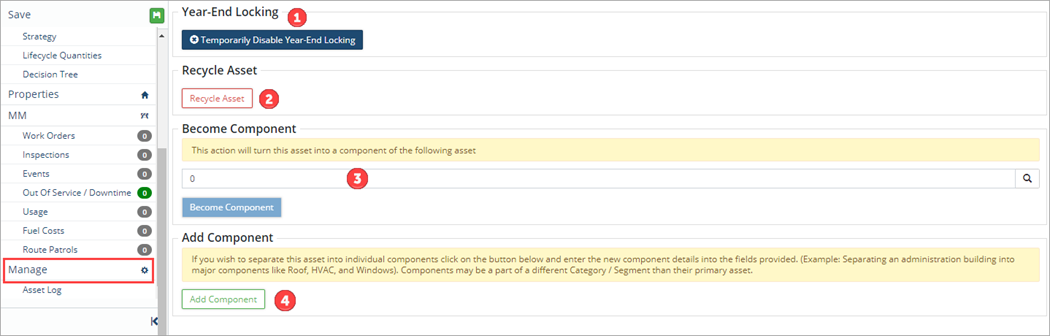 Become Component
To make an asset a 'component' of another primary asset:
- Search for the existing Asset ID ❸ - click the search icon

- Using the filters, search for the existing Asset ID then click the asset row
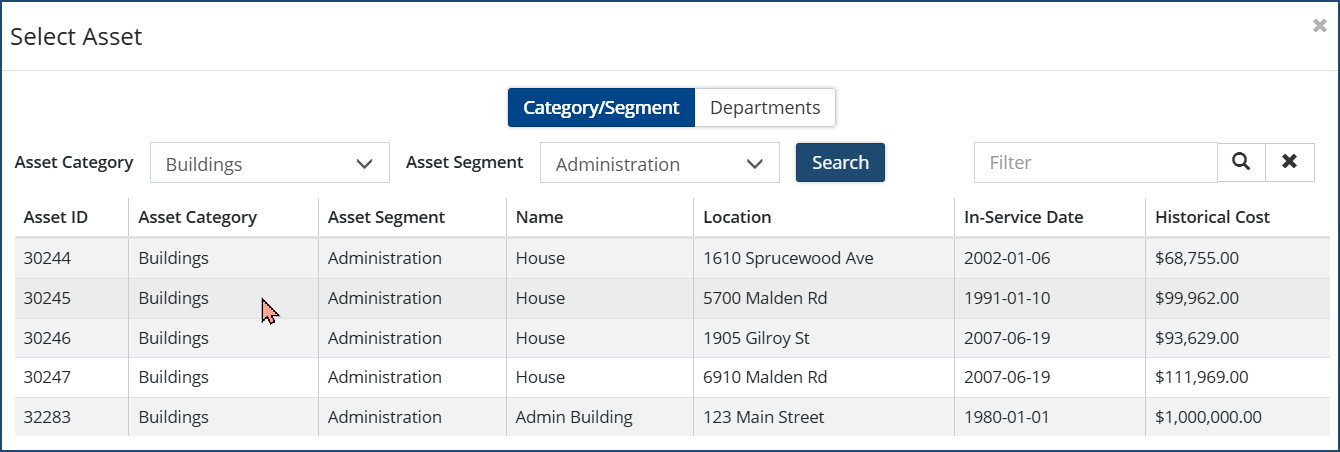 You will be returned to the Manage screen, then click Become Component.
- Using the filters, search for the existing Asset ID then click the asset row
Add Component
To separate an asset into individual components (ie. separating an administration building into major components like Roof, HVAC, and Windows. Note: Components may be a part of a different Category / Segment than their primary asset if required.):
- Click Add Component
- Enter the new component details as adding a new asset into the fields provided - classifications, name, historical cost, attributes, etc.
- Click Add
- Review the details on the Asset page as needed, then click Save
 at the top left
Temporarily Disable Year-End Locking
Year-End lock is used to preserve PSAB reports. Once set, assets can’t be created or modified prior to or on the set year. Where changes need to be made on an asset that has a year-end lock applied, Users can temporarily disable the Year-End lock.
To temporarily disable a year-end lock on an asset:
- Click Manage in the asset view.
- Click Temporarily Disable Year-End Locking ❶. A prompt displays, click Yes.
- Make adjustments and changes as needed.
- Click Save to apply the change(s). Once you navigate away from the asset, the year-end lock will be re-instated.
Temporarily disabling year-end locking is not recommended and may result in a retroactive change to your reporting numbers. Be careful before proceeding.


