
Overview
This article discusses the steps involved in adding a single new asset to the inventory. To bulk import multiple new assets, see our Upload Center (Assets) article.
Citywide Asset users with the appropriate permission settings can add new assets to the inventory using the Add Asset button.
To add a new asset:
- Navigate to Home 🢡 Assets 🢡 Inventory.
- Click Add Asset
in the top right ❶.

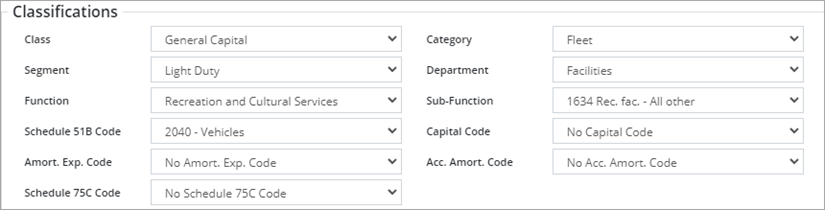
- Complete the Classifications, Fields, and Attributes sections ❷ Reference a similar existing asset within the inventory to ensure consistency and accuracy. If Asset Profiles have been created, select a Profile Group and Profile. Several fields may auto populate based on the selected profile. Click here to learn about Asset Profiles.
- Select a Class, Category, and Segment (these are mandatory fields). Set additional classifications as needed.
- In the Fields section, enter a name, in-service-date, and historical cost.
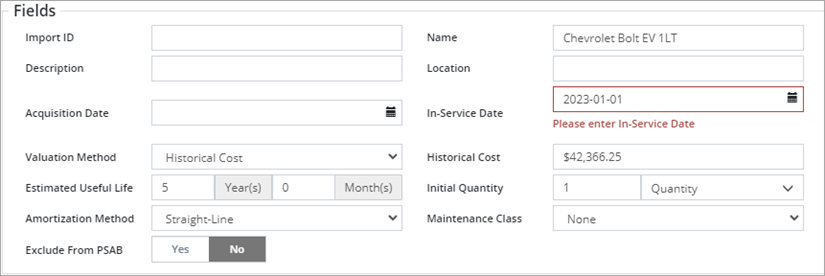
- The valuation method defaults to Historical Cost. Additional options are available on the drop-down.
- Enter the estimated useful life, initial quantity, and unit of measure.
- The amortization method defaults to straight-line. Additional options are available on the drop-down.
- Complete additional fields as needed.
-
The in-service-date is used for amortization of the asset which starts in the month of the year entered. Data from the in-service-date, historical cost, and the estimated useful life fields is used to create an amortization schedule.
-
Set the Exclude from PSAB flag to Yes when the asset is to be excluded from financial reporting (i.e., the asset falls below a capitalization threshold or the asset is for asset management only). When an asset is marked as excluded from PSAB, the Historical Cost and Estimated Useful Life fields can be left blank.
- Attach Attributes as needed. Review an existing similar asset to ensure all necessary attributes are tagged to the new asset.
- Click Attach and scroll/search through the list. Select an attribute or Ctrl+Click to select multiple attributes. Narrow the list by typing in text or click ü to select all. Click the X to clear the selections.
- Click Select Attributes
 . Fill in the new fields.
 - New attributes can be added by clicking Add New Attribute
 and completing the New Attribute popup. The new attribute will be available for use on any asset.

- Once all fields are complete, click Add. Check Add Another in the bottom right prior to clicking add when adding several assets to the inventory.
-
Save time when adding assets by using Copy details from existing Asset located at the top of the Add Asset window. See below to learn more.
When adding assets by using Copy details from existing Asset option located at the top of the Add Asset popup:
- Click > to expand the section.
- Enter an Asset ID or use the Search icon to locate an asset whose details will be copied from.
- Set the Copy Asset Attribute Fields and Include Asset Attribute Values flags to Yes
- Click Copy
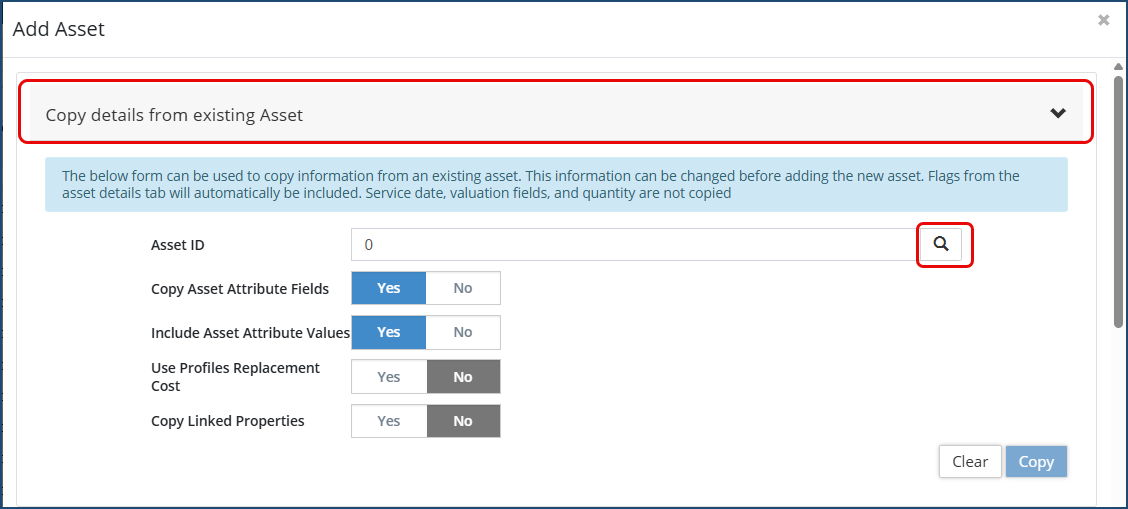 Then review the asset details that it copied from and adjust as needed.


