Overview
AROs (Asset Retirement Obligations) arise when there is a legal obligation to retire an asset. Examples include assets containing asbestos, fuel tanks, landfills, wells, etc. The ARO Reviewed and ARO Identified flags are used to review all assets within the inventory and then identify those assets that have a cost associated with decommissioning them.
Items to note prior to completing AROs in Citywide:
- The ARO Reviewed flag can be set individually at the asset level or in bulk using Default Values

- Once the ARO Reviewed flag has been set and the asset saved, the flag cannot be toggled off
- The ARO Identified flag only activates once the ARO Reviewed flag is set to yes
- An ARO cannot be completed on an asset that:
- does not have an in-service date
- has been fully amortized (you must complete an Addition on the asset and add EUL only)
- Block adding ARO if the asset does not have an in-service date
- Create ARO Categories as needed (Home ð Assets ð Manage/ARO Categories)
- Set-up GL Codes as needed (and for reference purposes only) to assign to the ARO (Home ð Administration/General Ledger Codes)
- Create a custom view of the grid showing ARO related columns (Customize Columns)
ARO Reviewed
Mark a single asset as reviewed:
- In the asset view click Asset Details/Flags .
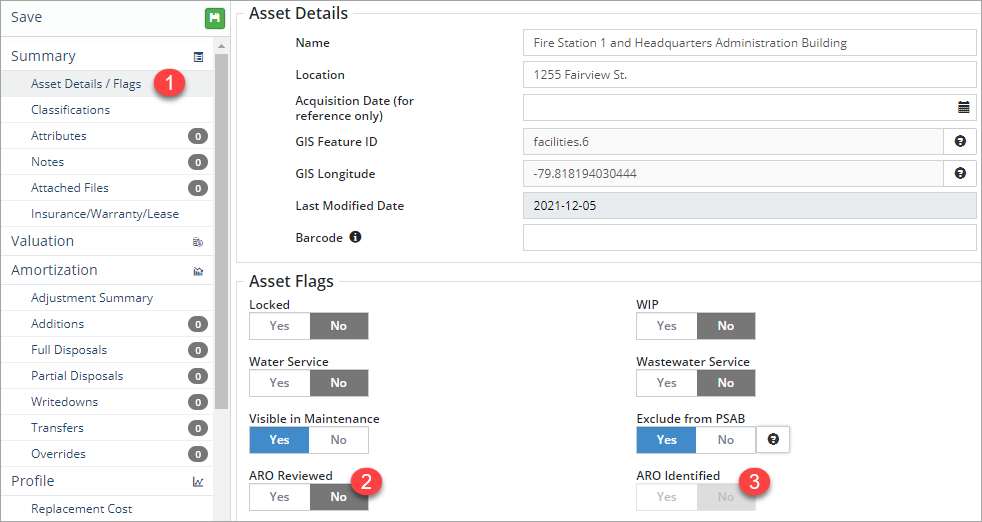
- Set the ARO Reviewed flag to Yes.
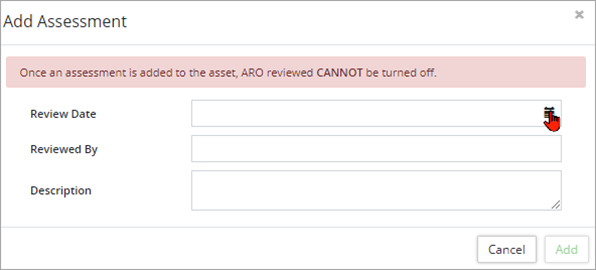
- Enter a Review Date.
- Complete the Reviewed By and Description (optional) fields. The review date can be a current or past date but not a future date.
- Click Add. Once a review has been added and the asset save, the flag cannot be toggled off. The review is summarized in the ARO Review section and additional assessments can be added using the +New Assessment button.

- If a retirement obligation has been identified, set the ARO Identified flag to Yes and complete the additional steps. If it's determined that an obligation does not exist, leave the ARO Identified flag as No.
- Click Save in the top left.
Mark multiple assets as reviewed:
- Filter the Inventory to show only the assets that will be marked as reviewed.
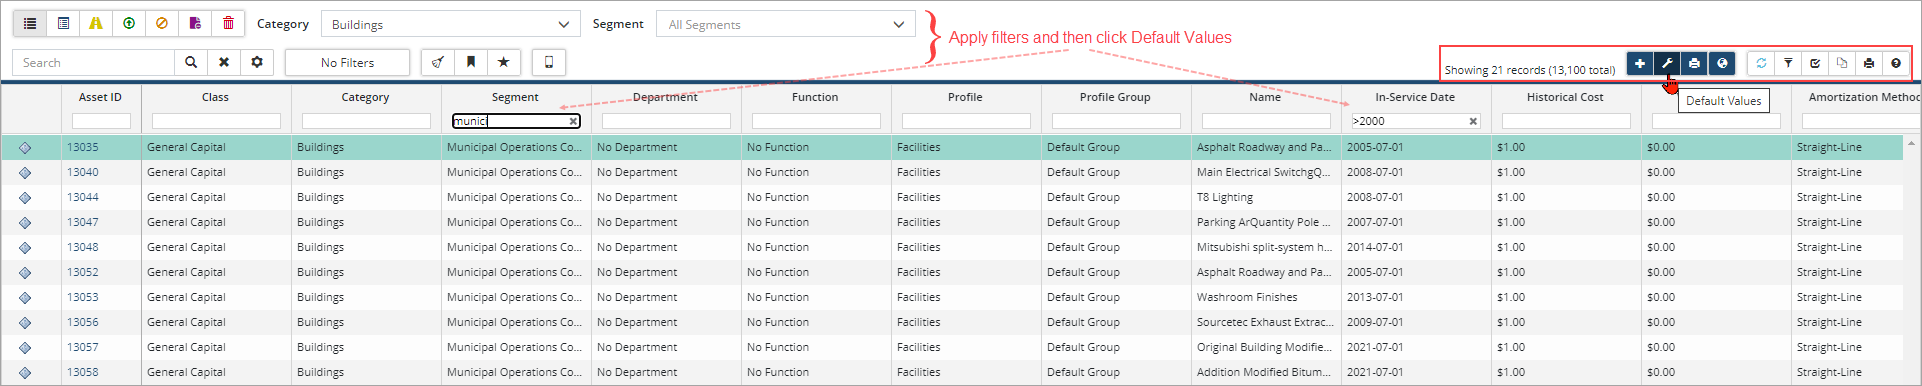
- Click Default Values .
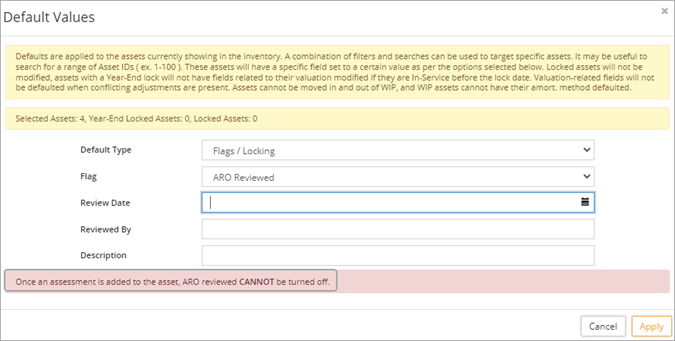
- Click Default Type and select Flags/Locking.
- Click Flag and select ARO Reviewed.
- Enter a Review Date. The review date can be a current or past date but not a future date.
- Complete the Reviewed By field
- Enter a Description (optional).
- Click Apply.
- Confirm the change when prompted.
- All assets listed in the inventory grid will update with the ARO Review flag set to Yes and the details summarized in the ARO Review section.
ARO Identified
The ARO Identified flag is activated once the ARO Reviewed flag is set to yes. If a retirement obligation exists then set the ARO Identified flag to yes and provide details of the retirement obligation. In this step users can set the asset as:
- ARO Valuation Pending OR
- Enter a Retirement Cost Estimate and enter the valuation information for retiring the asset.
- Set the ARO Identified flag to Yes.
-
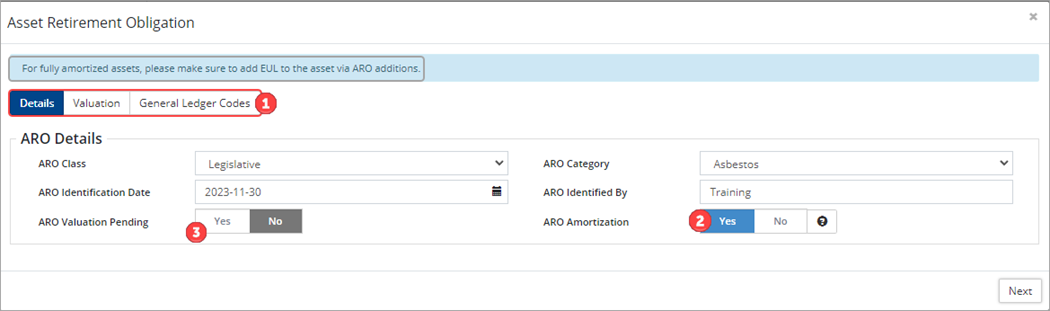
In the Asset Retirement Obligation window complete Details, Valuation, and General Ledger Codes for the ARO. In the Details tab:
- Select an ARO Class and an ARO Category (optional). ARO categories are set up on the Assets landing page (Assets ð Manage/ARO Categories/+New Categories).
- Enter an ARO Identification Date. The date cannot be a future date and must occur before the fully amortized date of the asset. (If the asset has already amortized complete an Addition and add EUL. You can complete an ARO on an asset that has fully amortized.)
- Complete the ARO Identified By field.
- The ARO Amortization flag defaults to Yes. Assets with no ARO Amortization have an ARO liability but are otherwise not amortized. When the flag is set to No, ARO costs can still be added to the asset but only ARO Accretion will be calculated instead of ARO Amortization and Accretion.
- Set the ARO Valuation Pending flag to Yes if the valuation is unknown. Users can complete the valuation on the Asset Retirement Obligation section at a later date.
- Click Next.
- In the Valuation tab:
- Enter the Cost Estimate Date. The date must occur before the fully amortized date of the asset and is used to calculate the periods to retirement.
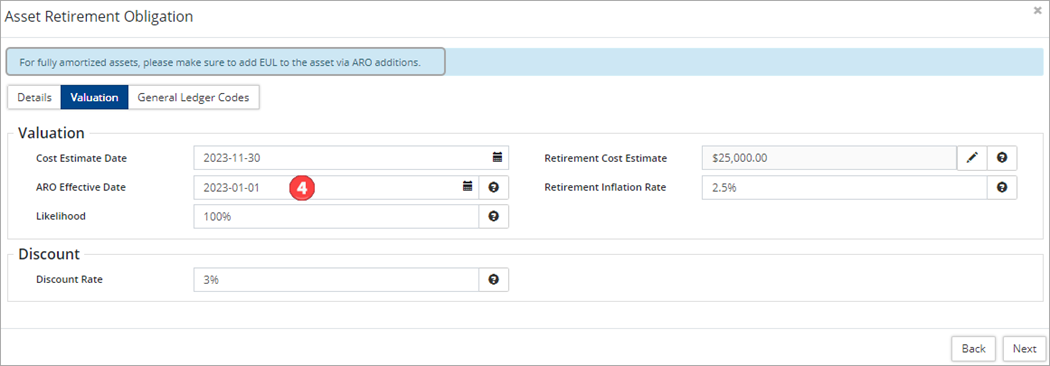
- Enter a Retirement Cost Estimate using the
 button. The retirement cost is calculated using a user defined method. This is the initial estimate of what it will cost to decommission the asset.
 - Enter an ARO Effective Date . This can be the date that the ARO legislation was introduced. Citywide will use this date to stat the ARO-amortization and accretion schedules. When this field is left empty, the asset's in-service-date is used to start the ARO-amortization and accretion schedules.
- Enter a Retirement Inflation Rate to determine the expected future cash flows of the liability for the estimated ARO.
- Enter a Likelihood to acknowledge a potential obligation that may or may not be met. Likelihood is the probability that an ARO exists in the ARO. It defaults to 100% until the asset is reviewed and confirmed for ARO. If the asset has a likelihood but the ARO doesn't exist then this is the percentage of likelihood that it will exist in future.
- Enter a Discount Rate which is used to calculate the accretion expense and the present value for those cash flows of the estimated AROs.
- Enter the Cost Estimate Date. The date must occur before the fully amortized date of the asset and is used to calculate the periods to retirement.
- Click Next.
- Complete General Ledger Codes as needed. General Ledger Codes are created and managed in the Administration section of the Home Page.
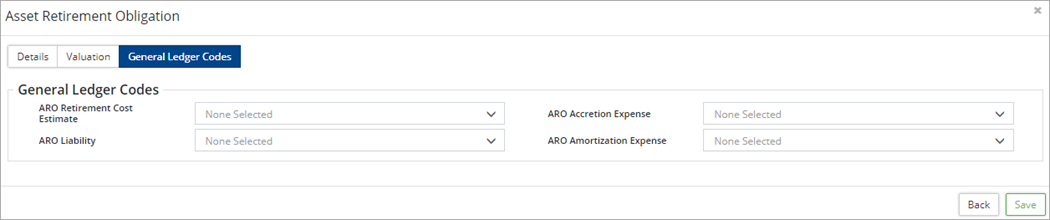
- Click Save. Once saved, an Asset Retirement Obligation page is added to the asset view and additional schedules are created. Schedules are viewed on the Amortization/Accretion page.
ARO Details
Assets with an ARO include an Asset Retirement Obligation page at the asset detail level. The system calculates an ARC (Asset Retirement Cost), an ARC at EUL and an Initial ARO with the information entered during the ARO identified step. Click Asset Retirement Obligation on the left to see valuation details and calculations, as well as to modify inflation or discount rates. Adjustments are also shown and include additions and/or write-downs completed on the ARO.
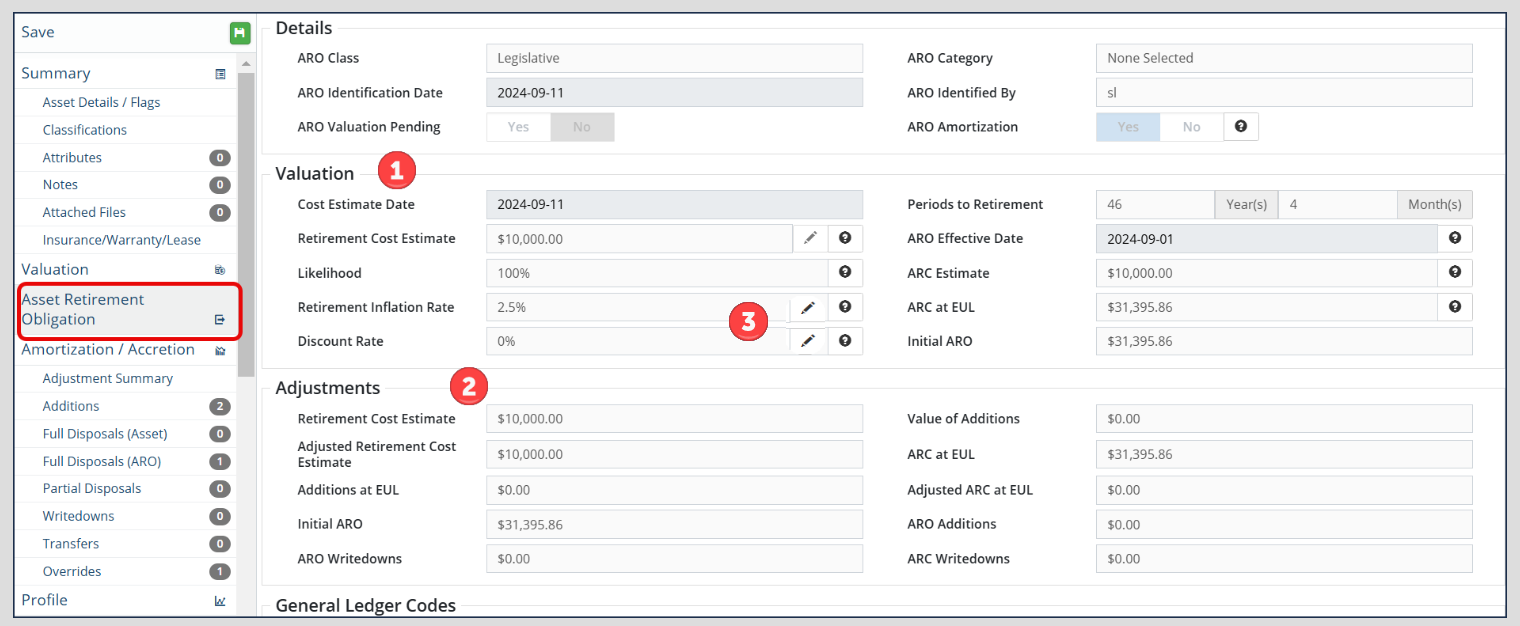
The following describes the fields found under Valuation:
- Cost Estimate Date: User Defined but cannot be a future date.
- Periods to Retirement: System calculation using the fully amortized date and the cost estimate date.
- Retirement Cost Estimate: Entered as a user defined value.
- ARO Effective Date: User defined. Citywide uses this date to start the ARO amortization and accretion schedules. If no date is provided, the schedules will start from the asset's in-service-date.
- Likelihood: Used to acknowledge a potential obligation that may or may not be met.
- ARC Estimate: System calculation multiplying the retirement cost estimate by the likelihood %.
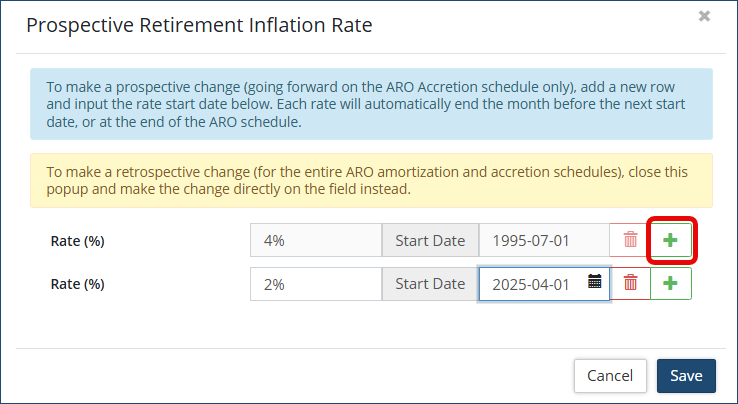
- Retirement Inflation Rate : User-defined.
- Retrospective Rate Change:
- To change the inflation rate retrospectively for the entire schedule (going backwards), edit the 'Retirement Inflation Rate' field.
- Prospective Rate Changes:
- To change the inflation rate prospectively from a specified date (going forward only), click the pencil icon
 .
. - Click the + icon to add a new inflation rate
- Enter the new Inflation Rate (%)
- Enter the Start date (YYYY-MM-DD)
- Click Save
- To change the inflation rate prospectively from a specified date (going forward only), click the pencil icon
- Retrospective Rate Change:
- ARC at EUL: System calculation multiplying the retirement cost estimate by the retirement inflation rate over the periods of retirement.
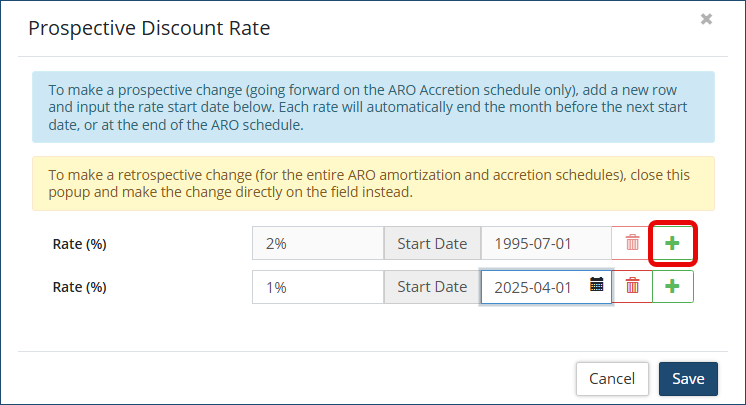
- Discount Rate : User-defined.
- Retrospective Rate Change:
- To change the discount rate retrospectively for the entire schedule (going backwards), edit the 'Discount Rate' field.
- Prospective Rate Changes:
- To change the discount rate prospectively from a specified date (going forward only), click the pencil icon .
- Click the + icon to add a new discount rate
- Enter the new Discount Rate (%)
- Enter the Start date (YYYY-MM-DD)
- Click Save
- To change the discount rate prospectively from a specified date (going forward only), click the pencil icon
- Retrospective Rate Change:
- Initial ARO: Present value for those cash flows of the estimated ARO. The retirement cost estimate is deflated back to either the effective date or the in-service-date.
- Click Amortization/Accretion to view the ARO amortization and accretion schedules.
- Click Display Type to access views related to the ARO.
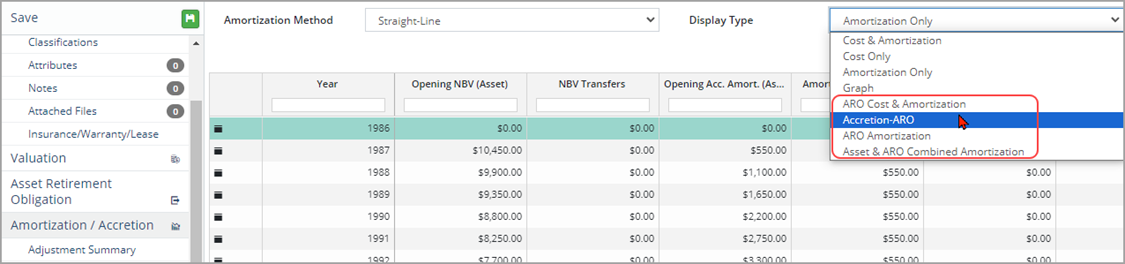
Screenshot #1: ARO amortization/accretion begins as of the effective date (2023-01-01)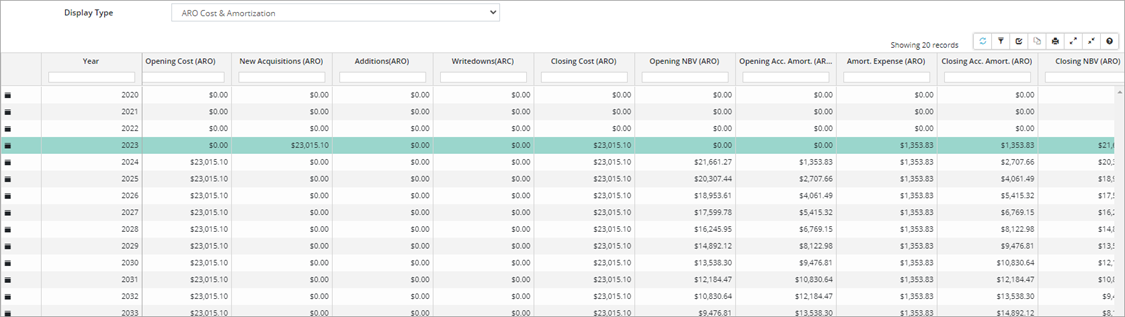
Screenshot #2: ARO amortization/accretion begins as of the asset's in-service-date (2020-01-01)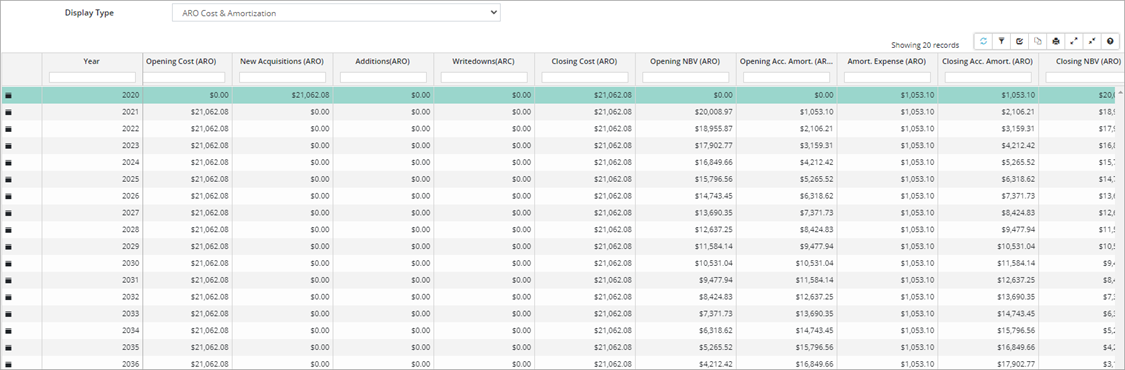
Upload Center - ARO Identification
The Upload Center/ARO Identification template can be used to complete AROs in bulk. Ensure the ARO Reviewed flag is set to Yes on the assets prior to attempting to upload ARO information using this template.
To complete the ARO Identified step and bulk import ARO details:
- Click Upload Center on the Assets landing page.
- Click Upload Type and select ARO Identification.

- Select Click to Export.
- In the Customize Template window select the fields to be completed on each asset.
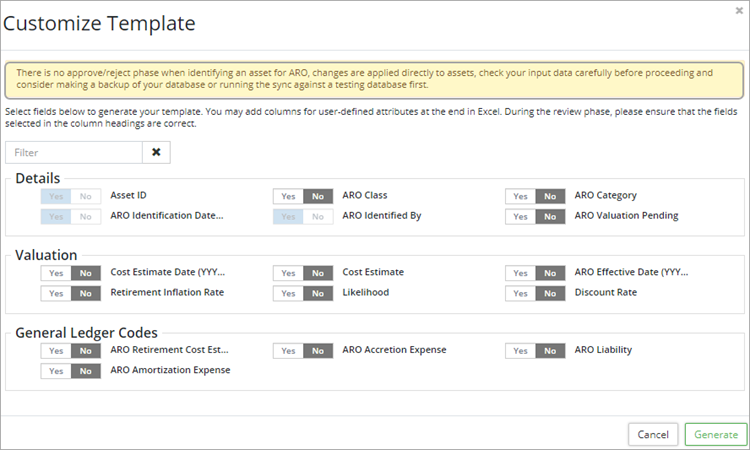
- The Asset ID, ARO Identification Date, and ARO Identified By are required fields. To bulk upload the valuation for the AROs select Cost Estimate Date, Cost Estimate, ARO Effective Date, Retirement Inflation Rate, Likelihood, and Discount Rate.
- Select General Ledger Codes as needed.
- Click Generate.
- Copy the string of text (which includes all the selected fields) into a blank Excel worksheet.

- Enter ARO information for each asset. The Asset ID is used to identify those assets that require an ARO.
- Once all information has been entered and reviewed, copy all the rows with data including the header row and paste it in the Upload Center, Input/Paste completed template below field.
- Review the information. If a field in the header row is not mapping correctly, click the lower field within the column and select the correct match. Any errors within the data will have to be corrected in the Excel spreadsheet.
- Click Submit.
- When the upload is successful, Citywide will apply the new information directly to the assets. There is no approve/reject phase when identifying an asset for ARO. Consider running an upload against a test/sandbox database first.
- If the upload fails, Citywide will display an error message with some troubleshooting information.

ARO Adjustments
ARO Additions, Full Disposals (ARO) and ARO Writedowns can be completed on the ARO. These can be added individually or in bulk through the Upload Center using the ARO Additions, Full Disposals (ARO) or the ARO/ARC Writedowns template(s).
Complete an ARO Addition on a single asset:
- In the asset view click on Additions.
- Click +New Addition in the top right.
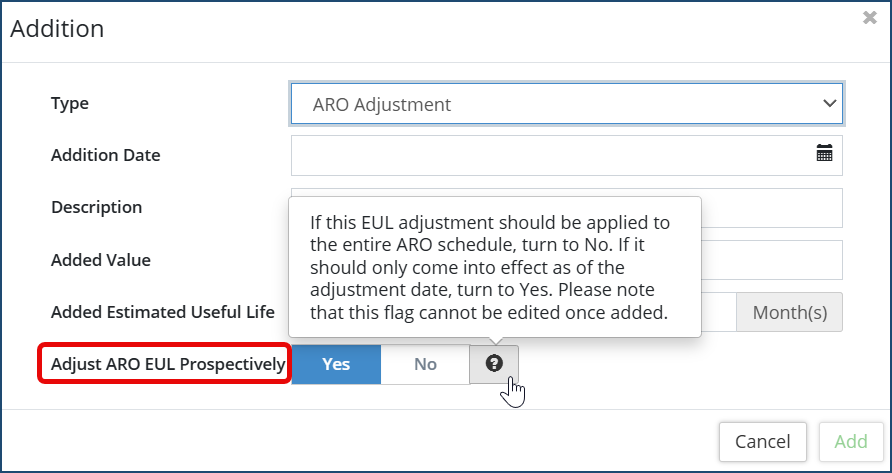
- Click Type and select ARO Adjustment.
- Enter an Addition Date and Description (optional).
- Enter an Added Value amount. When adding value, both the ARO amortization and accretion schedules will adjust from the addition date onward.
- Add EUL in the Added Estimated Useful Life field. When adding EUL only the ARO amortization schedule will adjust as of the addition date onward.
- Toggle Yes or No to Adjust ARO EUL Prospectively. This will determine if the EUL should be adjusted for the entire ARO schedule OR if it should only come into effect as of the adjustment date.
 To convert existing EUL adjustments to prospective, you must re-enter them:
- Navigate to the relevant asset.
- Go to the Additions tab.
- Delete the existing EUL adjustment.
- Re-add it, ensuring "Apply EUL adjustment prospectively" is set to "Yes".
-
Note: Retrospective adjustments cannot be added to assets with existing prospective EUL changes.
-
8. Click Add.
9. Click Save at the top of the affiliate panel to apply the change(s).
The adjustments are summarized on the Asset Retirement Obligation screen.

Complete a Full Disposal (ARO) on a single asset:
Note: For Full Disposal (ARO) adjustments, this disposes the ARO only on an asset while leaving the rest of the asset in-service.
- In the asset information view on the left side, click Full Disposals (ARO)
- then click +New ARO Full Disposal.

- Enter the information on the related fields (Disposal Date, Description, Net Proceeds)
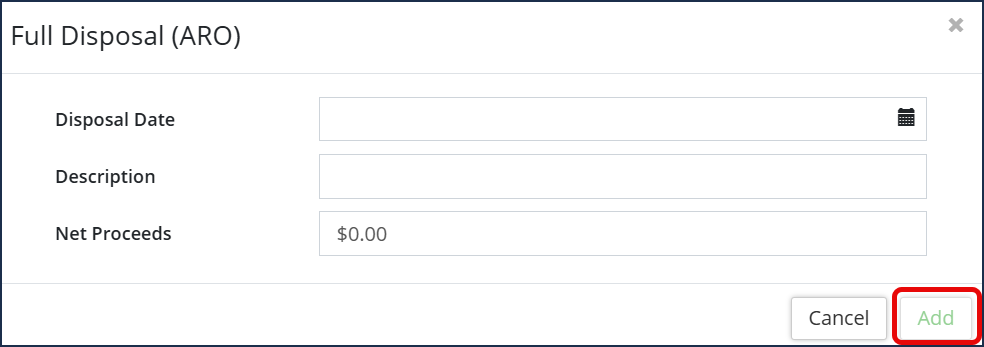
- Click Add.
- A warning box will appear to confirm this will dispose of the ARO financials only.
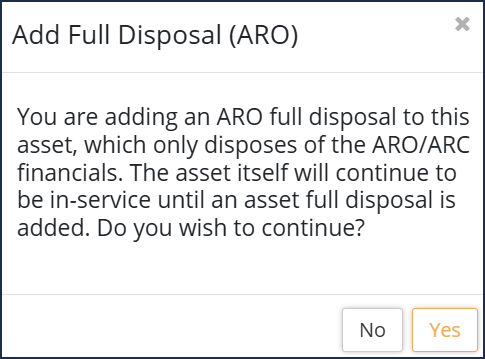
- Click No or Yes to continue.
- Click Save at the top of the affiliate panel to apply the change(s).
Complete an ARO/ARC Writedown on a single asset:
- In the asset view click Writedowns.
- Click +New Writedown.
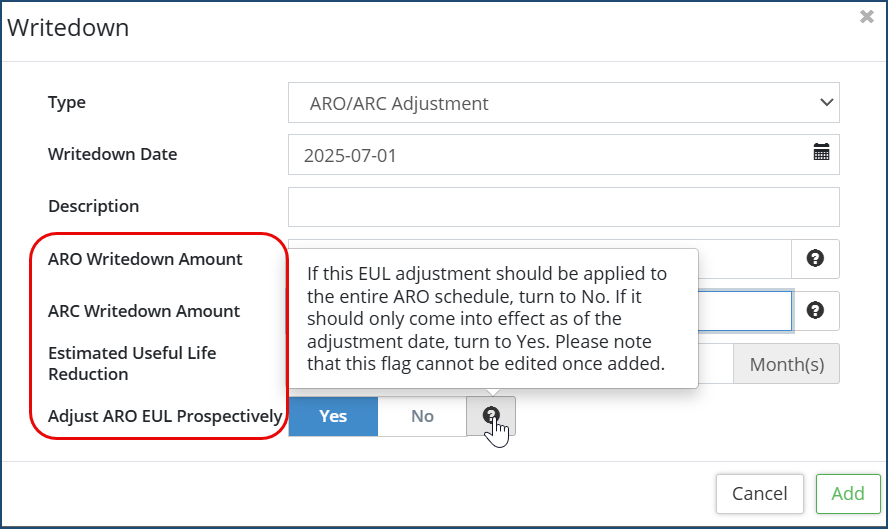
- Click Type and select ARO/ARC Adjustment.
- Enter a Writedown Date. This is a required field and when empty the ARO/ARC Writedown Amount fields are greyed out.
- Enter a Description (optional).
- Enter a writedown amount:
- Enter an ARO Writedown Amount. An ARO (liability) writedown amount can be entered here manually or calculated proportionately based on the manually entered ARC (asset) writedown amount. The entered amount removes value from the accretion of the ARO
- Or enter an ARC Writedown Amount. An ARC (asset) writedown amount can be entered here manually or calculated proportionately based on the manually entered ARO (liability) writedown amount. The entered amount removes value from the ARO amortization.
- Enter an Estimated Useful Life Reduction (optional). This is used to adjust the Periods to Retirement.
- Toggle Yes or No to Adjust ARO EUL Prospectively. This will determine if the EUL should be adjusted for the entire ARO schedule OR if it should only come into effect as of the adjustment date.
 To convert existing EUL adjustments to prospective, you must re-enter them:
- Navigate to the relevant asset.
- Go to the Writedowns tab.
- Delete the existing EUL adjustment.
- Re-add it, ensuring "Apply EUL adjustment prospectively" is set to "Yes".
-
Note: Retrospective adjustments cannot be added to assets with existing prospective EUL changes.
-
9. Click Add.
10. Click Save at the top of the affiliate panel to apply the change(s).
The following Financial reports can be generated for ARO reporting:
Generate an Amortization report for ARO Identified assets grouped by Category/Segment
- Click the Financial reports icon on the Assets landing page.
- Click Amortization.

- Assets will be grouped by the Category/Segment classifications . Adjust as needed.
- Click WIP Preference and select Exclude WIP.
- Click Asset Flag and select ARO Identified .
- Click Run Report .
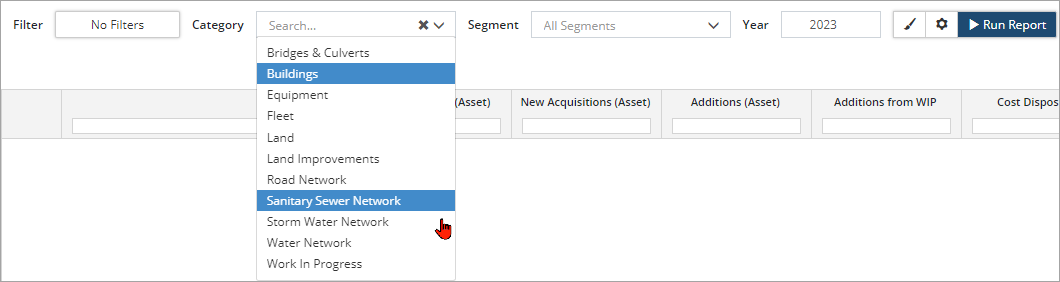
- Select the Category(s) and Segment(s) of assets to include in the report. Ctrl + click to select multiple items in the dropdowns.
- Enter a Year.
- Click Run Report.
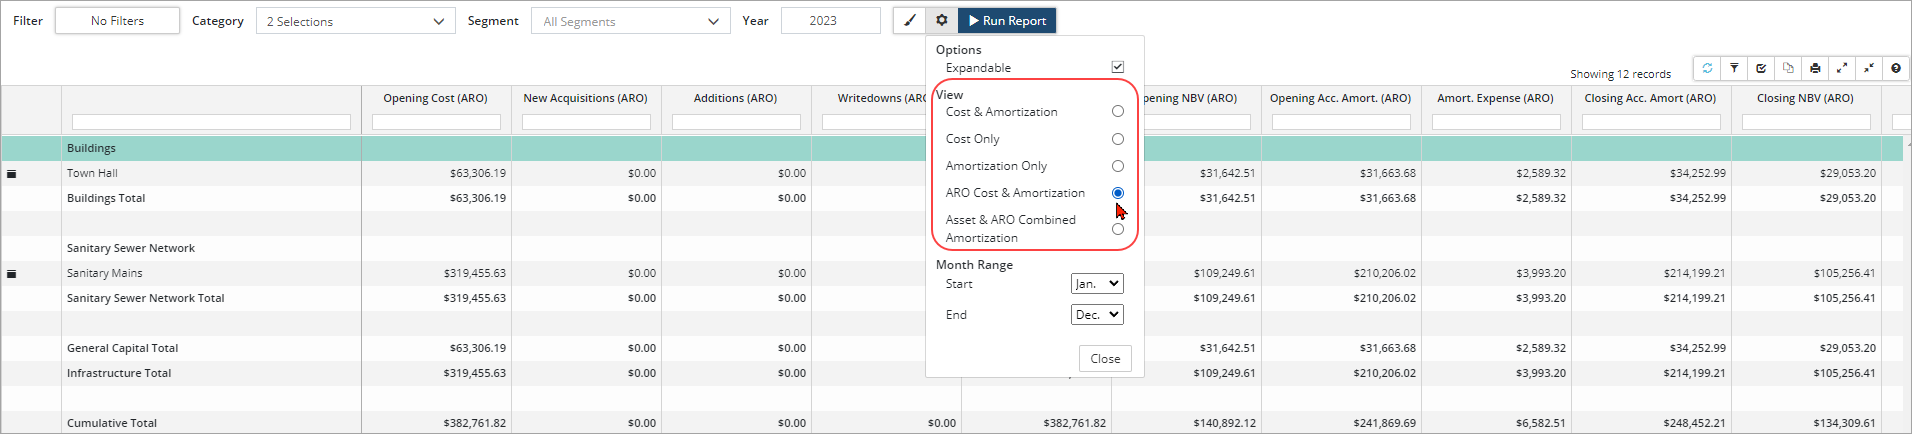
- Click Modify Report
 to switch to an ARO view.