Overview
The Decision Tree feature in Citywide allows users to build and generate asset lifecycle strategies using a visual, top-down, node-based methodology within Asset Profiles. This allows for more flexibility when determining the event triggers for lifecycle events.
The examples used in this article are for demonstration/learning purposes only and shows a Roads Decision Tree with multiple criteria to trigger certain lifecycle events and consolidating multiple strategies into a single profile.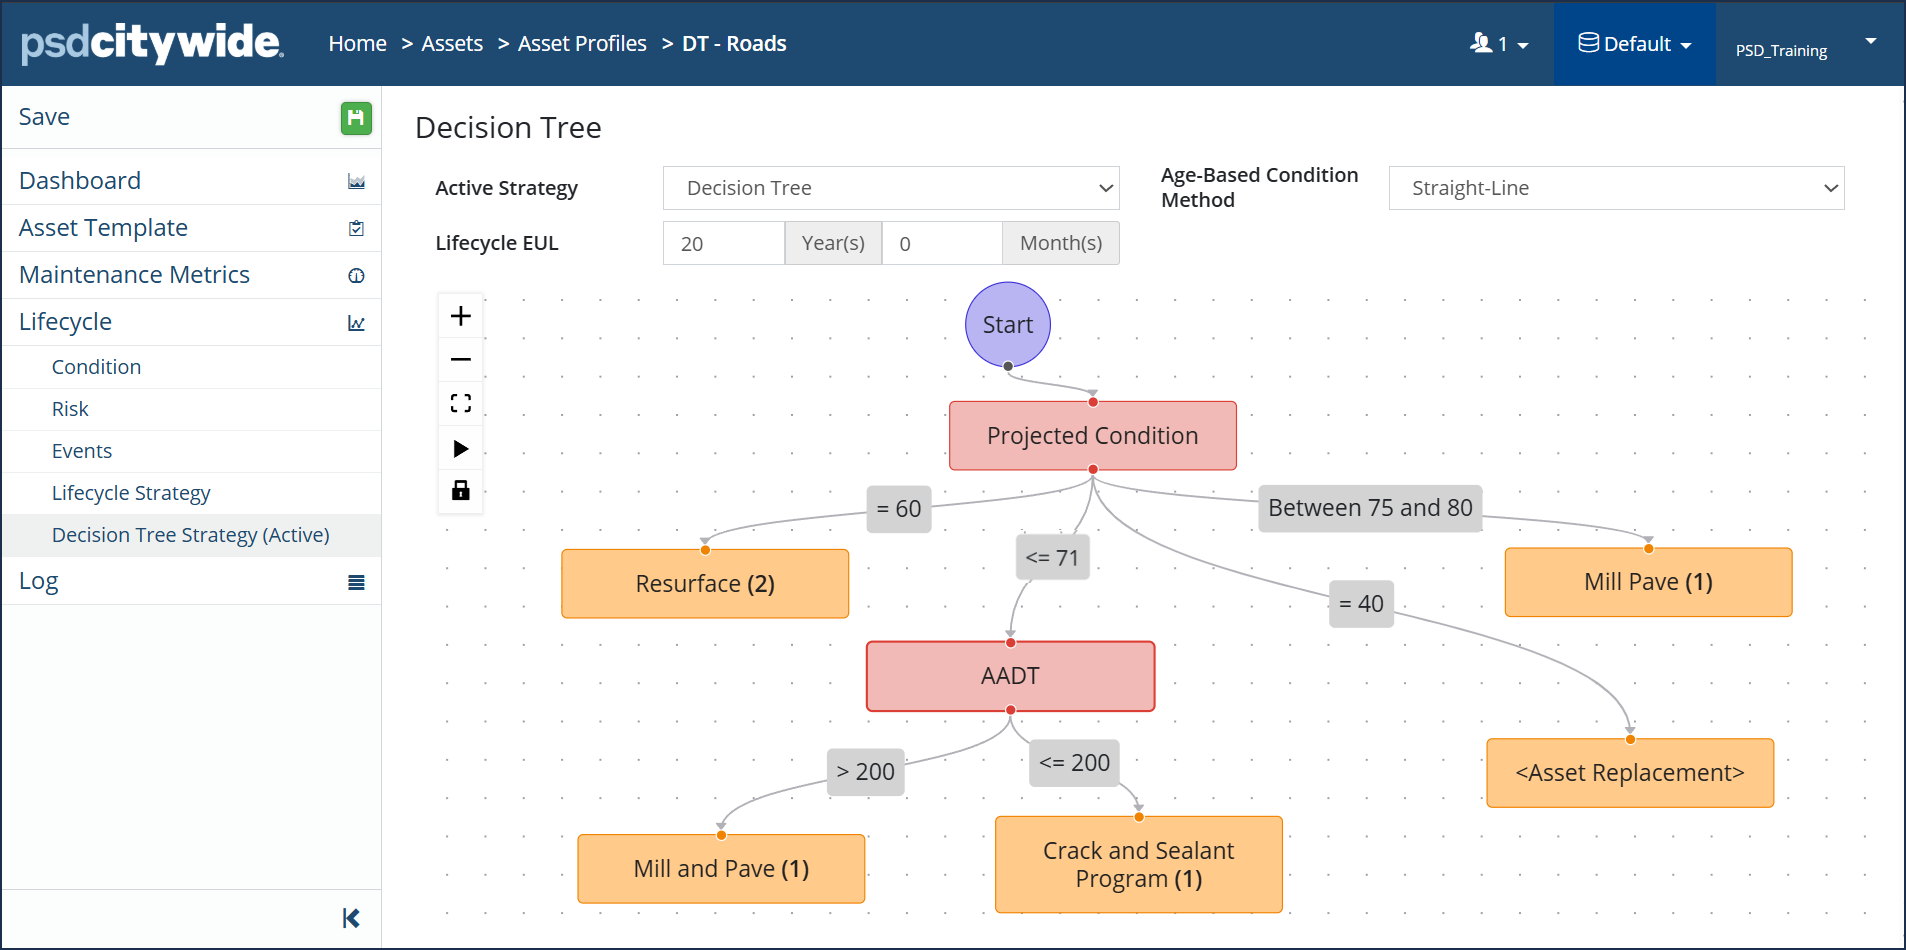 In the example above, the decision tree strategy looks at selected criteria first before determining what lifecycle event should take place.
- At the start of the Decision Tree, the strategy looks at what the projected condition of the assets are.
- If the projected condition of the asset equals 60, then a 'Resurface' event should occur. The number beside the event indicates the maximum number of times that this event should occur.
- If the projected condition of the asset is less than or equal to 71, then the AADT (Annual Average Daily Traffic) attribute will be evaluated to determine the next path.
- If the traffic count for the asset is greater than 200, then a Mill and Pave event should occur.
- If the traffic count is less than or equal to 200, then a Crack Sealant Program event should occur.
- If the projected condition is between 75 and 80, then a Mill and Pave event should occur.
- If the projected condition equals 40, then an Asset Replacement event should occur.
With this decision tree strategy, both the projected condition and traffic count values are used to determine which events should occur to assets in this profile. The elements of the Decision Tree (filter nodes, action nodes and branches will be outlined in further detail in the following sections below.
Pre-requisites
In order to use the Decision Tree strategy, Asset Profiles and Lifecycle details must be configured first and then assigned to the assets:
- Define Lifecycle Condition Ranges
- Define Lifecycle Risk Metrics - Probability and Consequence of Failure
- Define Lifecycle Events
- Define Lifecycle Strategy and Lifecycle EUL
For further details on setting up Asset Profiles and lifecycle strategies, click here.
Summary of Core Components
The core components and functionality of Decision Tree: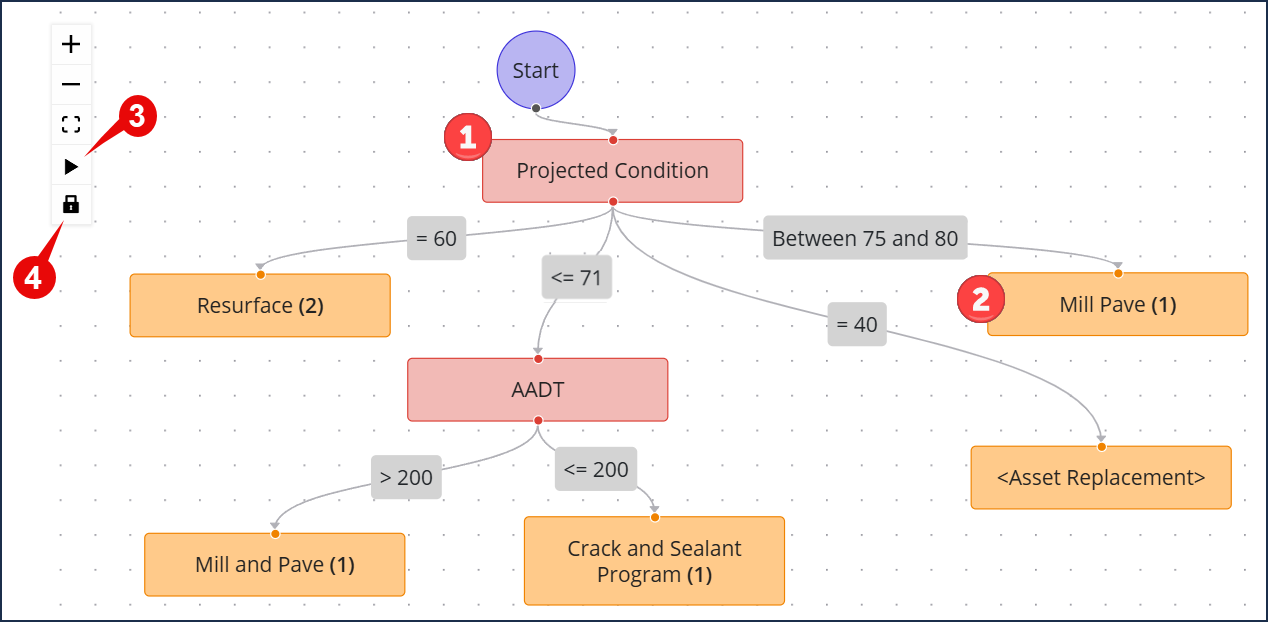
Interface and Node-Building: Once unlocked, users build the tree using a drag-and-drop menu to place different Nodes on a canvas and manually draw connection arrows to create Branches. The primary building blocks include:
| Filter Nodes ❶ | Filter nodes can be based on Asset Fields, Attributes, Field Comparisons (e.g., checking if Age is higher than a Maturity Age attribute), or Time Since Event (e.g., ensuring a repaint doesn't happen within 2 years of resurfacing). They are used as parameters to trigger different branches in the Decision Tree based on defined conditions for these fields. |
| Action Nodes ❷ | Action nodes are the lifecycle events that should occur based on the results of a Filter Node. These events are defined within the profile's Lifecycle Events. Users can set a "Max Event Visits" limit so that certain events are only triggered a defined number of times. This is to prevent infinite loops. |
| Simulation Mode ❸ | Simulation mode is used to help test and validate strategies. Users can "run" the tree for any specific year to see which events are triggered as a result of the Decision Tree. The interface will then provide live Asset Counts at each action node, letting users visualize exactly how many assets will follow a certain path up to a given year before they save the profile. |
| Lock/Unlock ❹ | The ability to lock or unlock the tree helps to prevent unwanted edits. |
How to Create a Decision Tree
- Navigate to Asset Profiles > Select your desired Asset Profile
- Click Decision Tree Strategy
- Then, click
- Click the Lock
 icon to unlock the tree.
 - Once the tree is unlocked, then the Add Nodes menu appears on the right side in order to start creating/editing your tree.
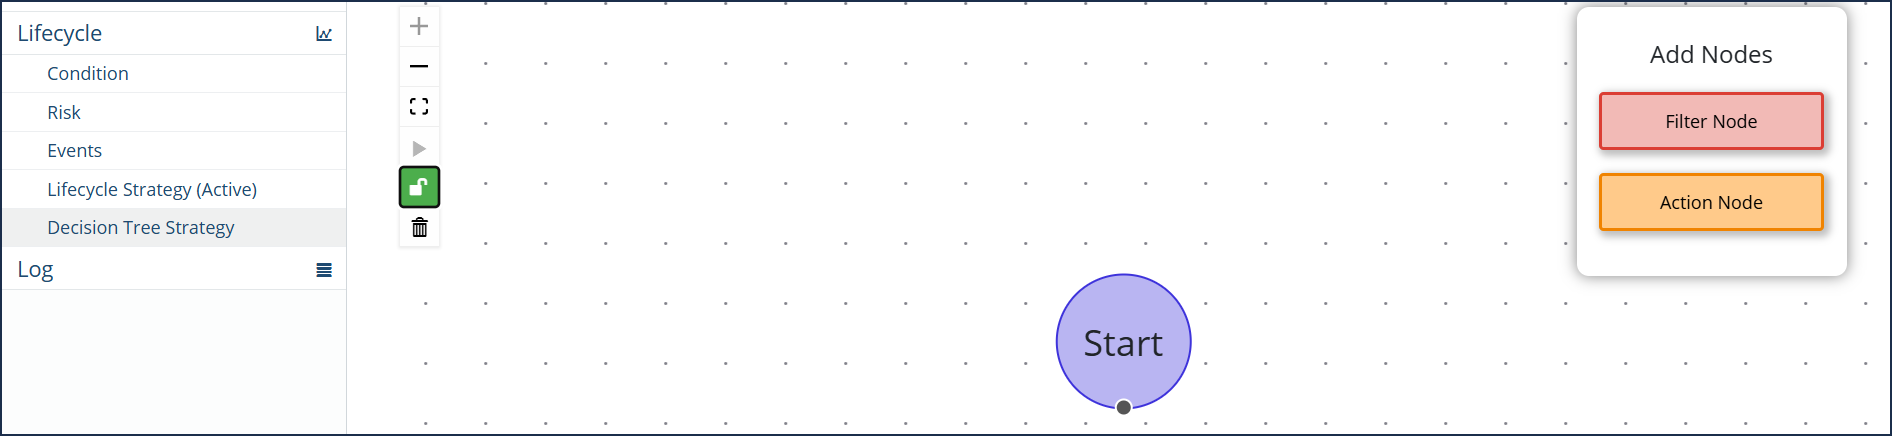
Lock/Unlock
- When the tree is unlocked
 - this indicates that edits can be made.
 - When the tree is locked - this indicates that edits cannot be made in the current state.
Filter Nodes
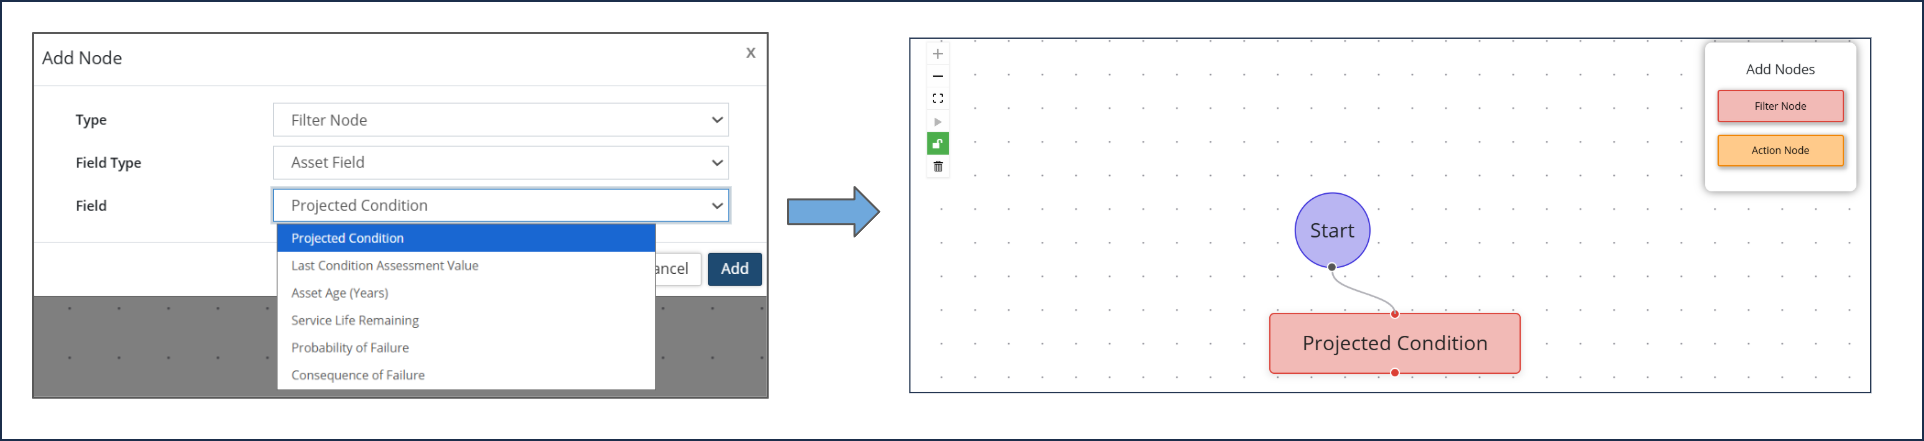
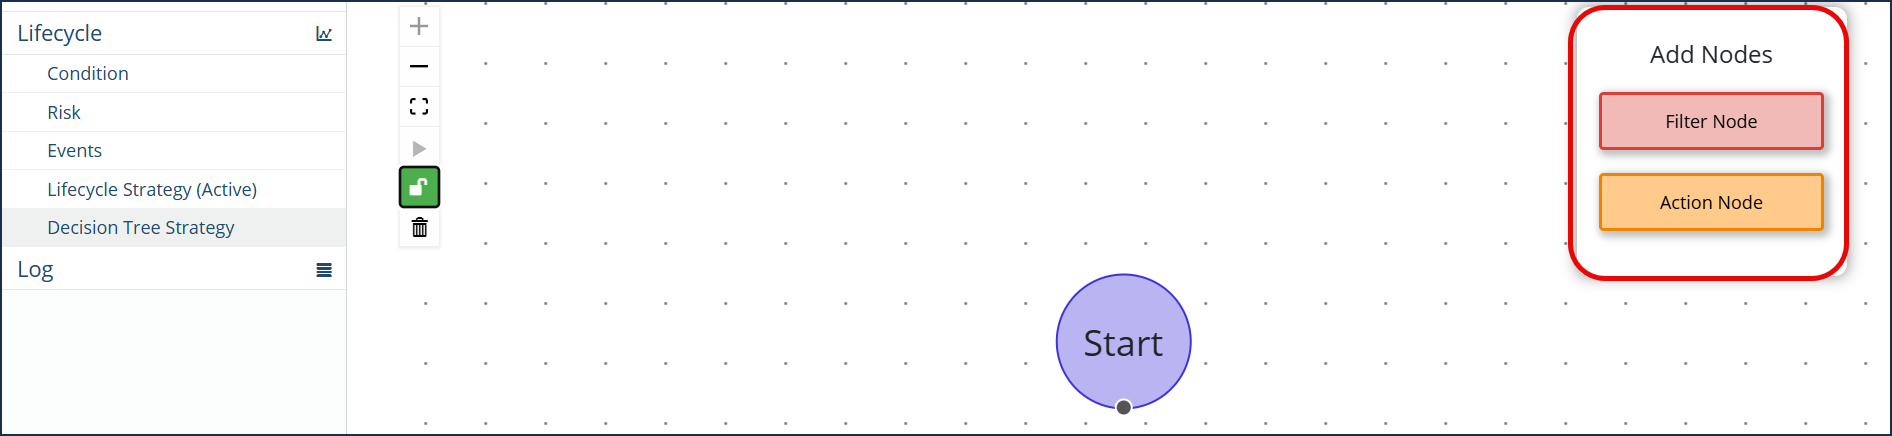 Add a filter node:
- Drag and drop the Filter Node icon into position under Start
- In the Add Node box, define the filter node Type = Filter Node
- Define the Field Type. Options include:
- Asset Field - such as Projected Condition, Asset Age, Probability/Consequence of Failure, etc.
- Attribute - Any attributes included in the Asset Template will appear in the drop down.
- Time Since Event (in years) - Lifecycle events from the profile will appear in the drop down.
- Click Add
- Left click and draw a line connecting the Start to the first filter node.
- Repeat steps to add multiple Filter Nodes as required to the tree.
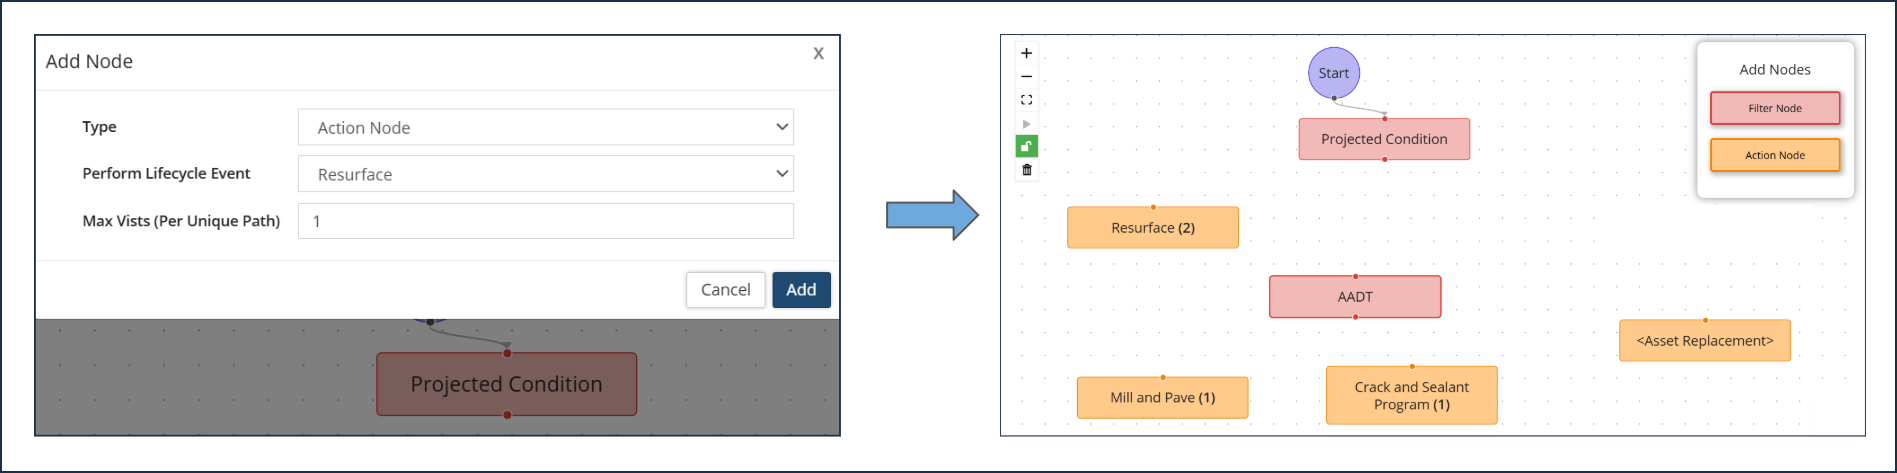
Action Nodes
Add an Action Node:
- Drag and drop the Action Node icon into position
- In the Add Node box, define the filter node Type = Action Node
- Perform Lifecycle Event = <select the Lifecycle Event to perform>. (In the selection drop down, it will show the list of lifecycle events defined in the Asset Profile.)
- Max Visits (Per Unique Path) = <select the maximum number of times this lifecycle event should be performed>. Once this maximum is reached by an asset, this branch in the Decision Tree will no longer be available. This helps avoid endless loops. Note: max visits cannot be set for asset replacement events.
- Click Add
- Repeat steps to add multiple Action Nodes as required to the tree.
Add a Branch
- Left click and draw a line connecting the Filter Node to the applicable Action Node.
- Operation = <select Equals, Less than equal to, Greater than equal to or Between (inclusive)>
- Value Type = <select Static or Attribute> (Static means a set value or Attribute from the Asset Profile Template.)
- Value(s) = <enter the desired value>
- Click Add
- Repeat steps to add applicable branches from each Filter Node to the respective lifecycle event.
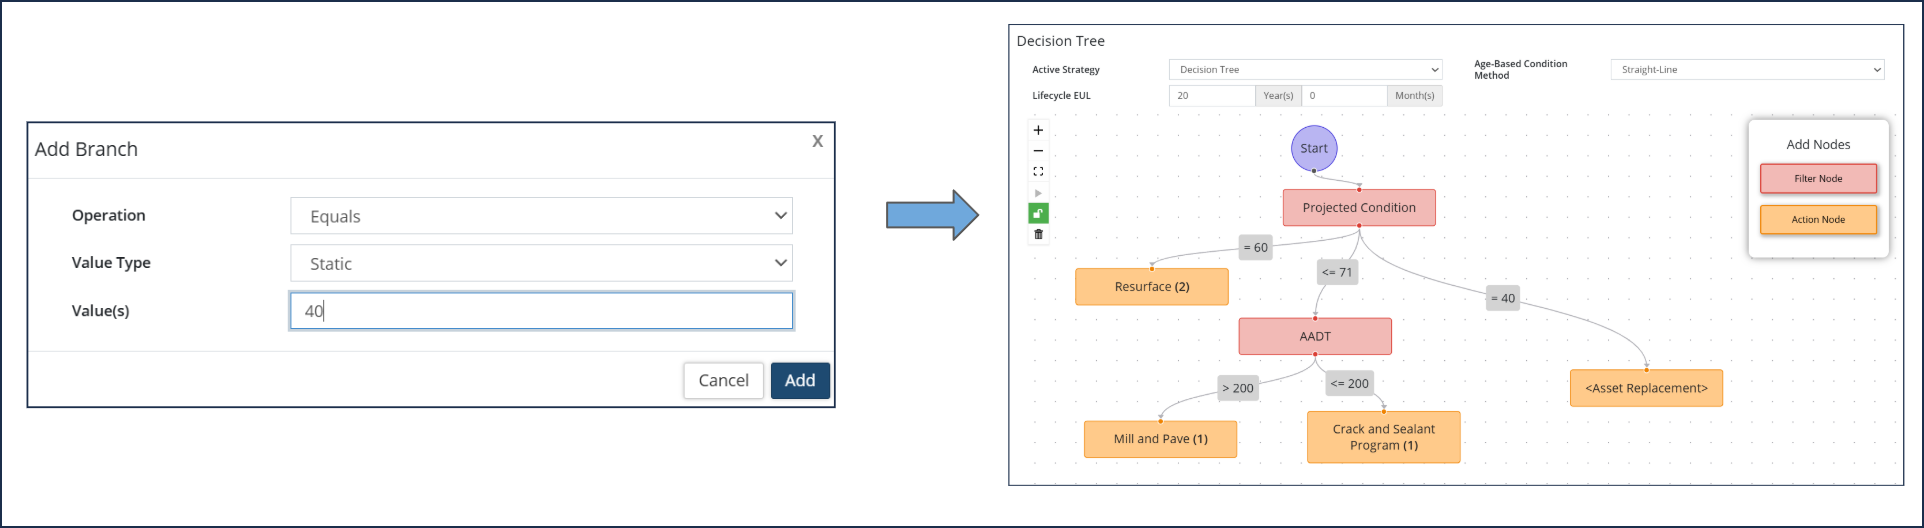
Once all Nodes and Branches are created, click the Lock icon to lock the decision tree and prevent any unwanted changes.
Activate Decision Tree Strategy
By default, the Lifecycle Strategy defined in the Asset Profile will be active. However, once the decision tree is completed, this strategy can be activated in the Asset Profile.
- In the Asset Profile, click Lifecycle
- Active Strategy = Lifecycle or Decision Tree
- (If not already defined) select the Age-Based Condition method from the drop down
- (If not already defined) enter the Lifecycle EUL in Year(s) and Month(s)
- Click Save at the top left side.
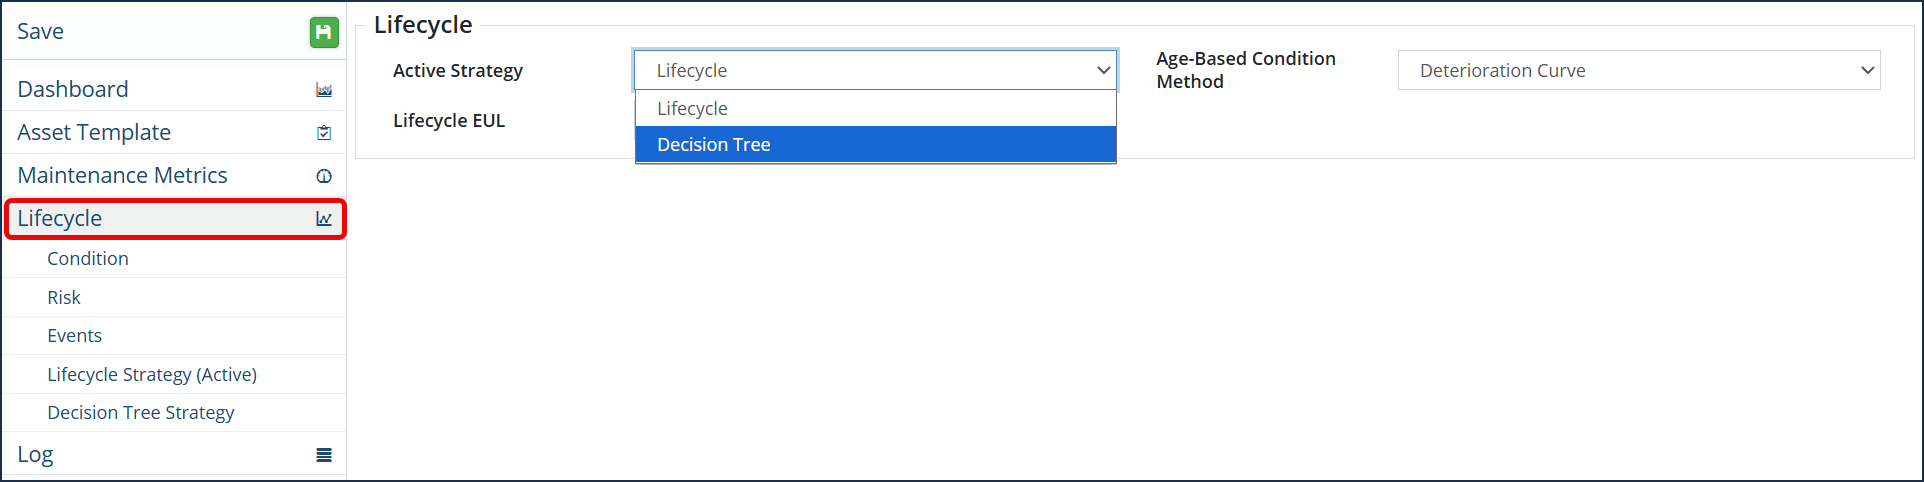
Upon activating the Decision Tree Strategy in the Asset Profile instead of the default Lifecycle Strategy, it will be used throughout the system in Citywide Asset Management reports as well as the asset's Strategy page and in Decision Support. this strategy will be followed for the first and future iterations of the asset's life.
Click here to view our help articles on Asset Management Reports or the Decision Support User Guide articles.
Simulation Mode
Use the Simulation Mode to test and validate your decision tree logic/strategy.
- Once you have completed your tree, click the Unlock icon to lock your tree.
- Click the Simulation Mode ▶ icon on the left side.
- Enter the Simulation Year - all events that will get actioned up until the end of the input year.
- This can help validate the decision tree by running it into the future (max year: 2200) and checking that all branches eventually get actioned.
- Click the green simulation mode ▶ icon.
- This will show the asset count(s) for each path. To view the assets in a path, click the Asset totals.
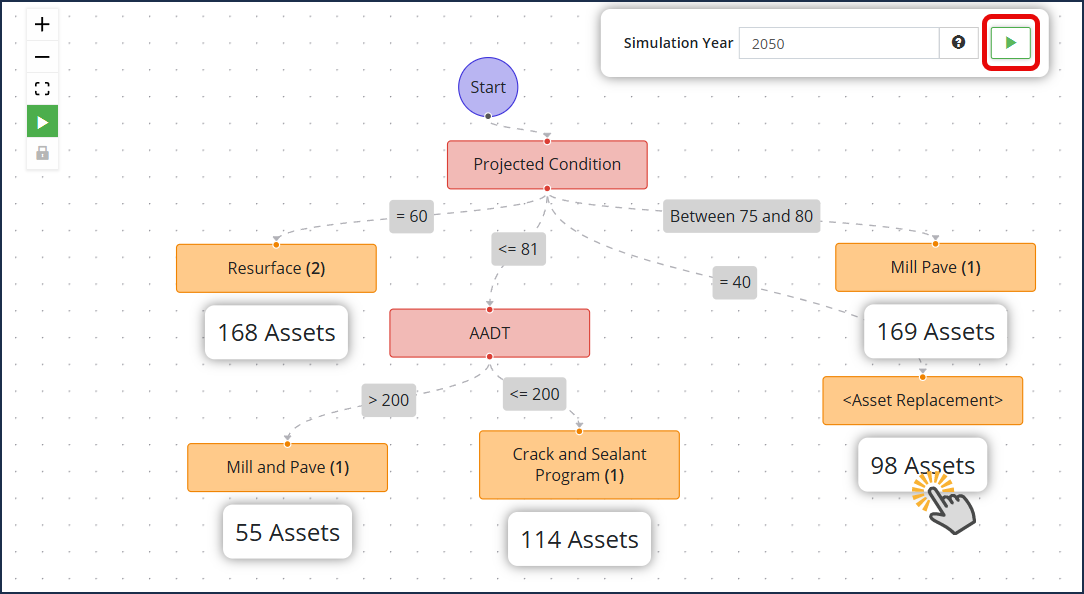
Any events that contain no assets represent lifecycle events that will not occur in the simulation run period. The filter nodes leading to these events should be refined to ensure that the parameter filter conditions will be met by some assets in the profile.
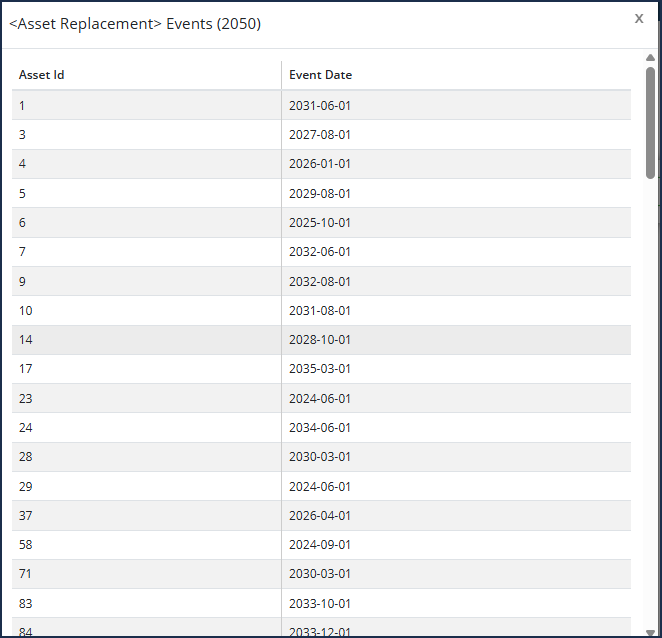
Upon clicking the number of assets in the simulation mode, it will show those Assets and the suggested Event Date for that path up to the end of the input year.