
Overview
Asset Collector is an asset management tool available on the Citywide mobile app for both Android (11+) and iOS (15+) devices. Users can download and visualize assets in the field, collect new assets, update asset attribute data, upload images and record condition assessments to optimize lifecycle event strategies in Citywide Assets.
Users can download up to 1000 assets from Citywide Assets or GIS layers. The maximum is in place to prevent a slowdown in user experience. Assets can also be downloaded directly through the map view.
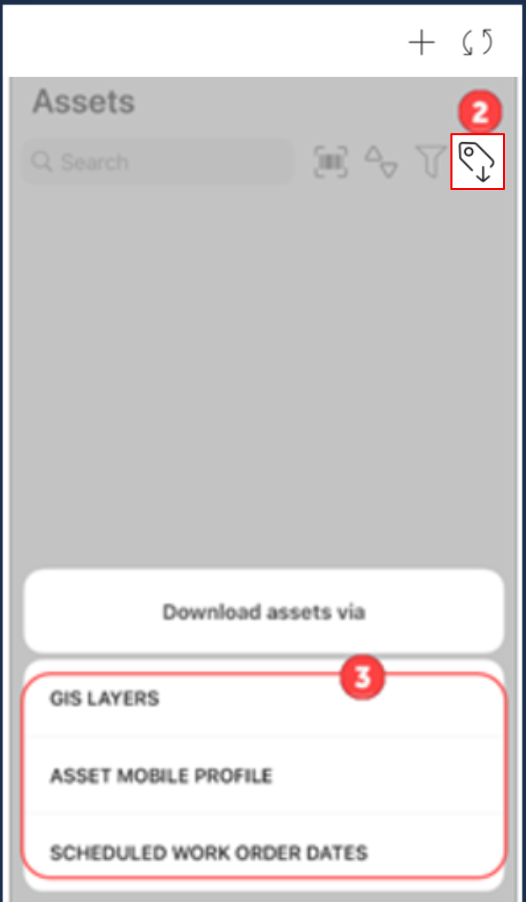
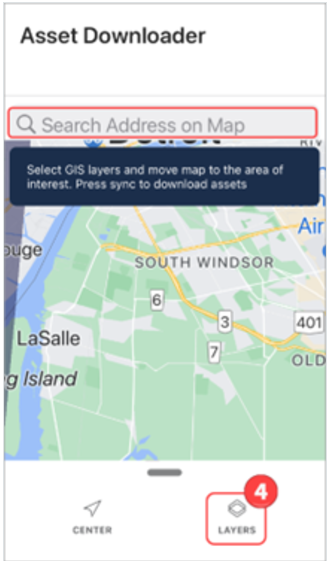
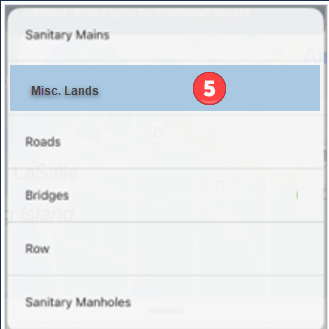
To download assets while out in the field using a GIS layer:
 |
|
 |
|
 |
|
Assets not linked to a GIS feature, as well as linked assets, can be added to an asset Mobile Profile in Assets and then downloaded to the mobile app. Mobile profiles are set up in the Asset Inventory view. Click here to learn how to setup a mobile profile.
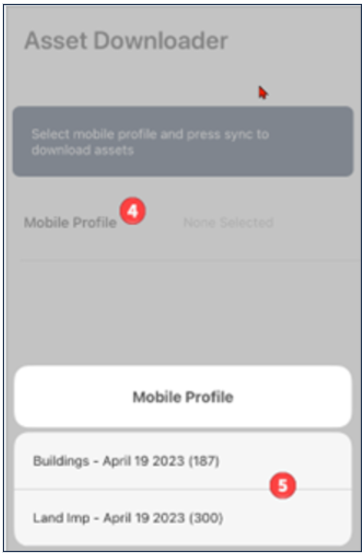
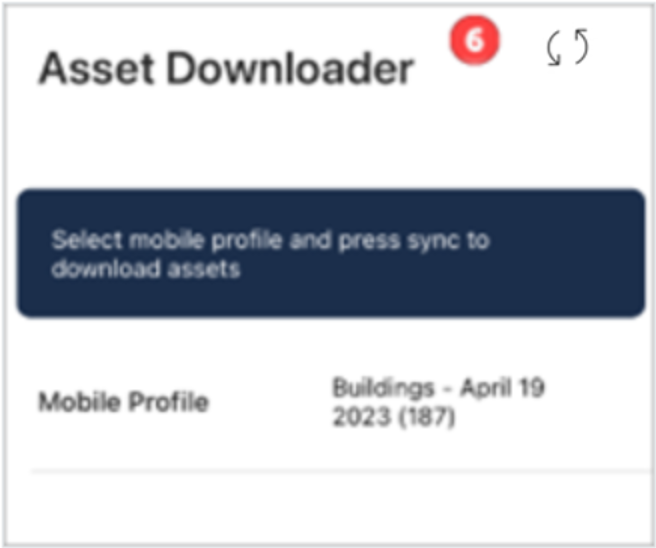
To download assets using a Mobile Profile:
 |
|
 |
|
 |
|
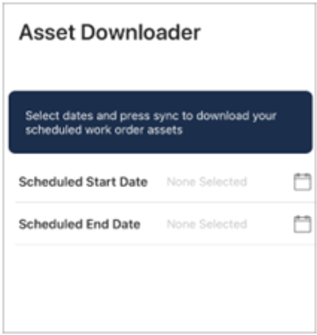
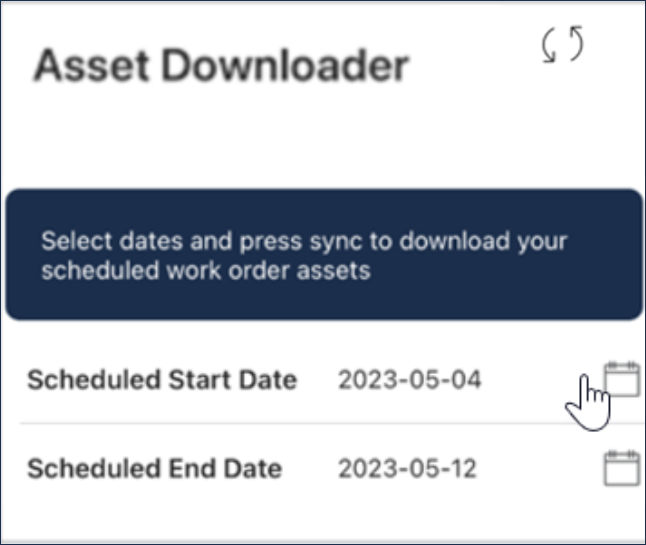
To download assets using Scheduled Work Order Dates:
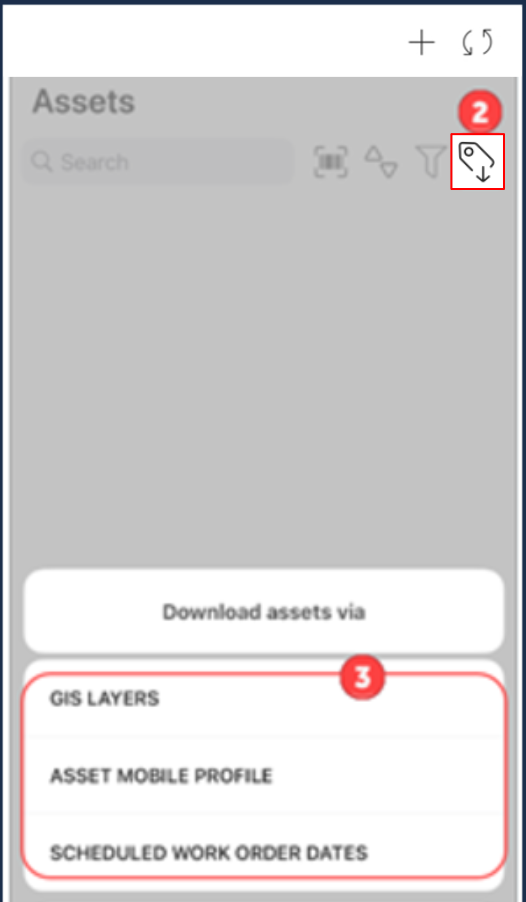 |
Users can download assets based on GIS layers, a mobile profile, or scheduled work orders. The same download button is also available in the map view accessed from the home screen. |
 |
|
 |
|
To add a mobile profile in Citywide Assets:
- Navigate to Assets on the web.
- Filter the inventory list for the assets to include in a profile. If the filtered list exceeds 1000 assets, only the first 1000 will be added to the profile.
- Click Mobile Profile
 above the grid. The Mobile Profiles window has two tabs ❶:
- Mobile Profiles – profiles created by individual users for their own use.
- Admin Mobile Profiles – profiles created by an Assets Admin for other users, based on their role.
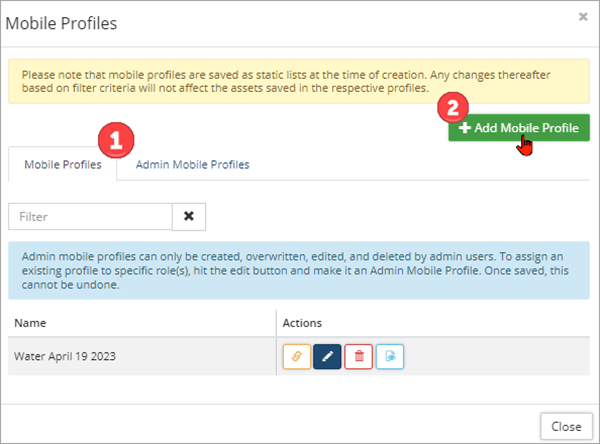
- Click +Add Mobile Profile ❷.
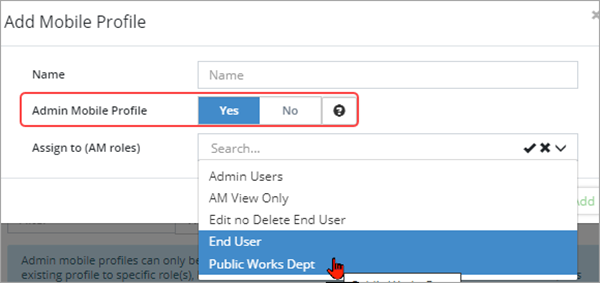
- Enter a name.
- If creating a mobile profile for your own use, leave the Admin Mobile Profile flag set to No and click Add.
- If you’re an Assets Admin and you’re creating a mobile profile for others to use, set the Admin Mobile Profile flag to Yes. Select which role(s) can view and download this profile from the Assign to (Assets roles) dropdown (hold Ctrl to multi-select). Click Add. Note: The role needs to have Assets - Mobile view permissions in order to download assets in Citywide Mobile.
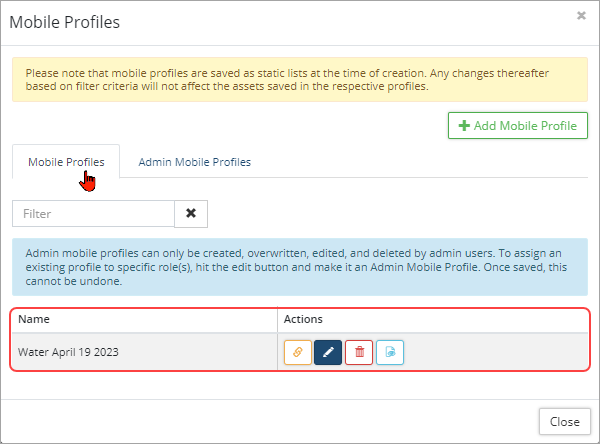
Once added, profiles can be managed using the Action buttons on the right. Action buttons include overwrite, edit, delete, and preview. - After syncing on mobile, the profile can be downloaded and used at any time.
-
Mobile profiles are saved as static lists at the time of creation. Any changes thereafter based on filter criteria will not affect the assets saved in the respective profiles.
-
Users can save up to 10 mobile profiles specific to their user account.
View and Update Asset Information
Once assets are downloaded, mobile users can search, filter, and edit asset data when out in the field. Condition assessments can be collected and images uploaded.
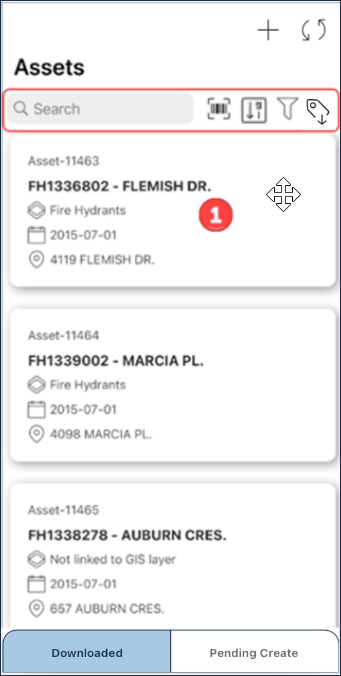 |
Options in the Downloaded view: Asset cards ❶ display the Asset ID and name, GIS layer if linked, in-service date, and the location for the corresponding asset. Tap an asset card to navigate to the asset view. |
Search
To quickly locate an item using a keyword, asset barcode, or an Asset ID:
- Tap search and begin to type. The app will search as you type.
- If the asset has a barcode sticker, click
 to scan the barcode. Only downloaded assets or pending assets will be searched.
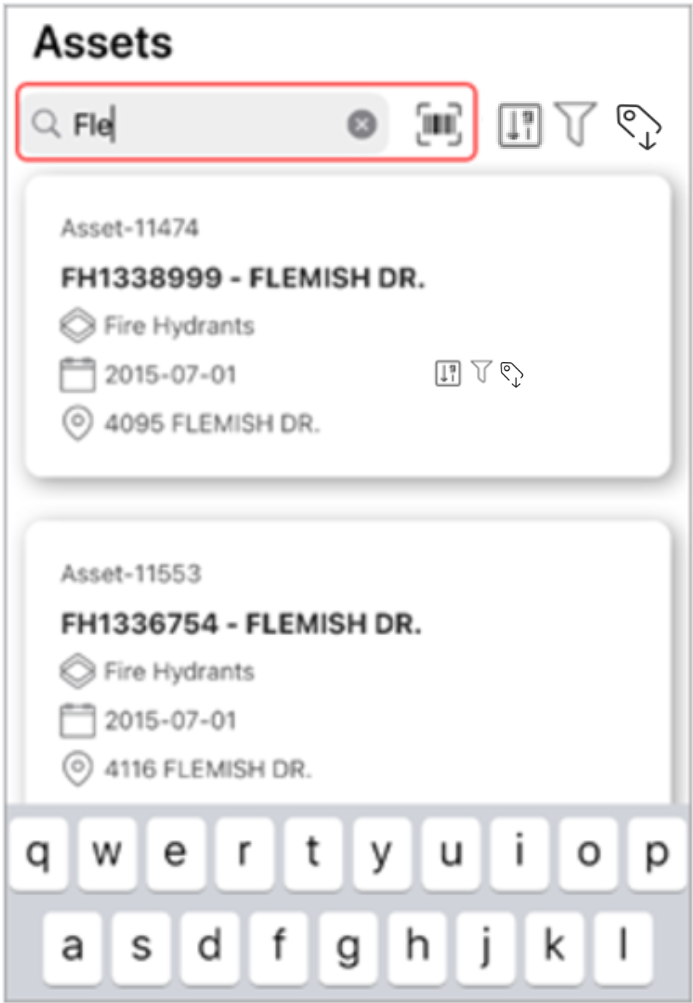
- The number of items returned in the search is shown above the search field.
- Click the x within the search field to clear the search.
Apply a Filter
Filter the assets in Asset Collector by category, segment and/or department.
- Tap
 to access the filter screen.
 - Tap Category/Segment/ Department. Multiple items can be selected within each classification. Tap anywhere on the screen to accept the selection.
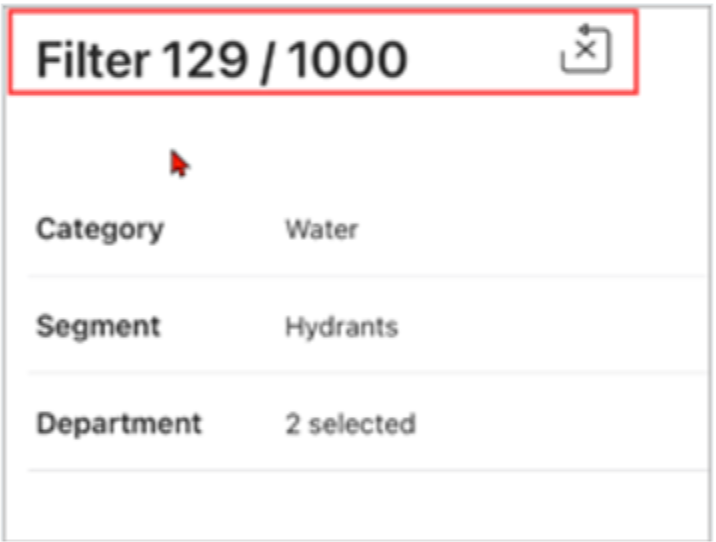
- Click Apply. The number of assets within the filtered list displays at the top (i.e., 129/1000). Close the filter screen to work with the filtered assets.
- Use the
 on the filter screen to clear the applied filter.
Asset Information
 |
Once in an asset view, users can:
Scroll down to see all available options. Click the checkmark icon
|
Add a Condition Assessment
To add a condition assessment while out in the field:
- Tap to view asset information.
- Navigate to Condition Assessments (#). The number in brackets indicates how many condition assessments have previously been completed on the asset.
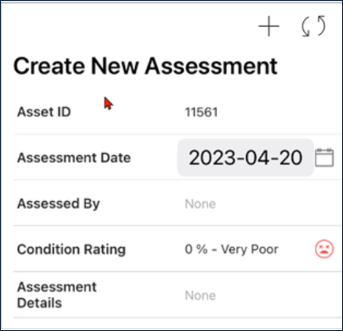
- Click Add a to capture the latest condition.
- Adjust the date as needed. Enter a name in the Assessed by field. Click the checkmark icon
 in the top right corner to save your information.
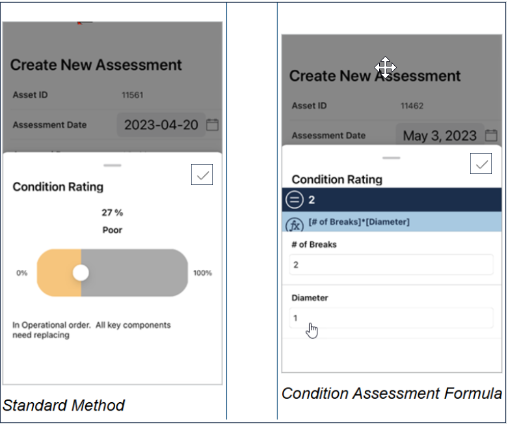
 - Tap condition rating. Two methods are available when entering a condition value:
- Standard method: Drag the slider to assign a value. Use the text below the slider as a guide when setting the condition value.
- Condition Assessment Formula: If the asset profile has a formula on it, attributes in the equation are listed for input. Enter a value for each attribute. Condition rating is calculated based on the inputs provided.
- Click the checkmark icon in the top right corner to save your information.
- Tap and enter Assessment Details.
- Adjust the date as needed. Enter a name in the Assessed by field. Click the checkmark icon
- Tap the checkmark icon in the upper right corner to save your condition assessment. Once the mobile app data is synced with the Asset database, the Risk Rating and Projected Condition will update.
- The sync icon on the main screen will display a red notification bubble
indicating the total number of items to be synced.
Upload an Image/PDF File
To take a photo or add an image/PDF file out in the field:
- Tap to view asset information.
- Navigate to Attachments (#). The number in brackets indicates how many attachments have been added to the asset.
- Click Add and select Take photo, Camera roll, Photo Library, or Files from the pop-up menu.
- Once a photo or PDF is added, a thumbnail image displays in the Attachments section. Click Attachments to view and manage attached files prior to syncing.
- Tap in the upper right corner to save the changes.
Create a Work Order
If Maintenance Manager is integrated with Assets, work orders can be viewed in Asset Collector on downloaded assets with work orders attached. New work orders can be added.
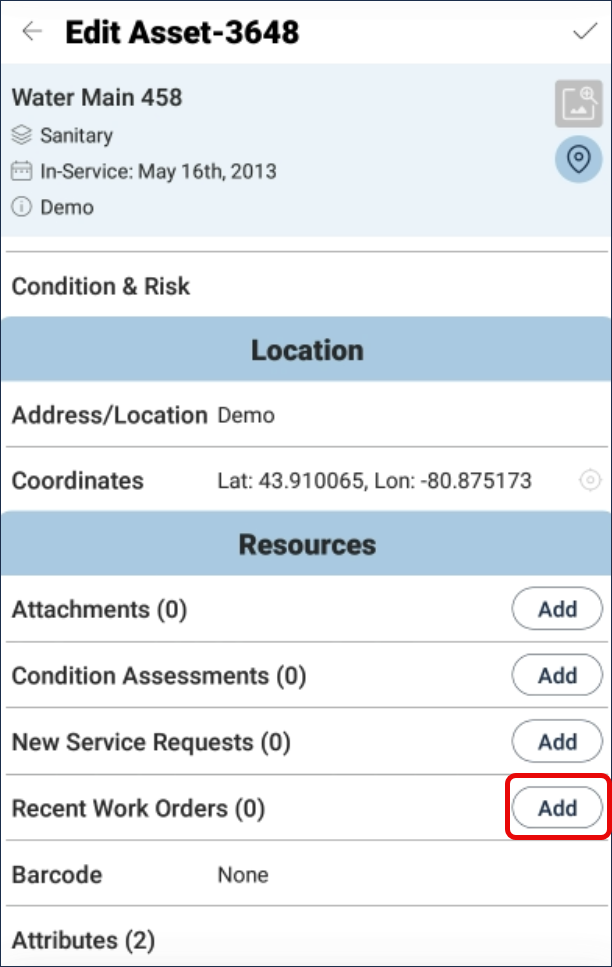
- Tap to view asset information.
- Navigate and tap Recent Work Orders (#). The number in brackets indicates how many work orders are attached to the asset.
- Scroll through the list to see all attached work orders.
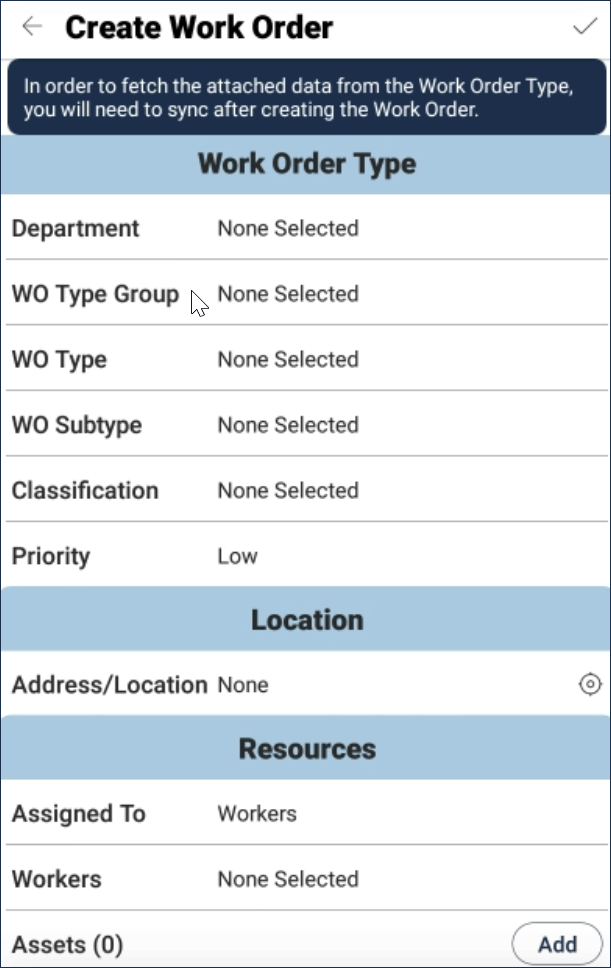
- Click Add to attach a new work order on the asset.
- Complete the necessary fields on the work order page. Tap to save.
- Once the new work order has been saved, tap sync
 at the top to fetch resources data from the work order type.
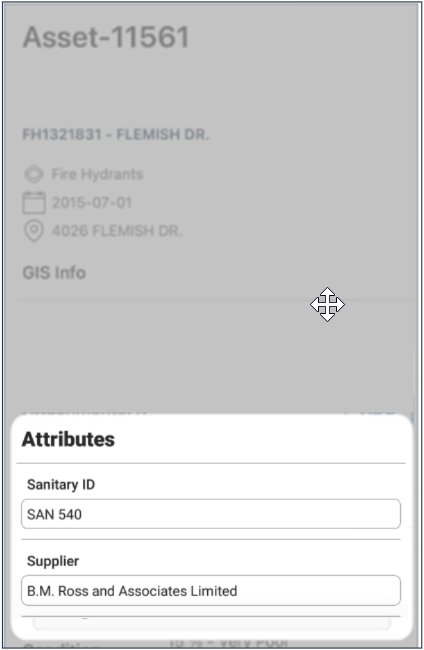
Update Attribute Values
- Tap an asset from the list to view its information.
- Scroll down to Attributes (#). The number in brackets indicates how many attributes are currently assigned to the asset. Tap to view attribute information.
- Tap an attribute field and enter a new value. Tap anywhere on the screen to continue.
- Tap in the upper right corner to save the changes.
Key-Value Attributes
Key Value attributes are used when a data point is represented by both a key and a value. Citywide will search by key and return the matching value. For example:
| Key | Value |
| 01 | Concrete |
| 02 | PVC |
| 03 | HDPE |
| 04 | Stainless Steel |
| 05 | Galvanized Steel |
| 06 | Other |
To update a key-value pairs attribute:
- Tap to view asset information.
- Scroll down to Attributes (#) and tap to view all attributes ❶.
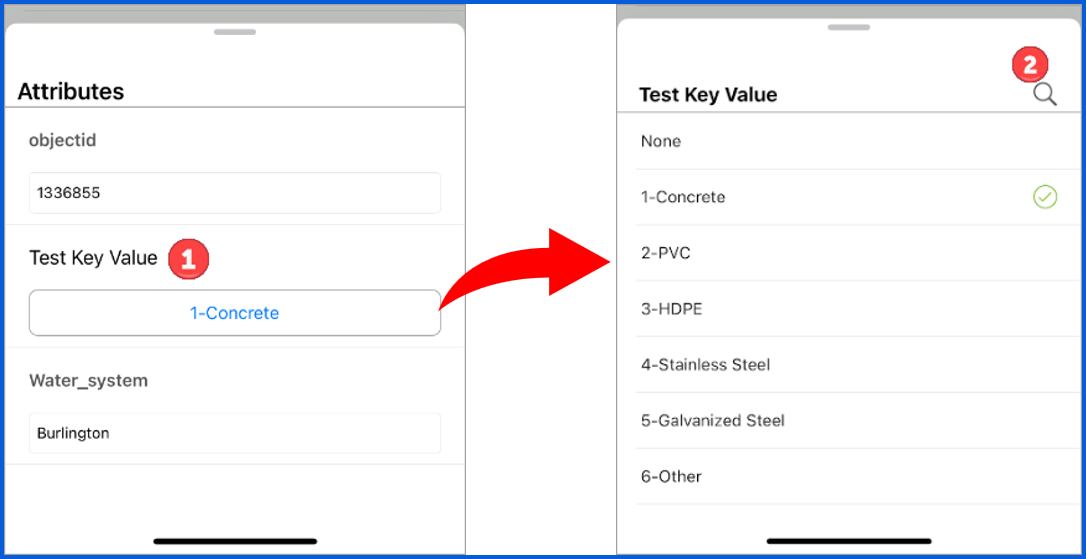
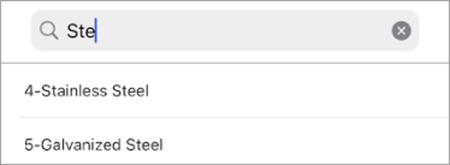
- Search ❷ by key or by value, when updating a key-value pair attributes.
Create an Asset
New assets can be collected while out in the field and synced back to the inventory list.
To add an asset:
- Select Assets on the home screen.
- Tap
 in the upper right corner.
 - Select a Profile Group and Profile (used for data management at the asset level).
- Enter a name, tap .

- Enter a location or click the location icon
 to open the map view and pan to the desired location ❶. Once the desired location is indicated with crosshair icon
 on the map, tap the checkmark to add the coordinates.
 - Tap layers to add the asset to a GIS layer and create a new feature (custom setting).
- Add a description.
- Tap
 to scan a new barcode or type in a barcode number. The barcode must be unique and not assigned to an existing equipment or asset. Citywide will perform a check during the Complete Asset process on the web platform.
 - Tap Add (Attachments) or (Condition Assessments) to upload an image or add a condition assessment.
- Tap Attributes to add attribute information. The profile determines what attributes are added to the new asset.
- Tap in the upper right corner to save the new asset.
- An asset card will display in the Pending Create view - the asset will remain pending until synced.
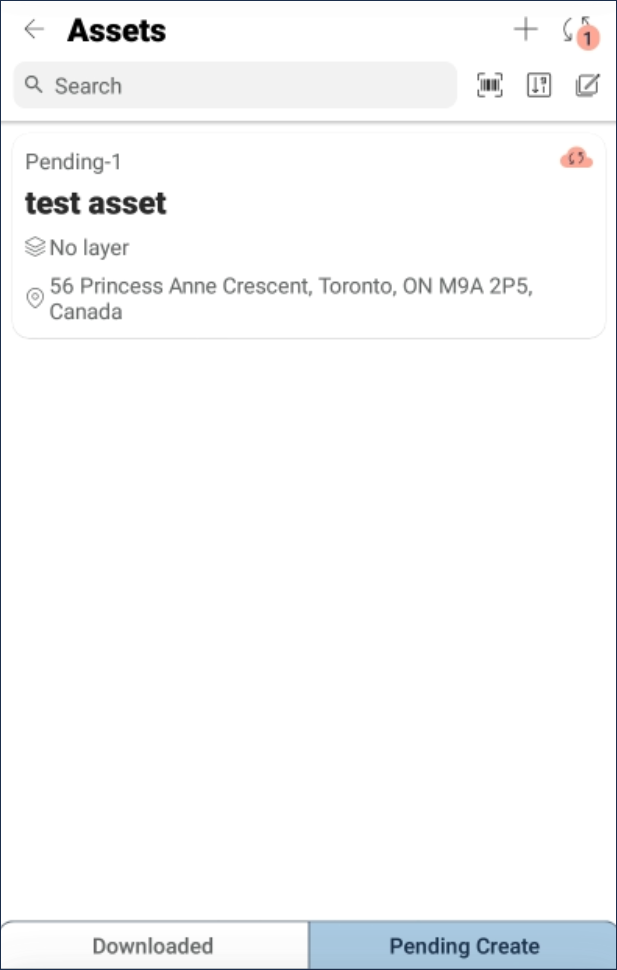
When an asset is created on mobile, it is pending until synced using the sync icon ![]() in the top right corner of the app. This will remove the asset from the mobile view and place it in the Pending Imports view of the Assets database. An Asset ID is assigned to the asset once in Pending Imports. Users with the appropriate permission settings would then complete the information on the uploaded asset and approve the import.
in the top right corner of the app. This will remove the asset from the mobile view and place it in the Pending Imports view of the Assets database. An Asset ID is assigned to the asset once in Pending Imports. Users with the appropriate permission settings would then complete the information on the uploaded asset and approve the import.
Sync with Web platform
Sync the app data only when the internet WiFi/Data connection will be stable throughout the entire synchronization process (which should take several seconds). Do not let the device go to sleep or turn off during the sync and do not log out or delete the application without first syncing the asset updates and pending imports.
To sync:
- Establish a stable Internet connection and tap the sync icon
 .
. - Syncing will take several seconds. Once synchronized, the updated asset information and new assets can be viewed in Assets.
To view a new asset:
Assets created in the field and synced with Citywide will be moved to Pending Imports where they remain pending until asset information is added and the import is approved.
- To complete asset information, click Pending Imports in the upper left corner. New assets created on mobile will have an Asset ID assigned.

- Locate the new asset and click the Asset ID. When prompted, click Complete Asset.
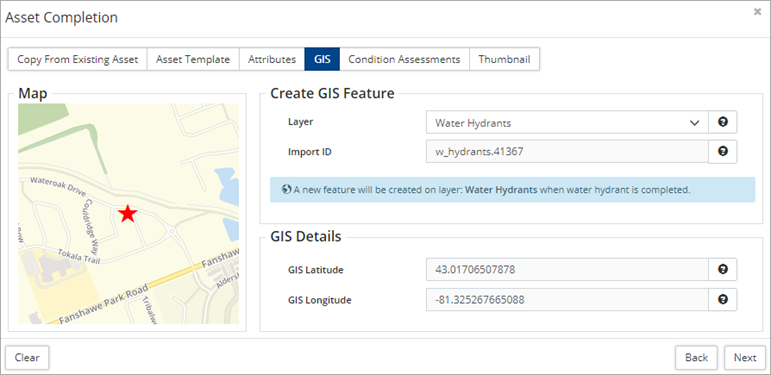
- In the Asset Completion window, set classifications, an in-service-date, historical cost, etc. for the new asset on the Asset Template If an asset profile was selected when the asset was created on mobile, several of these fields will be set.
Once an in-service-date is added or the Exclude from PSAB flag set to yes, all tabs are available for selection.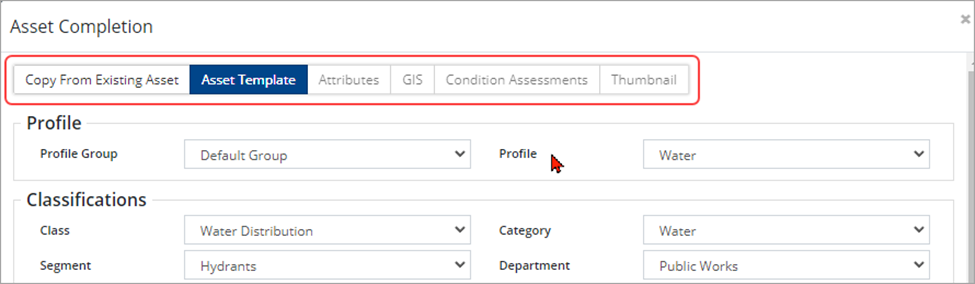
- Use Copy From An Existing Asset to select a similar existing asset from the inventory list and copy its details to the new asset. OR,
- Click Asset Template to assign a profile and complete classification and field The remaining tabs (Attributes, GIS, etc.) become available once an in-service date has been entered or the Exclude from PSAB flag has been set to yes.
- Click GIS to view feature and detail information or change the layer this asset will be added to (point features only). A new feature will be created on the selected layer once the details have been completed and saved.
- Click Condition Assessments to view all condition assessments added on mobile and/or to add a new assessment.
- Click Thumbnail to view all images/files added on mobile and/or to add a new file.
- Once all asset information has been added, click Save.
-
If a barcode was added to the asset when created on mobile, Citywide will complete a check during the complete asset process The barcode entered must be unique. If the barcode has already been assigned, Citywide will return the following message when attempting to save: This Asset's barcode is already being used by asset x.
- Navigate back to the Pending Imports screen.
- Click Approve import in the top right to add the asset to the Active inventory.

Map View
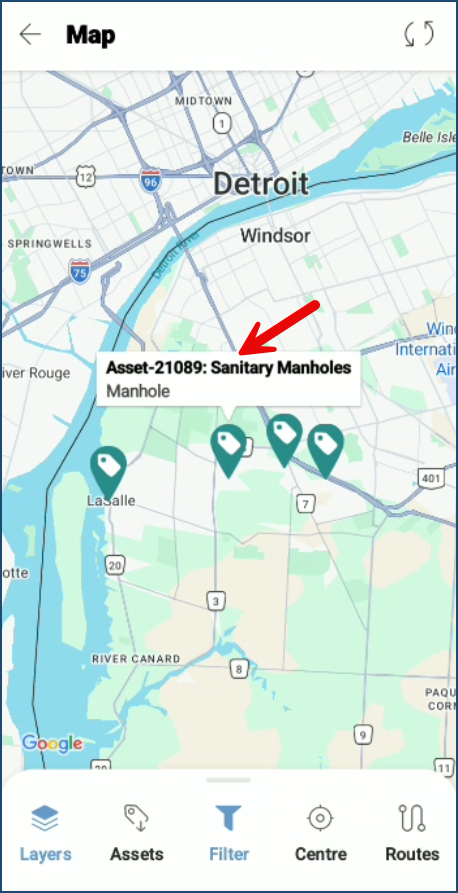
Downloaded assets can be viewed and accessed in Map view. Assets are identified by individual asset tags or can display in clusters when larger numbers are closely located.
To work with assets in Map view:
- On the home screen navigate to Map, download assets and sync.
- Tap Layers and select a layer(s) to view, select done.
 |
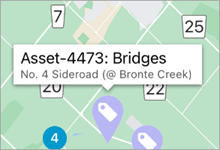
Icons in map view: |
- Locate an asset, tap the asset tag to display Asset ID, Type (Segment) and Name.
- Tap the Asset ID to see the asset’s detail and update attributes or add a condition assessment as needed. Tap to save any edits.
- Expand the tool bar at the bottom and select Create Asset to locate and collect a new Asset.
Moving GIS location of an Asset
The following describes the pre-requisites and process to edit the GIS location and coordinates of an asset that is currently linked to a GIS point feature in the Citywide mobile app.
Pre-Requisites
-
The asset must already be linked to a GIS feature in a non-Web Feature Service (WFS) layer.
-
The GIS feature must be a point feature (no linear or polygon features).
-
Client must be a level-3 Citywide GIS customer (have full GIS editor access) and use Citywide GIS shapefiles, or CityWide EGIS (this feature does not apply to remote services clients).
-
The user must have the appropriate Citywide permissions level (an Assets role which allows for “Assets – Mobile” viewing and editing).
Other Information
-
When an asset’s location is moved in mobile, and the application is synced, it will update immediately in Citywide GIS and in EGIS (if applicable).
-
If a feature is moved on Citywide GIS (web) or EGIS, it will be updated overnight. Keep this in mind when viewing assets on mobile, as you are only ever editing the geometry from the previous day.
-
Changes to point features in EGIS or Citywide GIS will only be visible in Citywide mobile the following day.
-
-
An asset that is not currently linked to a feature in GIS cannot be linked from mobile. The point feature can be created via Citywide web and then linked to the asset. Once the asset is linked to a GIS point feature, then the location can be edited in Citywide Mobile.
To Edit the GIS location of an asset:
- Download up to 1000 assets at a time by selecting GIS layers or asset mobile profiles. For steps on how to download assets, click here.
- View the assets on the map, move/zoom as needed then tap the asset name for which you want to edit the GIS location.
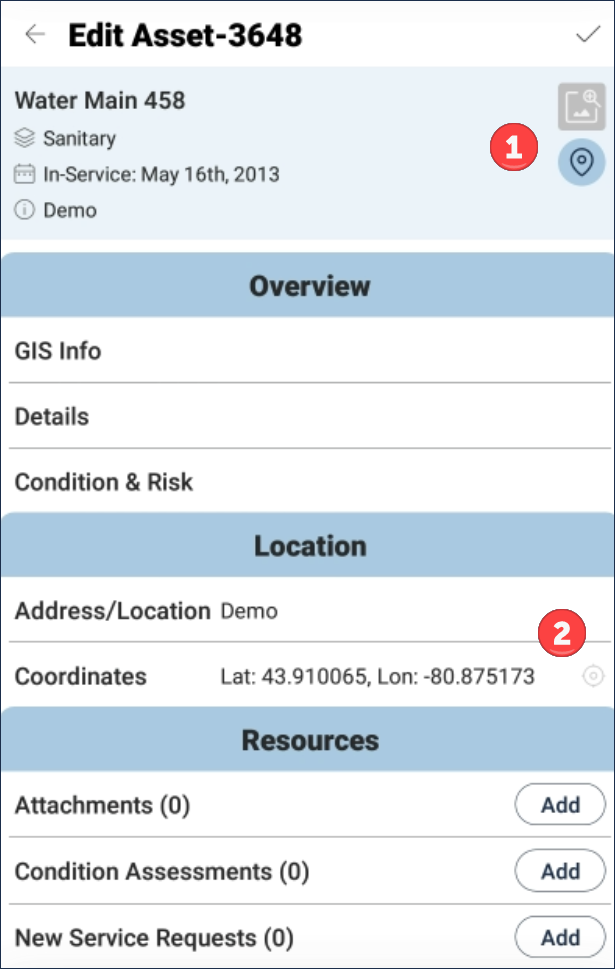
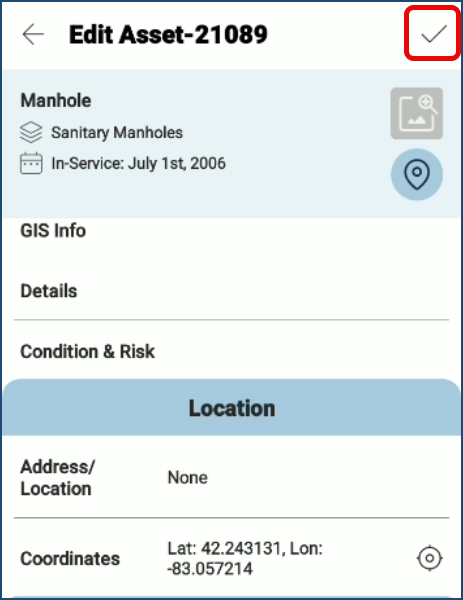
- On the Edit Asset screen, scroll down to Coordinates and tap the location symbol
 to change the GIS location.
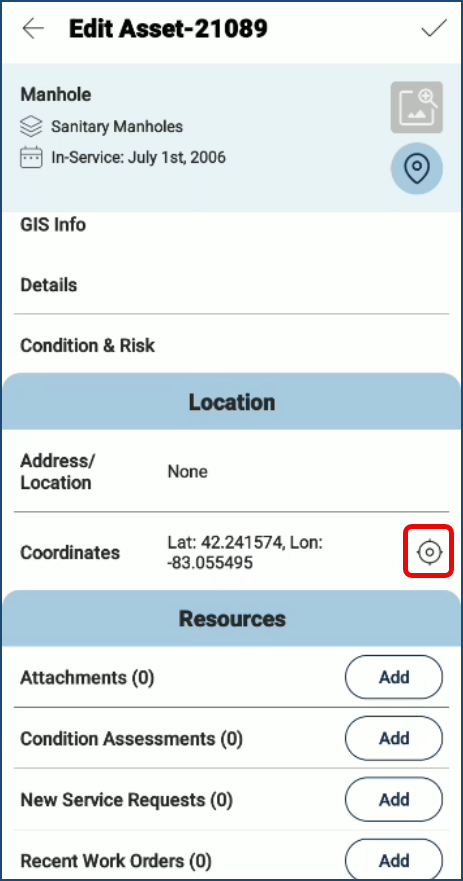
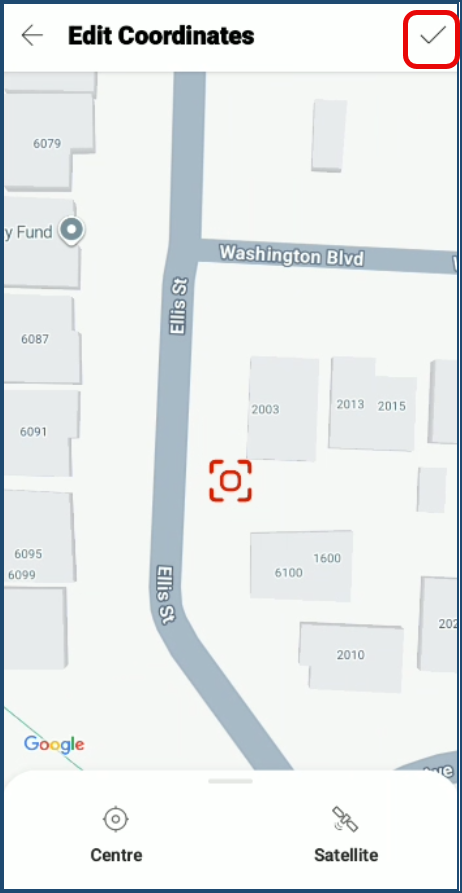
- Move the map until the red crosshairs land to where you want the asset location to be. Options at the bottom of the screen:
- Tap Satellite to view the map in satellite view
- Tap Center to move the map to your device's current GPS location.
- Once the crosshairs are in the correct location, tap the checkmark at the top right corner.
- Click the checkmark at the top of the Edit Asset page to save your changes.
- Once all changes are completed and you are connected to a stable network connection (Wifi or data), tap the Sync icon
 at the top right corner, which will indicate there are unsynchronized changes. Updated GIS locations via the mobile app will synchronize immediately to Citywide web.
Additional Information
Q: Am I able to edit the location of an existing asset?
Yes, but the asset must already be linked to a point-based GIS feature (not multipoint or shape geometry) and hosted on either the Citywide GIS or EGIS server (not ESRI). This assumes your GIS server also has edit permissions, and your user has Asset Mobile edit permissions. If the crosshairs are greyed out preventing you from editing a GIS location for the asset, then the Pre-requisites above are not met.
Q: When does my Asset Location update on GIS/EGIS?
When moving an asset on mobile, the location will update in GIS/EGIS immediately. If a feature connected to an asset on GIS (web) or EGIS is moved, the geometry will be updated overnight, meaning that these changes won’t be seen on mobile until the next day.
See the Citywide Mobile Application Update: Edit Asset Locations user guide for additional information (Home 🢡 Help & Support 🢡 User Guides).


